General College Live Documentation
A guide to general College Live Features…
College Live is the umbrella system for the following products…
There are features which are consistent throughout these products and this guide will describe them. Each product also has its own specific guide so please refer to these guides for specific product features.
Organisation Structure Course 32
Organisation Structure Staff 33
Statistic Organisation Structure 41
The system is accessed via a web browser and is compatible with all major browsers and screen sizes, from PC to Phone. Please note that the system is responsive to the size of the screen it is being viewed in to enhance the user’s experiences so may look different on different devices and to the screenshots used within this document.
Page Layout
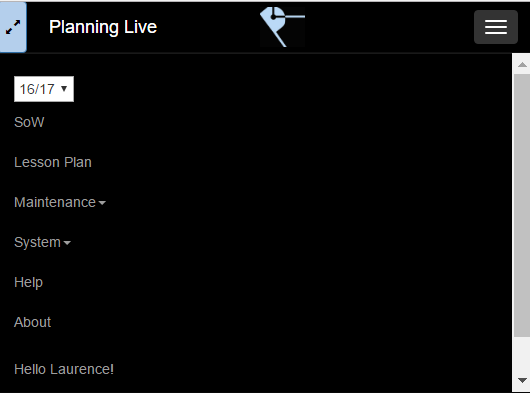
The webpage is typically made up of a top menu, a left hand context menu and the main page content.
Top Menu
The top menu has the following features.
Academic Year Dropdown
This allows users to move between different academic years. The list of academic years in the dropdown is configured by your administrator. (See Academic Year Section)
Product Name
The Product name currently being displayed will be shown on the top left. Clicking this will always take the user back to their homepage.
Menu Links
The menu links open the browser window onto a different page. The menu links will be different for different types of users based on their permission group which governs what information a user can access. (See the Permission Group section).
Help
The help link will download the help documentations for the system.
About
The About link gives a brief overview of the system and who System Live are (the development house who created Planning Live and Observation Live).
User Link
The menu will contain a link which displays Hello followed by the user’s first name. From here the user can see various information about their account including the ability to alter their password.
Log Off
The menu will contain a Log Off Button which will end the user’s session and take them back to the Login screen. Please note that if the website is configured with Windows Authentication this option will not be available.
The menu will look significantly different depending on the type of device viewed. On a phone format the menu will appear as 3 lines which can be expanded
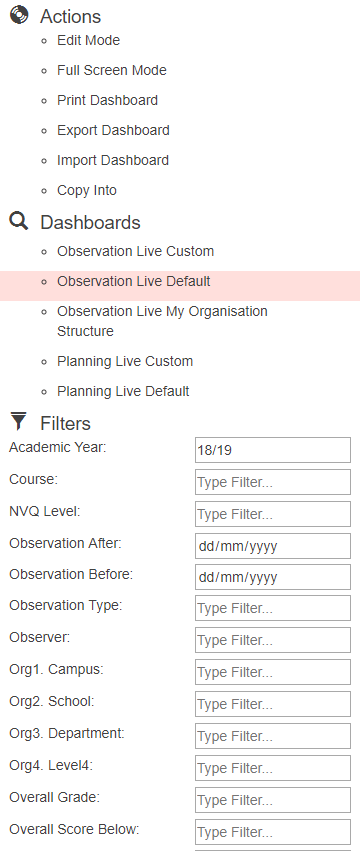
Side Menu
The Side Menu is context sensitive to the page being viewed but may contain the following features:
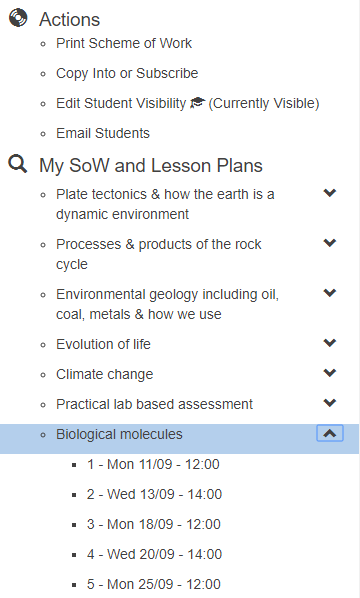
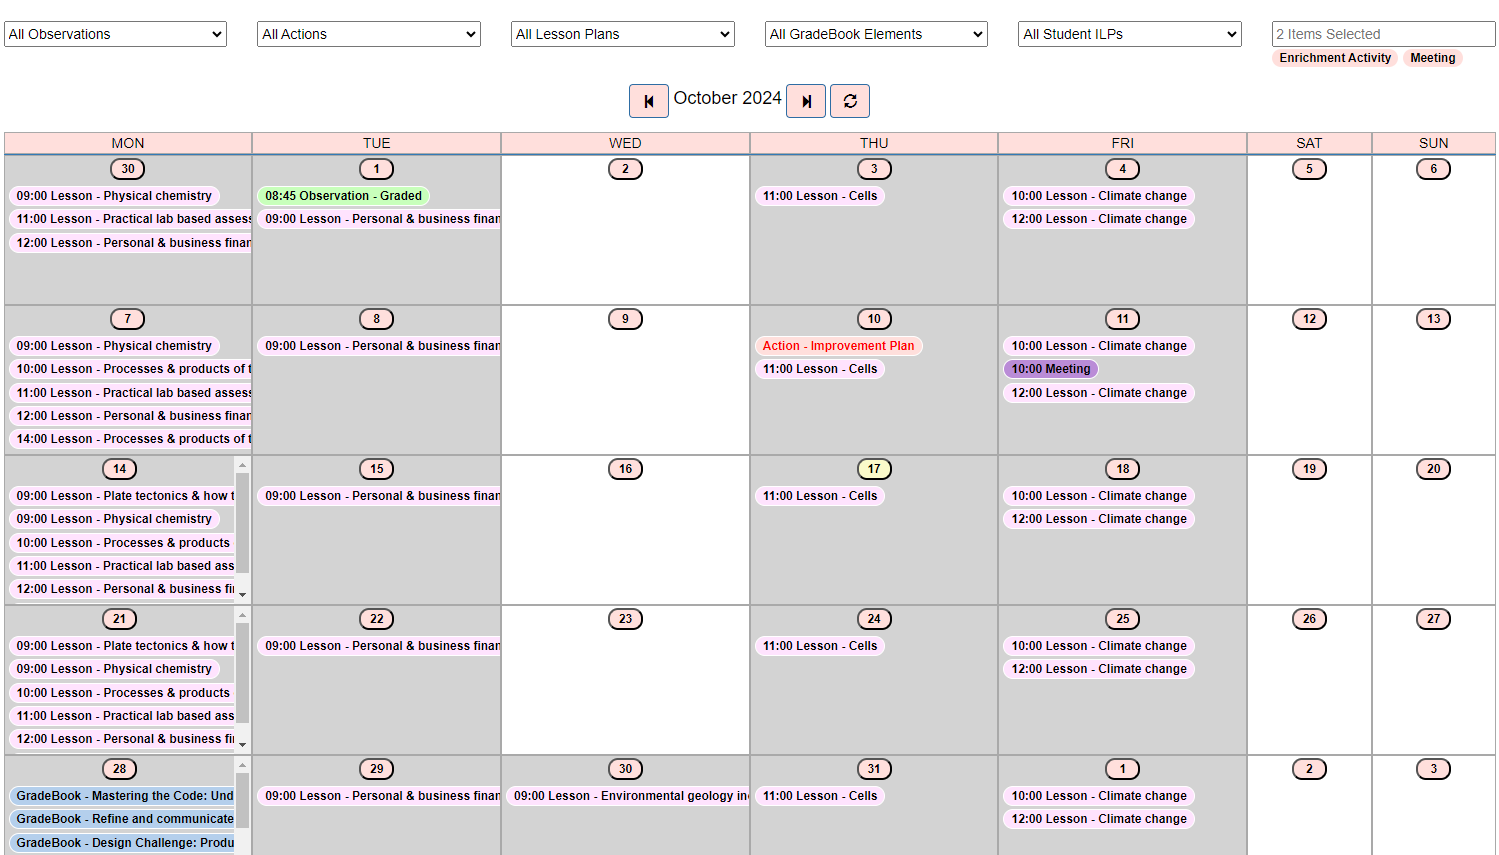
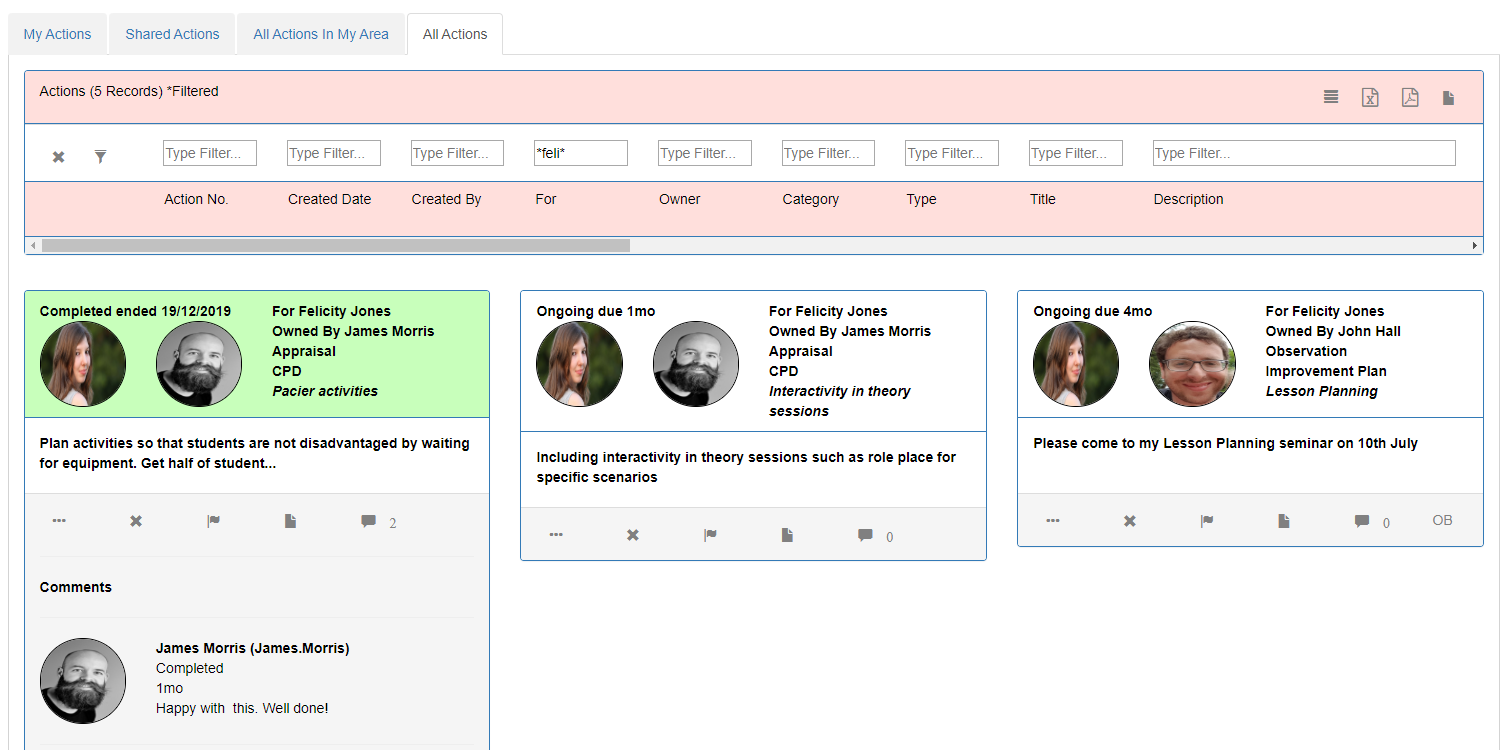
Actions
The Actions section differs from page to page. They are specific to processes that can be performed on the page. For instance on the Lesson Plan page the user can perform the ‘Print Lesson Plan’ Action.
My SOW and Lesson Plans
The Side menu will often contain Schemes of Work (SOW) and Lesson Plans associated with the logged in user. Specifically this will show Schemes of Work where the user is the owner or teacher of the SOW. Each SOW is a hyperlink which will take the user to the specific Scheme of Work page.
Clicking the down chevron will show the user all the Lesson Plans within the Scheme of Work. The date and time of the Lesson plan as well as the Lesson Number (e.g. 10 of 20) within the Scheme of Work will be shown. Again each Lesson Plan will be a hyperlink to the specific Lesson Plan page. Hovering over the Lesson Plan hyperlink will show the user more information about the lesson.
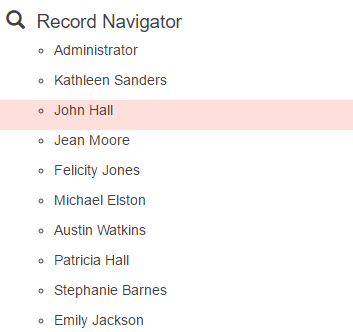
Record Navigator
Some detail pages will show a record navigator. This allows the user to quickly navigate between records by clicking the hyperlink. For instance if an administrator went to the ‘Manage User’ page and clicked the detail page for Joe Bloggs. Within the Record Navigator all the users can be seen and clicked on to move to another record. This negates the need to go back to the User Grid and then select another user.
The Side Panel may not show by default on smaller screens. Clicking the ‘Expand’ Button in the top left corner will overlay the side panel over the page content. For larger screens by default the side panel will be displayed but the user can contract the side panel permanently by clicking the ‘Contract’ Button in the top left corner.
Main Page Content
The rest of the page will be made up of the actual content.
Breadcrumb
The top of the page content will display a breadcrumb showing the user where they are in the system and be able to quickly go back to where they have come from.
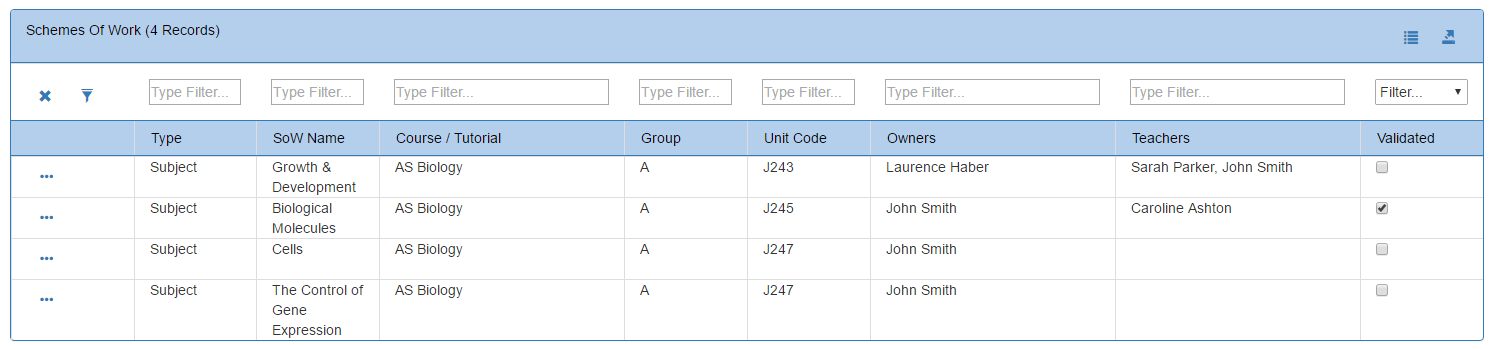
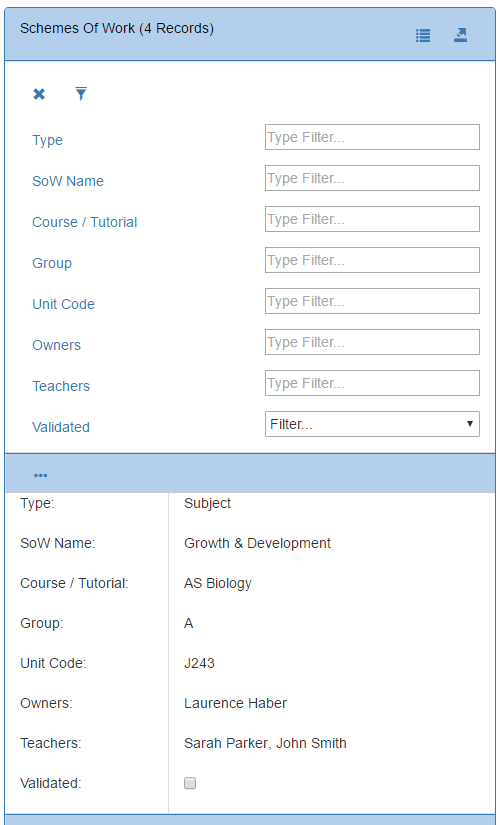
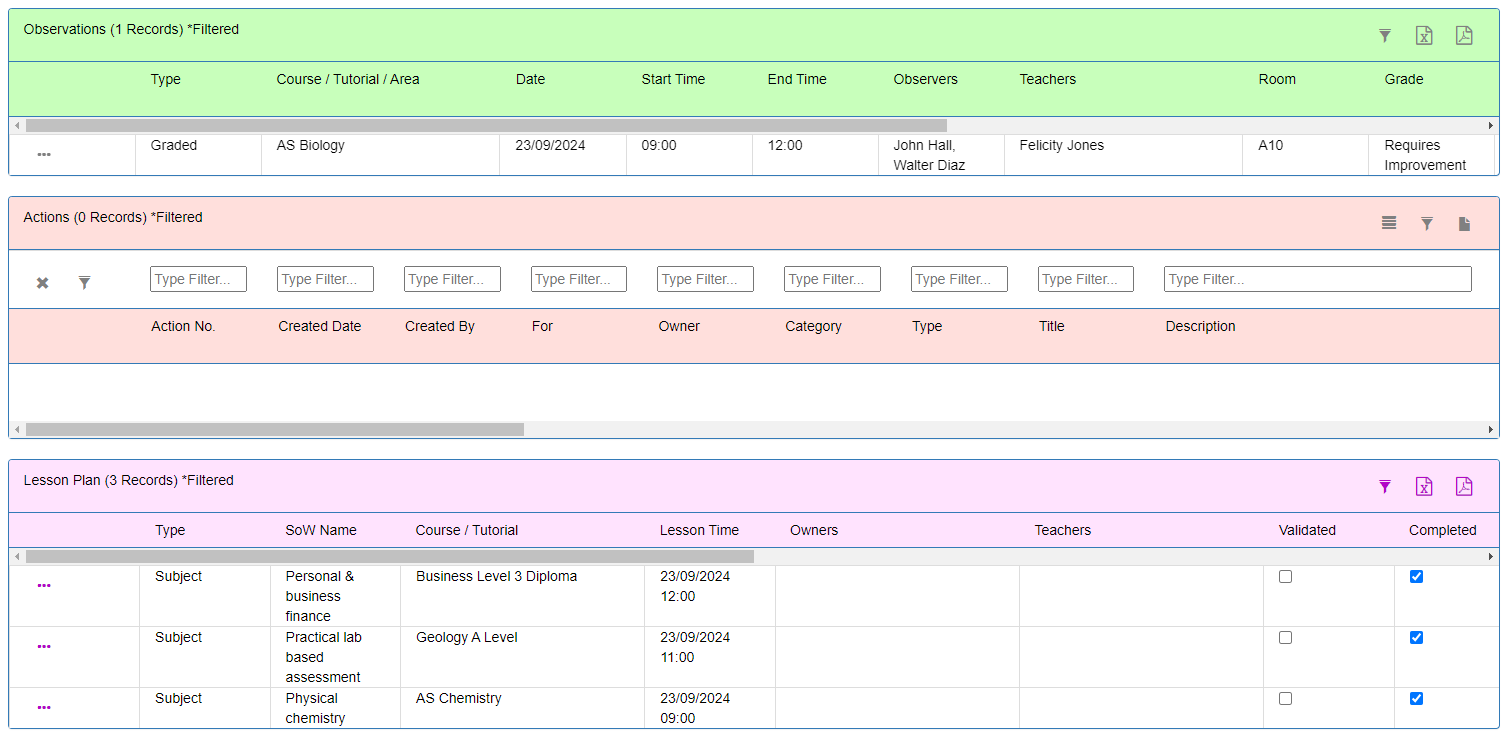
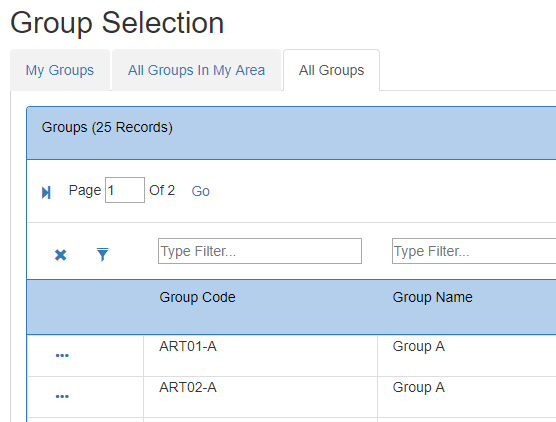
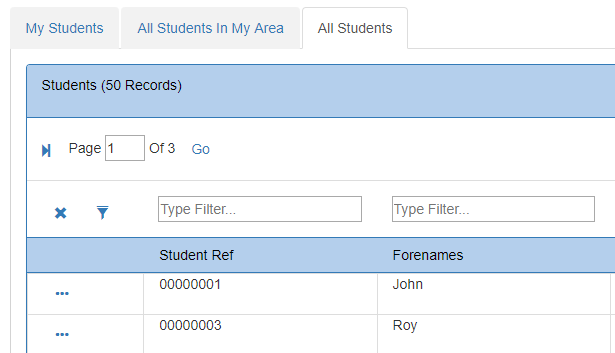
Grids
Data in the system is often displayed within a column and rows format similar to that found within a spreadsheet. These will be referred to as grids. Grids have various features. Note not all grids have all these features.
Pager
Often there will be too many rows of data to display on one page. If this is the case a pager will appear. Clicking the forward and backward arrows will move the grid to the next and previous pages. The current page will be displayed as well as the total number of pages. The user can go to a specific page by changing the number and clicking ‘Go’. Most grids by default will show 20 records per page but this can be altered.
Filter
Above the header there are filter options which can be applied to the Grid. Note that in some grids these may be hidden when first loading the grid and can be shown by clicking the filter ‘funnel’ button on the top right of the grid. These filter options restrict the data that appears on the grid. Each column can be filtered and filters for multiple columns can be combined. The Grid can be filtered by typing in the filter box and then clicking the filter ‘funnel’ button (or clicking enter). Clicking the ‘x’ button against the filter will remove all the filters. The grid will display ‘* filtered’ if a filter has been applied.
There are a number of ways a grid can be filtered.
Exact Value
Typing the exact value into the filter will restrict the grid to the precise value. For example you are filtering for a user with a Surname of ‘Smith’. This will show only users who have a surname of precisely Smith.
Wildcards
Perhaps you know that data contains a certain value within it but you do not know the specific value then wildcards can be used. For instance you know that a course code contains ‘BIO’. Then *BIO* will show all course codes which contain the letter combination of BIO. BIO* will show all course codes which start with BIO. *BIO will show all course codes which end with BIO.
NOT
Putting the word not before the filter will exclude that value. E.g. NOT Smith will exclude all Smiths.
Greater Than/ Less Than
Numerical and Date columns can use >, >=, <, <= to restrict. For example >= 5 will search for all data in the column greater than or equal to 5. < 20/09/2016 will find all dates less than 20/09/2016 excluding that date.
AND
FIlters within a column can be combined by using the word AND. For example filtering for BIO* and *C will find all course codes starting with BIO and ending with C.
OR
Filters within a column can be combined by using the word OR. For example filtering for BIO* OR *C will find all course codes starting with BIO or ending with C.
Some grid filter columns will show the list of distinct values in the column when clicking in the filter box. This makes filtering easier. Typing in the box will filter the list. Selecting the item in the list will add the item to the filter text box. Note that the dropdown can still be ignored and the standard filtering can still be used e.g. wild cards, OR, NOT etc.
Please note that filters are not case sensitive.
Ordering
Columns can be order by clicking the column header. The first click will order the column from smallest to largest or A to Z. The seconds click will order the column from largest to smallest or Z to A. The sort direction of the column will be displayed by the up/down arrow symbol.
Exporting
The Grid can be exported by clicking the export icons in the top right. This allows the grid to be exported in either a pdf or excel format. The filters and sorts will be applied to the export.
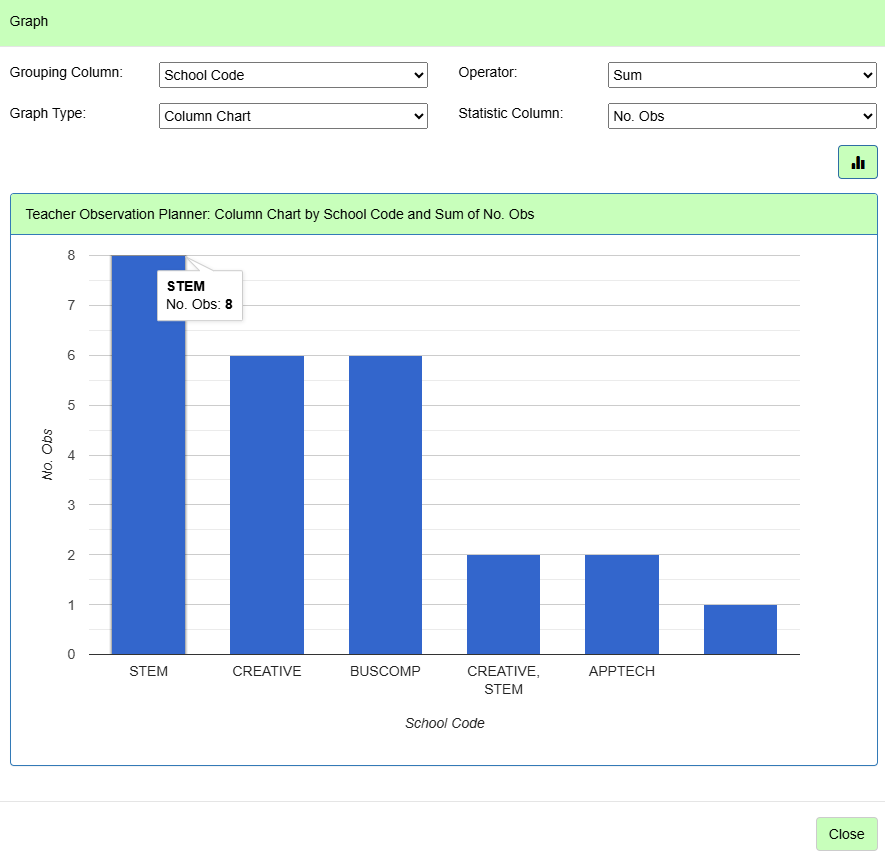
Graphs
Graphs can be created directly within some Data Grids. There is a Graph button on the top right of grids. When clicking the button this opens up a Graph popup with the following options:
Clicking the Graph button will load the graph.
Record Count
The top left of the grid will show how many records are currently being displayed in the grid taking filters into account.
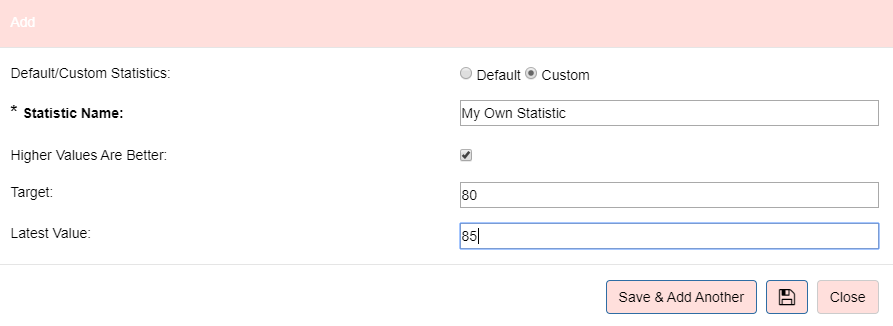
Add New
Some grids will contain an add new ‘plus’ button in the top right. The visibility of this button depends on the grid and the user’s permissions. Clicking the + icon will open a popup where the user can add in a new record into the grid.
The ‘Add New’ popup contains the following features.
Save Button
Saves the data into the grid and closes the popup.
Save and Add Another
Saves the data into the grid and leaves the popup open to add another record.
Save and Edit More Details
Saves the data into the grid and takes the user to the details page for the record to edit even more details.
Close
Closes the popup without saving.
Edit
The start of each row may contain an ‘...’ edit button which allows the user to edit the record. Clicking the button may either open a popup where the data can be modified or take the user to a separate details page. When the button takes the user to a separate page it is possible to right click the button and choose to ‘Open Link in New Tab/ Window’ which is useful if the user still does not want to navigate away from the page.
The ‘Edit’ popup contains the following features.
Save Button
Saves the data into the grid and closes the popup.
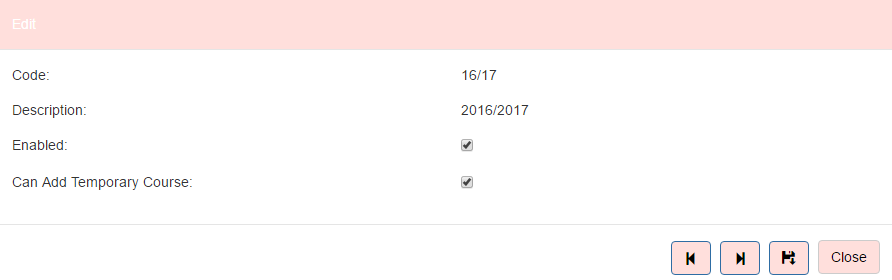
Forward and Back Buttons
Navigates to the next or previous record in the grid.
Save Forward and Back Buttons
Saves data and navigates to the next or previous record in the grid.
Close
Closes the popup without saving.
Delete
The start of each row may contain a ‘x’ delete button. This deletes the data from the grid. Please note that if the record contains child data then the child data needs to be deleted first. For example if you try to delete a permission group which contains users then firstly the users would need to be removed from the permission group before the permission group itself can be deleted.
Save
Sometimes grids have a save button in the top right hand corner allowing the grid records to be modified directly without going into a popup. After the changes the data can be saved by clicking the Save button.
Smaller Screens
The system is responsive to the size of the screen being used. On phone and tablets, a rows and columns format is inappropriate due to lack of space. Instead the grid reformats into a score card type design. All the functionality of the grids on PCs should still be available.
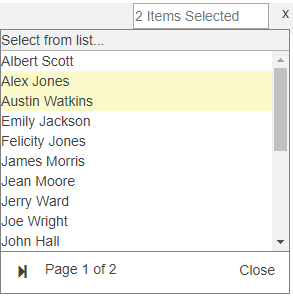
Dropdowns
Dropdown lists are prevalent throughout the system and allow the user to select from a list of predefined options. Typing into the text box will filter the list. For example if the user wishes to add a new subject Scheme of Work the user will be presented with a course dropdown list which might contain thousands of records. The user could type ‘biology’ which will restrict the list to any course with biology anywhere in the title. If there are more than 20 records in the list the user can page forward and backwards through the list.
When the user clicks the record in the list that they wish to add this will populate the text box. Some dropdown lists allow multiple values to be selected. The user can then select/deselect multiple values. The user can remove values from the text box by clicking the ‘x’ button.
Save Button
Many pages will contain the following save button to allow the data to be saved. Navigating away from the page without clicking this button will cause the data to be lost.
Required Fields
When saving data some fields will be required and some will be optional. For instance when creating a new user, surname is required but mobile telephone is not. Required fields can be quickly identified because the label has a bold font with an asterix at the beginning. The system will not allow data to be saved until the required fields are filled in. The user will be presented with messages explaining what is incorrect.
Messages
After a user performs an action in the system a popup will show on the bottom of the page telling the user whether it has been successful or not. Green indicates success, orange indicates a problem.The reason why the action has been unsuccessful should normally be displayed within the message. Clicking anywhere on the page will cause the message to disappear.
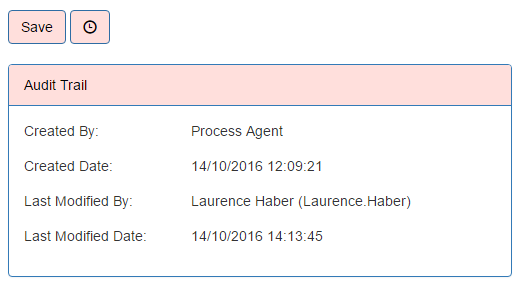
Audit Trail
Detail screens will often show a clock button. When clicking this button audit information will appear to show the user who created the record and the date and time the record was created. Additionally information will show who last modified the record and the time the record was modified.
Some pages will also have an Audit Log within the Actions panel. This will display a popup with more detailed information than just last modified and created. Clicking this will open a popup showing each individual change (deletion, update and creation). See the Audit Log section for more details about the information on this page
Session Timeout
If the user has been inactive on the website for a certain period of time (the exact length is governed by how the website has been configured by the administrator) the user’s session will timeout meaning that work that has not been saved will be lost.
In order to help avoid this the system will popup a warning message 2 minutes before the session will timeout in order to keep the session active. Once the session has timed out the user will need to refresh the page in order to continue.
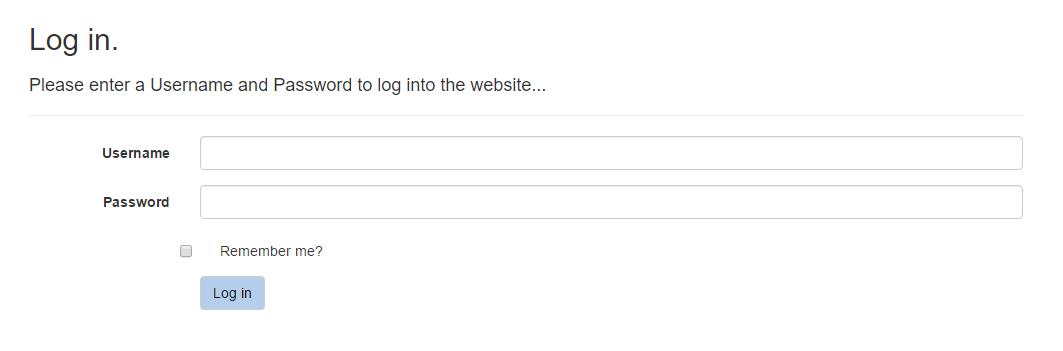
When navigating to the website the user will be taken to the login page. They need to provide a correct username and password and then click the ‘Log in’ button. Selecting the ‘Remember me’ box will tell the browser to remember the username password the next time the user navigates to the website. This is not recommended if the user is using a shared computer/ device.
When using Password based authentication there are two methods:
If the college has turned on multi-factor authentication then the user will be emailed or texted a 6-digit code. This needs to be entered into the Verification Code box and then the user clicks the ‘Log In’ button again to enter the website. The System Settings which turn these options on are ‘Use MFA Email’ and ‘Use MFA SMS’.
If the website has been configured to use windows authentication then the login page will be bypassed and the user automatically logged in. The system will verify the user based on the account the user has logged onto windows with. However if your windows user is not configured in the system then the system will fall back to the login prompt to allow the user to provide a username and password.
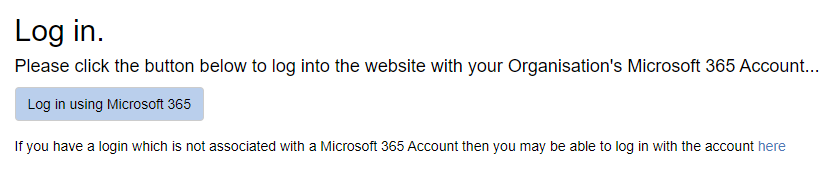
If the website has been configured to use Azure Active Directory then the user will login using their Microsoft 365 credentials. The login form will look as below.
Clicking the ‘Log in using Microsoft 365’ will take the user to their organisation’s Microsoft 365 page for authentication. The user may have a login within the system which is not associated with a Microsoft 365 Account e.g. an administrator account which can still be logged in by clicking the ‘here’ link.
This will display the standard username and password fields. In order to use Azure Active Directory for authentication please see the System Settings section.
If you are unable to access the system you should contact the system’s administrator who will be able to create a user account for you and provide a password.
Checks
When logging in the following system checks are made. Failure in any of these checks will prevent the user logging in.
SQL Server Connection
If the system cannot connect to the SQL Server check the SQL Server connection in the web.config file in the root of the website. Then restart the website for the effects to take place.
Licence Key
The system checks for a valid licence key. The licence key sits within a .lic file on the website in the User Area folder. Please contact support - it could be that the licence key is out of date. A new licence key should be added to overwrite the old one. Then restart the website for the effects to take place.
Database and Server Version
The system checks that the database version and web site versions are the same. If they are not the same the user will not be able to login. Mismatched version may mean that the website has been upgraded but not the sql server or vice versa.
Homepage
The first page will be the homepage. It will contain a section for each product owner by the colleges.
The homepage section for that product can be opened by clicking the banner.
The user can set the section which automatically opens first under ‘Set Default Homepage’.
The user can view the calendar by clicking ‘View Calendar’.
Note that if only one product is owned by the colleges then the product homepage will just open by default and there will be no owner to set the default homepage.
Accessed from the System menu
The manage user screen shows a list of users within the system with their information. The screen is split into 4 tabs for each User Type: Staff, Students, Parents and Other. Users are accounts which allow people to access the system. Clicking the edit button against the record will take the user to the Manager Users detail screen where they can view and edit details. Deleting the record will attempt to delete the member of staff against the user if the staff member is not attached to any records e.g. Scheme of Work Teacher.
The 5th tab called ‘User List’ is only available for colleges with Notification Live. A user list is a collection of users. This tab allows User Lists created by notifications to be maintained. User lists can be added/removed and users added/removed from these lists.
Actions
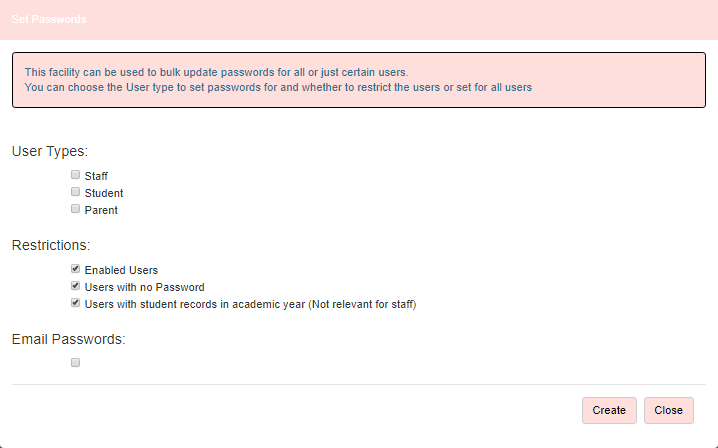
Set Passwords
The Action ‘Set Password’ will open a popup as follows which has various options.
Please note that the password for the administrator account will not be reset.
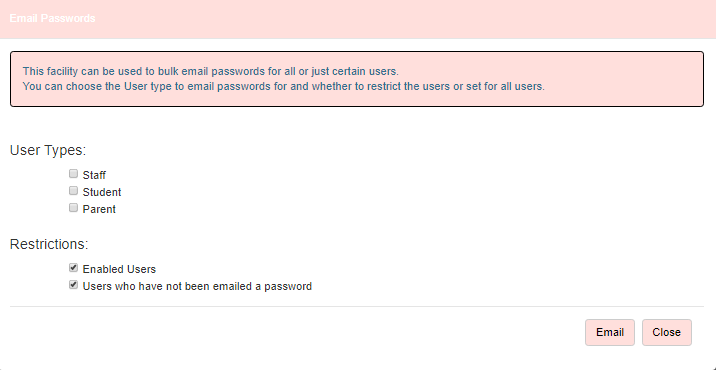
Email Website Passwords
The Action ‘Email Website Password’ will open a popup as follows which has various options and allows passwords which have already been set to be emailed out. This will include a link to the website. This might be useful as a reminder for parents of their passwords.
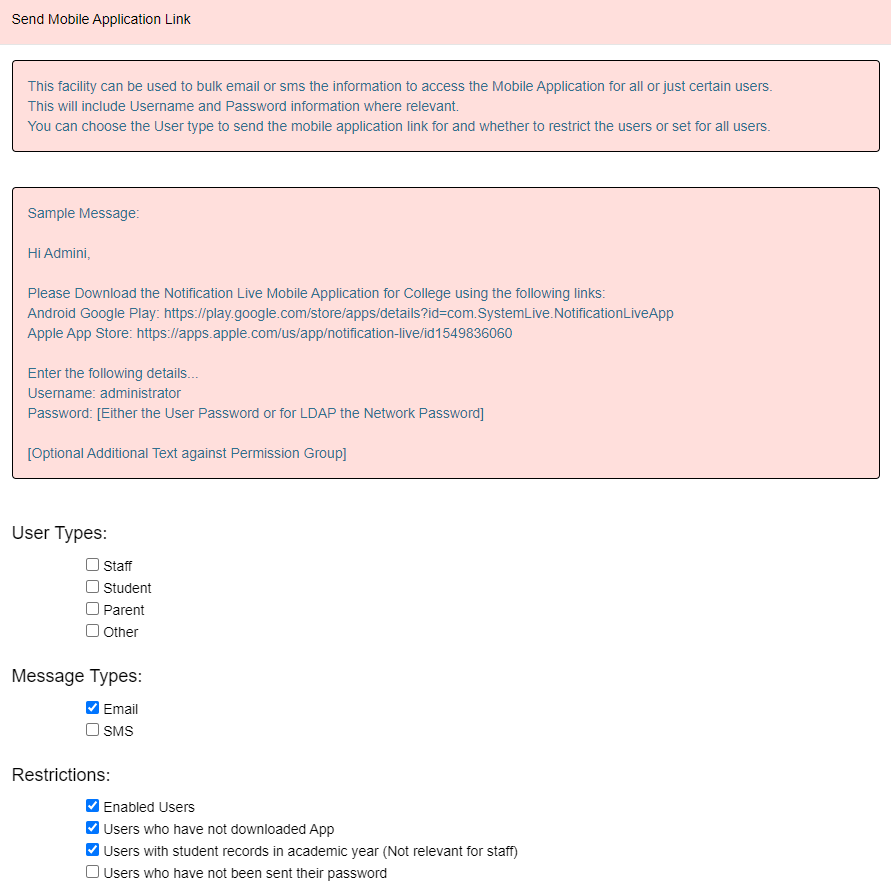
Send Mobile Application Link
This facility will allow users to either be emailed or texted a link to the mobile application on google play store or apple app store. These links can be set up within System > System Settings. The message will also give the user information about how to log in with their username and password (if not using LDAP authentication.) A sample message is displayed giving an indication of what the message will look like. Additional text can be added to the end of the message for different permission groups. This can be set under System > Permissions > Permission Group Detail.
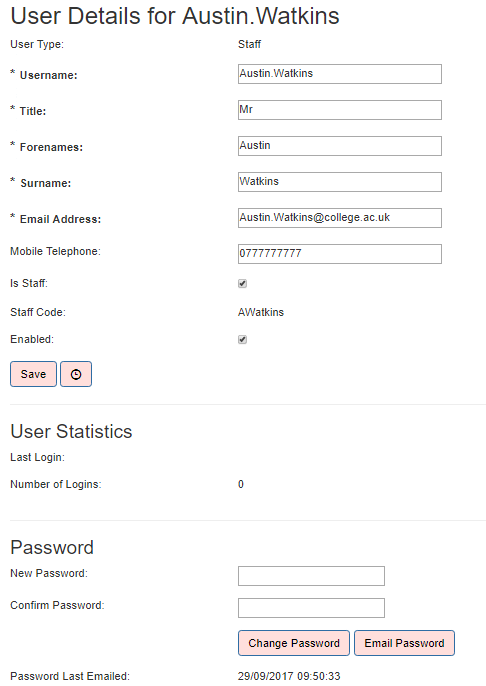
Details
UserName
The name which the user logs into the system with. When using windows authentication this should match their windows username.
Title, Forenames, Surname
Email Address
The system will use the email address to send emails to the user in certain situations if the email functionality is configured correctly.
Mobile Telephone
Is Staff
Users can log into the system. Most of the time users are teaching staff. However there may be users who are not teaching staff for example the IT Administrator or Head of Quality. In this case the Is Staff flag can be deselected. These users will then not be selectable in dropdowns e.g. when allocating a member of staff as a teacher to a Scheme of Work.
Staff Code
The Staff Code associated with the user.
Default Homepage
The default homepage selected by the user.
Enabled
Unchecking this flag stops the user being able to login to their account. This might be done if the user no longer works at the college. As the system is used the staff associated with the user will most likely be associated with data in the system. The user will therefore not be able to be deleted as it is being used. In this scenario it would be best to disable the user instead.
Fixed
Stops the user record being disabled when the import option to ‘Disable Records not in Import’ is set to true. This is useful for setting up test accounts which may not appear within the import datasource. This affects the following imports: Staff, Student, Parent and Other User.
User Statistics
Last Login
The date and time when the user last logged in.
Number of Logins
The number of times the user has logged in.
Last App Contact Time
The time the user last used the Mobile App.
Password
Change Password
Sets the user with a password to log into the system.
Email Password (Website)
Sends the current password to the user’s email address with a link to the website. Requires that the email settings have been set up correctly.
Email Password (App)
Sends the current password to the user’s email with instructions for downloading the App.
Password Last Sent
Displays the date when the password was last sent to the user.
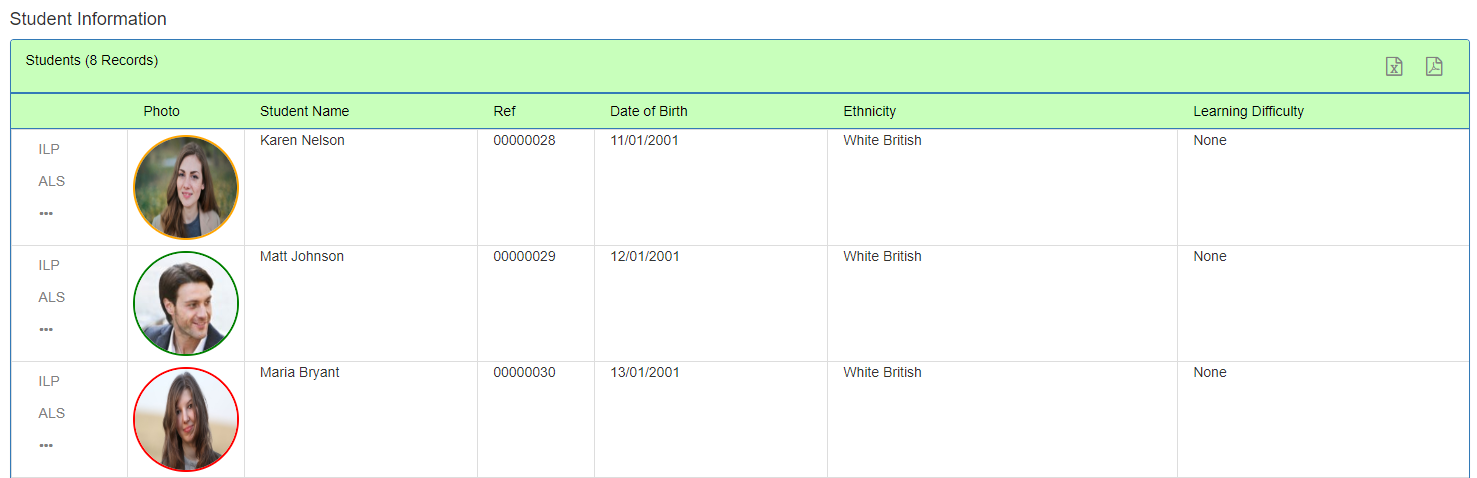
Students
Shows the students associated with the user account. Allows for students to be added or deleted from the user. This is not available for staff users, only students and parents. Students and staff users who login will just see information related to these student records.
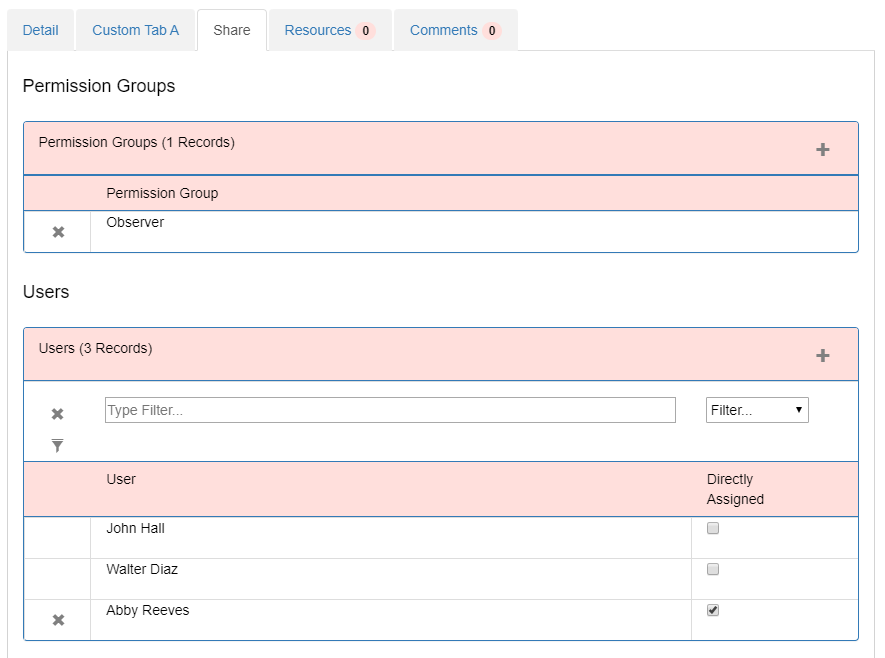
Permission Groups
Add or edit or delete permission groups associated with the user. Permission groups determine which pages and functionality are available to the user. New Permission Groups can be added or removed from the Permission Group page. If a user is associated with multiple permission groups then they take the cumulative permissions from both groups. Users can only be assigned to Permission Groups of their own type. For example a Student could only be assigned Student Permission Groups.
Notifications
A list of all the App Notifications sent to the user.
Actions
Impersonate User
The Impersonate User option will allow the user to see the system exactly how another user would view it. This is helpful for an administrator to diagnose issues which the user reports or keep track of particular user’s progress.
Clicking this option will take the user back to the homepage. A banner will appear to indicate that a user is being impersonated. The user can click the remove button to go back to how they would view the system normally. Or the user can choose a different user to impersonate and then click the impersonate button.
Accessed from the System menu
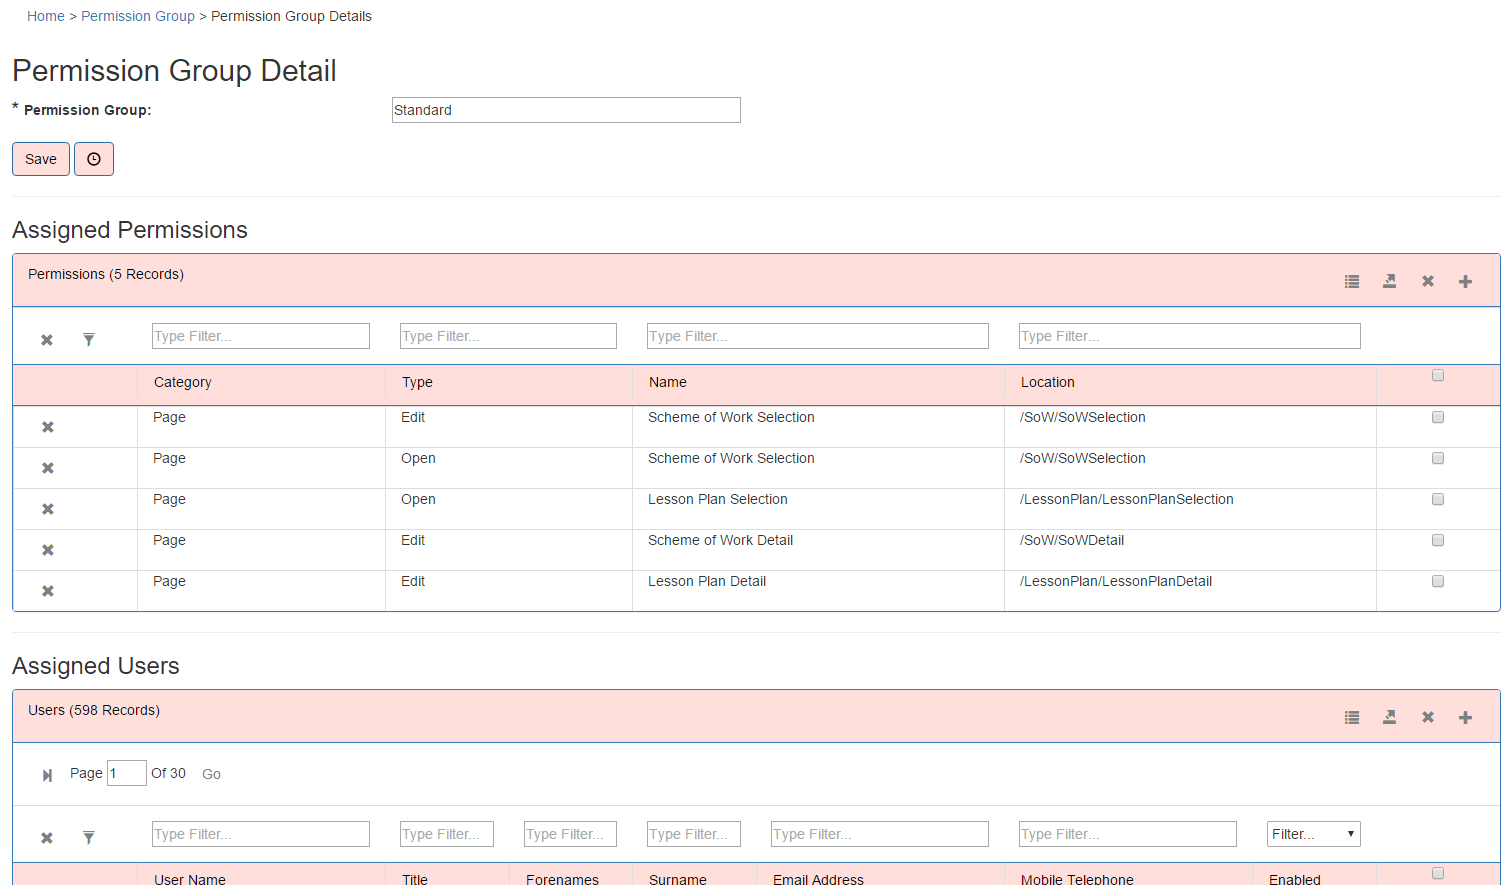
The Permissions Screen shows a list of permission groups in the system. The Permission Group determines which functionality is available to users assigned to the group. The Permission Screen is split into 4 tabs for each User Type: Staff, Students, Parents and Other. Each User Type has a different set of permissions which can be associated with the Permission Group. For example Staff based Permission Groups will have far more permissions available than Students.
The system ships with five permission groups: Administrators,Standard and Observer for staff, and Standard Student and Standard Parent. Administrators by default have access to all functionality. Users are assigned to permission groups to access these permissions.
Clicking the edit button against the row will take the user to the Permission Group Details page.
For users with Notification Live there is also ‘Mobile Application Link Additional Text’. When sending out instructions for users to access the Mobile App this text will appear at the bottom of the message.
Assigned Permissions
The Assigned Permissions grid shows all the individual permissions attached to the group. New permissions can be added and existing permissions can be removed. Permissions are always positive and do not take functionality away.
Permissions have the following attributes
Products
The products the permission is for. Products include Planning Live and Observation Live. Some permissions are associated with multiple products.
Category
Either page, process or section. Page refers to being able to open or edit an entire page. Process refers to specific functionality often page unrelated or specific functionality on the page. Section refers to an area within a page.
Type
Either Open or Edit. Opens refers to being able to access information. Edit refers to being able to modify information.
Name
The name of the permission. This should tell the user what it does.
Location
If the permission is specific to a page provide the url of the page it affects.
Assigned Dashboard Permissions
Each Reporting dashboard has an Open and Edit Permission. Open allows the user to view the dashboard. Edit allows the user to edit the dashboard.
Assigned Users
Users can be added or removed from the Permission Group in bulk.
Accessed from the System Menu
The Datasource Tab shows a list of all the datasources set up within the system. A Datasource is a combination of the SQL Server and Database Name. Additional information in the grid shows the SQL Server Login the datasource uses or whether windows authentication is used to connect. The Count of Used columns shows how many imports or messages or dashboard sections use this datasource.
Datasources are used in various parts of the system including imports, message creator and page creator.
A new datasource can be added by clicking the Add button on the grid. Existing Datasource can be modified by clicking the edit button against the row.
Server
The name of the SQL Server and/or instance. This can also be an ip address.
Database Name
The name of the database on the sql server.
Windows Authentication
Ticking this flag will connect to the sql server using Windows Authentication
Username, Password
The SQL Login Username and password to connect to the SQL Server.
Validate
The Validate button will validate that the Connection is valid.
Accessed from the System menu
There are various imports which populate the system with data. Some are required to use the system e.g. Staff and Courses. Others are recommended e.g. enrolments and students. Others are useful if the college possesses the data e.g. Rooms, Scheme of Work Teachers, etc and may improve the user experience.
All imports require a link to data that sits within a SQL Server environment. This can be in the form of Tables, Views or Stored Procedures. Each import has a specification of columns required. It is advised that imports should be configured to automatically pull data out of the current academic year so that they do not need to be altered year on year. Each import can be scheduled to automatically import at a time required by the college. Colleges which use ProMonitor or ProSolution can use predefined imports which allows the system to be set up quicker. The imports are performed by the Process Agent and requires the Process Agent to be installed and set up correctly.
Import Tab
The Import Tab shows a list of all the Imports.
Import Row
Each row will have a play button. This will manually add the import to the import queue to be processed by the Process Agent. The edit button will take the user to the import details page.
The row will show
Last Import Status
This will either show failed or successfully.
Last Import Error
If the import failed for some reason this will show the reason.
Import Details
Enabled
If unticked will prevent the import processing.
Datasource
The SQL Server and Database where the data will be pulled from. Datasources will need to firstly be configured within System > Datasources.
Object Name
The SQL Server Object within the Datasource. The dropdown will show all the tables, views and stored procedures within the SQL Server. The object in question should adhere to the import specification.
Integrate with External System
Instead of choosing an Object name the import can use our standard ProMonitor, ProSolution or ProAchieve import. This will use our own internal SQL Views on your ProMonitor,ProSolution or ProAchieve data. Not all the imports can tap into ProMonitor, ProSolution or ProAchieve data.
Course - ProMonitor and ProSolution
Enrolment - ProMonitor and ProSolution
GradeBook Element - ProMonitor only
GradeBook Element Library - ProMonitor only
Organisation Structure - ProMonitor and ProSolution
Organisation Structure Course- ProMonitor and ProSolution
Organisation Structure Staff - ProMonitor and ProSolution
Other User - ProMonitor and ProSolution
Parent - ProMonitor and ProSolution
Qualification Aim - ProMonitor, ProSolution and ProAchieve
Register - ProSolution only
Room - ProSolution only
Scheme of Work Teacher - ProMonitor only
Site - ProSolution only
Staff - ProMonitor and ProSolution
Student - ProMonitor and ProSolution
Timetable - ProSolution only
Tutorial - ProMonitor and ProSolution
Import into Current Year
If ticked will import the data into the current academic year. If unticked a dropdown list will appear where the user can select the academic year in question.
Disable Record Not in Import
This essentially allows the data in the system to be synced with the data in the import. Data not in the import will be disabled. For example a student was studying at the college so was imported by the student import. Now however the student has dropped out of the college. As the student record no longer appears in the import the record will be set as disabled so the student will no longer be visible within the system. Please note that the student will not be deleted from the database. So if the student comes back into the student import then the student will be reinstated within the system and all the data entered into the system previously will still be intact.
Email Address On Error
If the Import errors then the email will receive details about the error. Multiple addresses can receive emails if separated by a comma.
Import Schedule
Enabled
Setting the import as enabled will allow the Process Agent to automatically import the data.
Time
The Time when the import will automatically run.
Day of Week
The days when the import will automatically run. One or more can be selected.
Expiry Date
The date after which the import will stop running. This should be set if at the end of the academic year the import could import into the wrong year. For example data is being imported from 15/16 into the current academic year which is 16/17. If at the start of 17/18 15/16 data might import into 17/18 which the college does not want then it might be best to set the expiry data at the end of 16/17 i.e. 31/07/2017.
Currently Queued Imports
Shows all the imports being queued and its status e.g. queuing, processing etc.
Import History
Shows all the past imports: The start and end time, the status whether the import failed or was successful and the error message if this import failed. Clicking the detail button against the row will show more information about the nature of the errors, in particular why each row failed to import.
Actions
Add To Queue
This will manually immediately add the import to the queue for the Process Agent to process.
Import Specification
ColumnName | DataType | Required | Example Data |
CreatedByUserName | varchar(50) | Yes | JB01 |
ForStaffCode | varchar(24) | Yes | LH01 |
OwnerStaffCode | varchar(24) | Yes | ZG01 |
ActionCategoryName | varchar(150) | Yes | Getting Ready For OFSTED |
ActionTypeName | varchar(150) | Yes | Strategic Plan |
ActionTitle | varchar(100) | Yes | Section 1 of Plan |
ActionDescription | varchar(8000) | Yes | Improve Attendance and Achievement |
ActionTag | varchar(8000) | No | Attendance|Achievement |
Reviewed | bit | No | True |
StartDate | datetime | No | 05/06/2019 |
DueDate | datetime | Yes | 25/06/2019 |
EndDate | datetime | No | 01/07/2019 |
CourseCode | varchar(36) | Yes | MTH01 |
OrgStructure1Code | varchar(150) | No | SITE1 |
OrgStructure2Code | varchar(150) | No | SCIENCE |
OrgStructure3Code | varchar(150) | No | MATHS |
OrgStructure4Code | varchar(150) | No | MATHS_TEAM1 |
ActionStageName | varchar(150) | No | Complete |
ActionCompletionName | varchar(150) | Yes | Complete |
ActionOutcomeName | varchar(150) | Yes | Positive |
ActionProgress | decimal(9, 2) | No | 100 |
ActionHours | decimal(9,2) | No | 2 |
ActionTabA1-20 | varchar(8000) | No | Some Text... |
ActionTabB1-20 | varchar(8000) | No | Some Text... |
ActionTabC1-20 | varchar(8000) | No | Some Text... |
ColumnName | DataType | Required | Example Data |
CourseCode | varchar(36) | Yes | MTH01 |
CourseName | varchar(150) | Yes | A-Level Maths |
GroupCode | varchar(36) | No | MTH01A |
GroupName | varchar(150) | No | Group A |
GroupExternalURL | varchar(500) | No | http://www.MyStudentGroup.com?Group=MTH01A |
QualificationAimCode | char(8) | No | 60163690 |
ColumnName | DataType | Required | Example Data |
StudentRef | varchar(12) | Yes | 1000001 |
CourseCode | varchar(36) | Yes | MTH01 |
GroupCode | varchar(36) | No | MTH01A |
StartDate | datetime | No | 01/09/2016 |
EndDate | datetime | No | 31/07/2016 |
ActualEndDate | datetime | No | 20/07/2016 |
CompletionID | char(1) | No | 1 |
OutcomeID | char(1) | No | 1 |
Attendance | decimal(9,2) | No | 95.7 |
Punctuality | decimal(9,2) | No | 99.5 |
TargetGradeNational | varchar(12) | No | MMM |
TargetGradePersonal | varchar(12) | No | DMM |
PlannedHours | decimal(9,2) | No | 450 |
AimTypeID | int | No | 5 |
ProvisionType | varchar(100) | No | AEB |
IsMainEnrolment | bit | No | 1 |
GradeFinal | varchar(12) | No | MMM |
ColumnName | DataType | Required | Example Data |
CourseCode | varchar(36) | Yes | MTH01 |
GroupCode | varchar(36) | Yes | MTH01A |
Element1Code | varchar(12) | Yes | Unit01 |
Element2Code | varchar(12) | No | A1 |
Element3Code | varchar(12) | No | P1 |
ElementName | varchar(150) | No | Algebra |
ElementDescription | varchar(8000) | No | In this unit we want to cover… |
ElementOrder | int | Yes | 1 |
ExternalCode | varchar(50) | No | ABC123 |
Weighting | real | No | 10 |
OutOf | int | No | 100 |
DateSet | datetime | No | 01/10/2024 |
DateExpected | datetime | No | 31/10/2024 |
VisibleToStudent | bit | Yes | 1 |
ColumnName | DataType | Required | Example Data |
Provider | varchar(250) | Yes | My College |
QualificationAimCode | char(8) | Yes | 10033506 |
GroupDescription | varchar(1000) | Yes | Group: ABCDE |
Element1Code | varchar(12) | Yes | Unit01 |
Element2Code | varchar(12) | No | A1 |
Element3Code | varchar(12) | No | P1 |
ElementName | varchar(150) | No | Algebra |
ElementDescription | varchar(8000) | No | In this unit we want to cover… |
ElementOrder | int | Yes | 1 |
ExternalCode | varchar(50) | No | ABC123 |
Weighting | real | No | 10 |
OutOf | int | No | 100 |
DateSet | datetime | No | 01/10/2024 |
DateExpected | datetime | No | 31/10/2024 |
VisibleToStudent | bit | Yes | 1 |
ColumnName | DataType | Required | Example Data |
ObservationDate | datetime | Yes | 18/01/2018 |
TemplateName | varchar(150) | Yes | Graded Observation |
Completed | bit | Yes | 1 |
StartTime | time | No | 10:00 |
EndTime | time | No | 11:30 |
ObserverStaffCode | varchar(24) | No | JB01 |
TeacherStaffCode | varchar(24) | No | LS02 |
RoomCode | varchar(24) | No | Z10 |
CourseCode | varchar(36) | No | MTH01 |
GroupCode | varchar(36) | No | MTH01A |
Element1Code | varchar(12) | No | Unit1 |
TutorialCode | varchar(24) | No | TTT01A |
OrgStructure1Code | varchar(150) | No | SITE1 |
OrgStructure2Code | varchar(150) | No | SCIENCE |
OrgStructure3Code | varchar(150) | No | MATHS |
OrgStructure4Code | varchar(150) | No | MATHS_TEAM1 |
OverallGrade | varchar(100) | No | Good |
OverallGradeNumerical | Real | No | 2 |
Moderated | bit | No | 1 |
ModeratorStaffCode | varchar(24) | No | LH04 |
ModeratedDate | datatime | No | 18/02/2018 |
LessonContext1-12 | varchar(8000) | No | Workshop |
ObservationA1-40 | varchar(8000) | No | The lesson was taught well... |
ObservationB1-40 | varchar(8000) | No | The lesson was taught well... |
Outcome1-12 | varchar(8000) | No | Another observation scheduled |
ColumnName | DataType | Required | Example Data |
OrgStructure1Code | varchar(150) | Yes | SITE1 |
OrgStructure2Code | varchar(150) | No | SCIENCE |
OrgStructure3Code | varchar(150) | No | MATHS |
OrgStructure4Code | varchar(150) | No | MATHS_TEAM1 |
OrgStructureName | varchar(150) | No | Maths Team 1 |
StaffCode | varchar(24) | No | LH01 |
ColumnName | DataType | Required | Example Data |
OrgStructure1Code | varchar(150) | Yes | SITE1 |
OrgStructure2Code | varchar(150) | No | SCIENCE |
OrgStructure3Code | varchar(150) | No | MATHS |
OrgStructure4Code | varchar(150) | No | MATHS_TEAM1 |
CourseCode | varchar(36) | Yes | MTH01 |
ColumnName | DataType | Required | Example Data |
OrgStructure1Code | varchar(150) | Yes | SITE1 |
OrgStructure2Code | varchar(150) | No | SCIENCE |
OrgStructure3Code | varchar(150) | No | MATHS |
OrgStructure4Code | varchar(150) | No | MATHS_TEAM1 |
StaffCode | varchar(24) | Yes | JB01 |
ColumnName | DataType | Required | Example Data |
UserName | varchar(50) | Yes | 1000001 |
StudentRef | varchar(12) | No | 1000001 |
Title | varchar(24) | Yes | Mr |
Forenames | varchar(100) | Yes | Richard |
Surname | varchar(100) | Yes | Hadley |
EmailAddress | varchar(100) | Yes | hadley@applicant.com |
MobileTelephone | varchar(15) | No | 0777777777 |
Password | varchar(30) | No | %GFRJ*()&^ |
PermissionGroupName | varchar(50) | No | Applicant |
ColumnName | DataType | Required | Example Data |
UserName | varchar(50) | Yes | hadley@parent.com |
StudentRef | varchar(12) | Yes | 1000001 |
Title | varchar(24) | Yes | Mr |
Forenames | varchar(100) | Yes | Richard |
Surname | varchar(100) | Yes | Hadley |
EmailAddress | varchar(100) | Yes | hadley@parent.com |
MobileTelephone | varchar(15) | No | 0777777777 |
Password | varchar(30) | No | %GFRJ*()&^ |
PermissionGroupName | varchar(50) | No | Standard Parent |
ColumnName | DataType | Required | Example Data |
ParentsEveningName | varchar(50) | Yes | Spring Term |
ParentsEveningDate | datetime | Yes | 14/03/2025 |
ParentsEveningStartTime | time | Yes | 18:00 |
ParentsEveningSessionCode | varchar(50) | Yes | MTH01A |
ParentsEveningSessionName | varchar(250) | Yes | A-Level Maths Group A |
StaffCode | varchar(24) | Yes | JB01 |
LocationType | varchar(50) | Yes | Onsite |
SiteCode | varchar(50) | No | HillE |
RoomCode | varchar(24) | No | Z10 |
OnlineURL | varchar(500) | No | https:www… |
OrgStructure1Code | varchar(150) | No | SITE1 |
OrgStructure2Code | varchar(150) | No | SCIENCE |
OrgStructure3Code | varchar(150) | No | MATHS |
OrgStructure4Code | varchar(150) | No | MATHS_TEAM1 |
SlotCount | int | No | 10 |
SlotDuration | int | No | 8 |
SlotGap | int | No | 2 |
StudentRef | varchar(12) | No | 1000001 |
CourseCode | varchar(36) | No | MTH01 |
GroupCode | varchar(36) | No | MTH01A |
SlotNumber | int | No | 1 |
ColumnName | DataType | Required | Example Data |
QualificationAimCode | char(8) | Yes | 10033506 |
QualificationAimTitle | varchar(250) | No | Certificate in Work with Children |
NVQLevel | char(1) | No | 2 |
QualificationType | varchar(250) | No | Certificate |
AwardingBodyCode | varchar(250) | No | EDEXCEL |
AwardingBodyName | varchar(250) | No | EDEXCEL |
SSA1Code | varchar(50) | No | 05 |
SSA1Name | varchar(250) | No | Education and Training |
SSA2Code | varchar(50) | No | 05.1 |
SSA2Name | varchar(250) | No | Education and Training |
ColumnName | DataType | Required | Example Data |
StudentRef | varchar(12) | Yes | 1000001 |
CourseCode | varchar(36) | Yes | MTH01 |
GroupCode | varchar(36) | Yes | MTH01A |
RegisterCode | varchar(50) | Yes | MTH01A/1 |
RegisterDescription | varchar(150) | Yes | Maths Group A Monday 9-1 |
RegisterDate | datetime | Yes | 09/07/2018 |
RegisterStartTime | time | Yes | 10:00 |
RegisterEndTime | time | Yes | 12:00 |
RegisterMark | char(1) | Yes | / |
RegisterMarkDescription | varchar(150) | Yes | Present |
HasAttended | bit | Yes | 1 |
IsRequiredToAttend | bit | Yes | 1 |
IsPunctual | bit | No | 0 |
ColumnName | DataType | Required | Example Data |
RoomCode | varchar(24) | Yes | Z10 |
RoomDescription | varchar(150) | Yes | Chemistry Lab A |
Photo | varbinary(max) | No | |
RoomTypeDescription | varchar(150) | No | Classroom |
SiteCode | varchar(50) | No | HillE |
ColumnName | DataType | Required | Example Data |
CourseCode | varchar(36) | Yes | MTH01 |
GroupCode | varchar(150) | No | MTH01A |
Element1Code | varchar(12) | No | Unit01 |
SOWName | varchar(150) | No | Algebra |
StaffCode | varchar(24) | Yes | JB01 |
ColumnName | DataType | Required | Example Data |
SiteCode | varchar50) | Yes | HillE |
SiteDescription | varchar(250) | Yes | Hill East |
Address | varchar(1000) | No | 1 Hill Street, Billington, B17 HDA |
TelephoneNumber | varchar(15) | No | 012345678901 |
ColumnName | DataType | Required | Example Data |
UserName | varchar(24) | No | JoeBloggs |
StaffCode | varchar(24) | No | JB01 |
Title | varchar(24) | No | Mr |
Forenames | varchar(100) | Yes | Joe |
Surname | varchar(100) | Yes | Bloggs |
EmailAddress | varchar(100) | Yes | JoeBloggs@Test.com |
MobileTelephone | varchar(15) | No | 07777777777 |
Password | varchar(30) | No | ABC123 |
PermissionGroupName | varchar(150) | No | Standard |
Photo | varbinary(max) | No |
ColumnName | DataType | Required | Example Data |
CourseCode | varchar(36) | Yes | MTH01 |
StatisticCourseNumber1-8 | decimal(9,2) | No | 9.81 |
StatisticCourseDate1-2 | datetime | No | 18/01/2018 |
StatisticCourseString1-8 | varchar(250) | No | AB |
ColumnName | DataType | Required | Example Data |
StudentRef | varchar(36) | Yes | 1000001 |
CourseCode | varchar(36) | Yes | MTH01 |
StatisticEnrolmentNumber1-15 | decimal(9,2) | No | 90.5 |
StatisticEnrolmentString1-4 | varchar(250) | No | Yes |
ColumnName | DataType | Required | Example Data |
CourseCode | varchar(36) | Yes | MTH01 |
GroupCode | varchar(36) | Yes | MTH01A |
StatisticGroupNumber1-8 | decimal(9,2) | No | 9.81 |
StatisticGroupDate1-2 | datetime | No | 18/01/2018 |
StatisticGroupString1-8 | varchar(250) | No | AB |
ColumnName | DataType | Required | Example Data |
OrgStructure1Code | varchar(150) | No | SITE1 |
OrgStructure2Code | varchar(150) | No | SCIENCE |
OrgStructure3Code | varchar(150) | No | MATHS |
OrgStructure4Code | varchar(150) | No | MATHS_TEAM1 |
StatisticOrgStructureNumber1-20 | decimal(9,2) | No | 9.81 |
StatisticOrgStructureDate1-2 | datetime | No | 18/01/2020 |
StatisticOrgStructureString1-8 | varchar(250) | No | AB |
ColumnName | DataType | Required | Example Data |
StaffCode | varchar(36) | Yes | JB01 |
StatisticStaffNumber1-8 | decimal(9,2) | No | 9.81 |
StatisticStaffDate1-2 | datetime | No | 18/01/2018 |
StatisticStaffString1-8 | varchar(250) | No | AB |
ColumnName | DataType | Required | Example Data |
StudentRef | varchar(36) | Yes | 1000001 |
StatisticStudentNumber1-30 | decimal(9,2) | No | 90.5 |
StatisticStudentString1-8 | varchar(250) | No | Yes |
ColumnName | DataType | Required | Example Data |
Title | varchar(12) | Yes | Mr |
Forenames | varchar(100) | Yes | James |
Surname | varchar(100) | Yes | Hadley |
StudentRef | varchar(12) | Yes | 1000001 |
UserName | varchar(24) | No | JHadley |
Password | varchar(30) | No | %GFRJ*()&^ |
PermissionGroupName | varchar(150 | No | Student |
EmailAddress | varchar(100) | No | JH@College.com |
MobileTelephone | varchar(15) | No | 07123456789 |
DateOfBirth | datetime | No | 10/10/1998 |
Gender | char(1) | No | M |
Ethnicity | varchar(100) | No | White British |
LearningDifficulty | varchar(100) | No | Dyslexia |
ILPURL | varchar(500) | No | http://ilp.com?StudentRef=1000001 |
ALSURL | varchar(500) | No | http://als.com?StudentRef=1000001 |
GCSEMathsGrade | varchar(20) | No | B |
GCSEEnglishGrade | varchar(20) | No | C |
InitialAssessmentMathsGrade | varchar(20) | No | L1 |
InitialAssessmentEnglishGrade | varchar(20) | No | L2 |
UserDefined1 | varchar(255) | No | High Risk |
UserDefined2 | varchar(255) | No | A1 |
UserDefined3 | varchar(255) | No | 100 |
UserDefined4 | varchar(255) | No | Low Risk |
Photo | varbinary(max) | No | |
PhotoBorderColour | varchar(50) | No | red |
ColumnName | DataType | Required | Example Data |
CourseCode | varchar(36) | Yes | MTH01 |
GroupCode | varchar(36) | Yes | MTH01A |
TimetableDate | datetime | Yes | 11/11/2017 |
TimetableStartTime | time | Yes | 10:00 |
TimetableEndTime | time | Yes | 13:00 |
RoomCode | varchar(24) | No | Z10 |
StaffCode | varchar(24) | No | JB01 |
ColumnName | DataType | Required | Example Data |
TutorialCode | varchar(36) | Yes | Tut01 |
TutorialName | varchar(150) | Yes | Felicity Jones Tutorial Group |
Queue Tab
The Queue Tab shows a list of queued imports. The information displayed includes the type of import e.g. Course, the time the import was first queued and the status of the import e.g. queuing, processing.
History Tab
The History Tab shows all the past imports. Clicking the details button against the row will take the user to the Import History Detail page. The following information is shown: The start and end time, the status whether the import failed or was successful and the error message if this import failed.
Errors
The grid shows more detailed information about the error for each row.
Error Message
The reason why the row did not import.
Problem Row
The line number of the row which caused the problem. This can help more easily identify the problem record.
Row Details
The information contained in the problem row. The Course Import might show ‘BIO1, ASBiology, A, Group A’ for example.
System Settings
The System Settings associated with the imports
GradeBook Element Import - Add SOW
A flag to say whether to automatically add a Scheme of work against Level 1 GradeBook Elements which do not already have a Scheme of Work. The SOW will be given the same name as the Level 1 GradeBook.
Accessed from the System menu
The system can be configured to send emails to users. The Email page shows a history of all emails sent, the emails currently being queued to be sent and settings to configure the connection to the email server.
Queue Tab
Emails are not immediately sent but instead they are queued up to be sent by the Process Agent. The Queue tab shows all the emails currently being queued to be sent. If there are lots of emails in this tab then this could indicate a problem sending emails.
History Tab
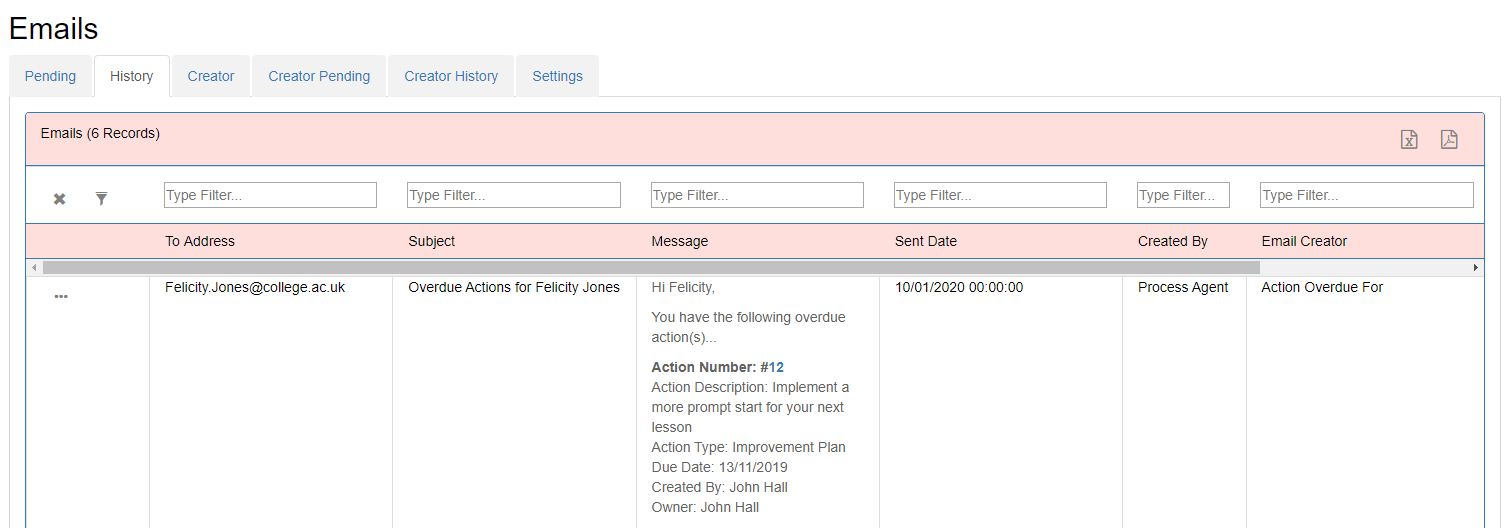
The History Tab shows a record for all the emails which have been sent by the system. A preview of the message is shown in the row. For the full email click the details button at the start of the row. Information about the email including who the email is sent to, the subject, when the email was sent and any attachments are included. The Message Creator column shows which Message Creator created the email. This will be blank if the email was created within the website itself e.g. when sending an action.
Settings Tab
The settings tab configures the connection to send out emails.
Enabled
Unticking this box means that emails will not be sent out.
Email Method
Either SMTP or Microsoft 365 (using Microsoft Graph)
For SMPT
Exchange Server
The name of the server which hosts the exchange. This can be the server name or ipaddress. In the case of web hosted email this will be the url of the email server e.g. smtp.gmail.com
UserName, Password
The username and password for the Process Agent to connect to the Exchange Server. Depending upon how exchange is configured this may not be required. For example if the machine where the Process Agent is installed is allowed to relay emails on the exchange server then a username would not be required.
From Address
The email address which the email will be sent from. It is best to create a mailbox on exchange with this address e.g. PlanningLive@College.ac.uk.
Port
The Port to connect to the Exchange server. This is often required for web hosted emails e.g. Office365. Please see your web hosted documentation for the port number.
SSL Required
A flag whether the exchange server requires SSL. This is often required for web hosted emails e.g. Office365. Please see your web hosted documentation to see whether SSL is required or not.
For Microsoft 365
Username
The Microsoft 365 user which has permissions to send out emails. This will be in the form of an email address.
From Address
The email address which the email will be sent from. It is best to create a mailbox with this address e.g. PlanningLive@College.ac.uk. The Username must have permissions to send on behalf of this shared email address.
TenantID
This is a unique identifier for your Azure AD directory. It represents your organization's account in Azure.
ApplicationID
This is a unique identifier for your application within your Azure AD tenant. When you register an application in Azure AD, it's assigned an Application ID. This ID is used to identify your specific app when it requests access to resources. The Application:
Secret Code
The Secret Code generated under Certificates & Secrets against the Application within the Azure AD Tenant.
Accessed from the System menu
The system can be configured to send SMSs to users. The SMS page shows a history of all SMS sent, the SMS currently being queued to be sent and settings to configure the connection to your Janet Txt SMS account.
Queue Tab
SMS are not immediately sent but instead they are queued up to be sent by the Process Agent. The Queue tab shows all the SMSs currently being queued to be sent. If there are lots of SMSs in this tab then this could indicate a problem sending SMSs.
History Tab
The History Tab shows a record for all the SMSs which have been sent by the system. A preview of the message is shown in the row. For the full SMS click the details button at the start of the row. Information about the SMS including who the SMS is sent to, the subject and when the SMS was sent are included. The Message Creator column shows which Message Creator created the SMS. This will be blank if the SMS was created within the website itself e.g. when sending an action.
Settings Tab
The settings tab configures the connection to the college’s Janet Txt SMS account. Please enter your Username and Password and the From Address where the SMS will be sent from.
Enabled
Unticking this box means that SMSs will not be sent out.
Check Valid
Once configured checks that the credentials are correct.
Send Test SMS
Send a test SMS to the Mobile Telephone number against the logged in user.
Accessed from the System menu
Google Gemini API is integrated into various modules.
In order to use this functionality the college will need to have a Google Account.
Settings Tab
Once the settings are filled out click ‘Test’ to see if the connection is set up correctly.
Prompt History
This tab shows a grid of the prompts sent out by the system.
Accessed from the System menu
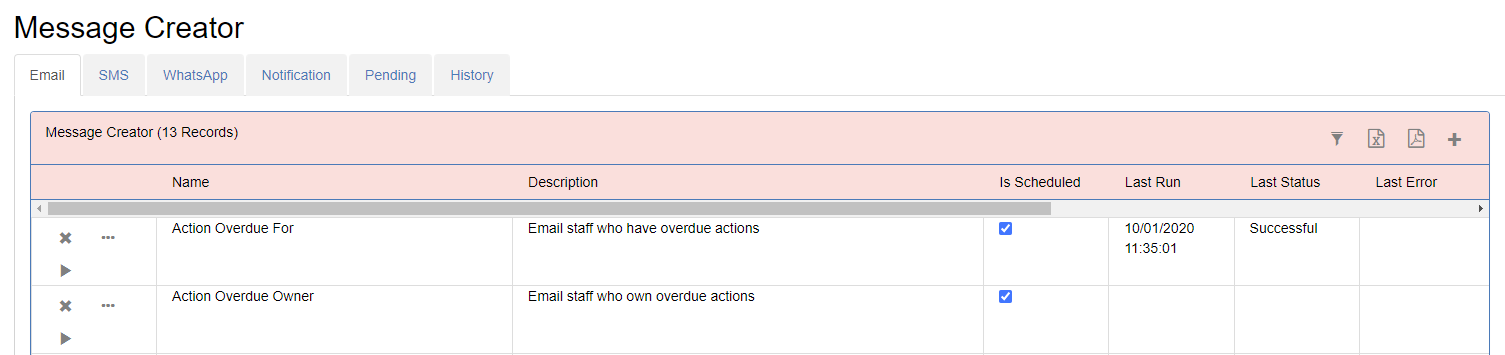
Creator Tab
The Message Creator allows you to create your own custom messages (Email, SMS, WhatsApp or App Notification) to be sent out on an adhoc basis or scheduled periodically. This has a great number of usages for example this could be used for sending all staff a list of their overdue actions. Or to send every student a notification saying the college is closed today due to snow.
The system ships with default Message Creators for the various modules. These can be modified as required or new messages can be created by clicking the add button. When adding a new Creator there is the option of copying from an existing Creator.
The Message Creator can be run from the grid by clicking the ‘Play’ button at the beginning of the row.
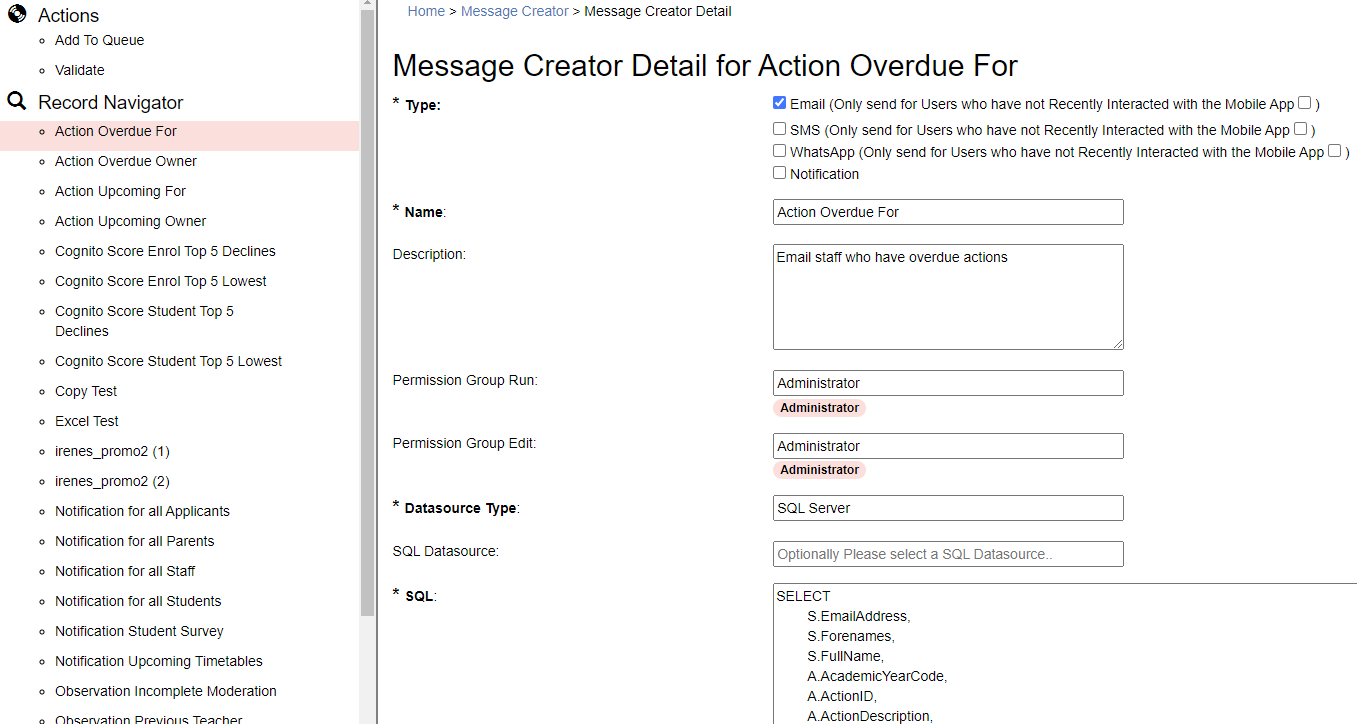
A Message Creator is made up of various components…
EmailAddress | ActionID | ActionDescription | DueDate |
john@college.ac.uk | 1 | Action1 | 01/02/2020 |
john@college.ac.uk | 2 | Action2 | 02/02/2020 |
tim@college.ac.uk | 3 | Action3 | 03/02/2020 |
tim@college.ac.uk | 4 | Action4 | 04/02/2020 |
If the EmailAddress field is chosen then John and Tim will receive one email but with 2 action records. If the ActionID field is chosen then John and Tim will receive 2 emails with 1 action in each.
Tags can be placed within the Subject, Header, Body and Footer boxes. These will be replaced when the message is generated. Any field within the datasource can be used by starting the fieldname with @@. For example a field name of AcademicYearCode can be replaced by adding it as @@AcademicYearCode.
A special tag of $$WebSiteRootURL can also be used which will use the root of the url in the system setting. This can be used to create links.
For colleges with Parents Evening Live, a special tag of $$WebSiteParentsEveningURL will create an encrypted link to the Parents Evening page for each parent. Please ensure that the datasource returns the columns UserID and StudentID.
A special tag of $$CurrentAcademicYearCode can also be used in the SQL which will be replaced by the current academic year e.g. 20/21.
Note that if you copy and paste these tag names from another document sometimes html tags can be placed within the tag so behind the scenes it is not @@AcademicYearCode for example. When you preview the message you will see the tag rather than the replaced value. This can be simply fixed by highlighting the tag and clicking the ‘Remove Formatting’ option.
The message can be scheduled to automatically run on a specific time each day. An expiry date can be set which means that the messages will not be run after this date. Alternatively the messages can be sent on an adhoc basis by clicking the ‘Add to Queue’ Action. This will then be processed by the background Process Agent. The Message Creator can also be validated to check if there are any problems which would stop messages being sent. For example incorrect SQL syntax. Clicking Validate will show how many messages would be generated. A preview of the first 20 messages will be displayed showing who the message is for, the subject (if not SMS) and body of the message.
Note that for SMS messages that are over 480 characters(3 SMS messages long) will be truncated to 480 characters in length.
Attachments can be added to Email or Notifications. Either fixed Attachments by adding attachments to the grid. Or different attachments can be generated for each record in the datasource. For example you could send a different attachment to each student.
Notification Specific Details
These options are only available when sending a notification message.
The Queue grid will show any Message Creators currently queuing/processing.
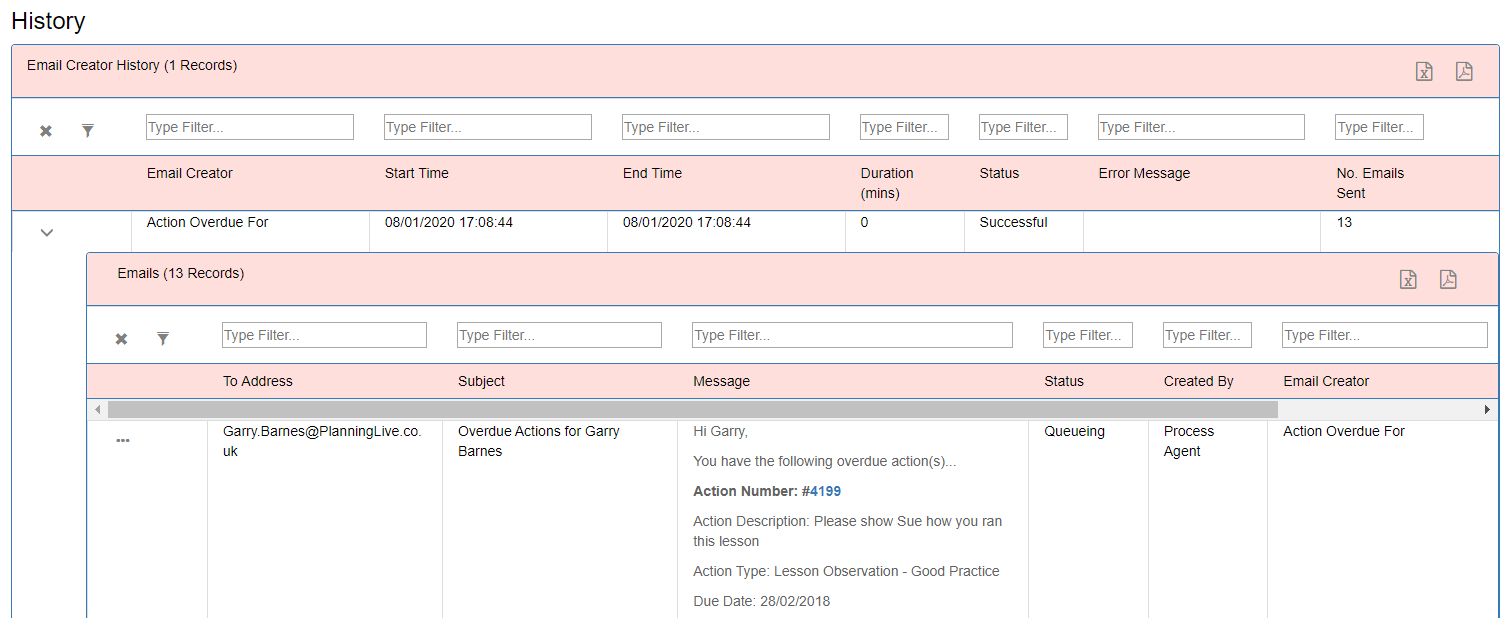
The History grid will show each time the Message Creator was run and whether it was run successfully or not. If successful will show how many messages were sent. The Down Chevron will show details about each message sent. If not successful will show the error which prevented the Message Creator from running.
Permissions
On the main message creator screen you will only see message creators if:
You will only be able to run the message creator if:
You will only be able to edit the message creator if:
You will only be able to copy from a message creator if:
Creator Pending Tab
The Queue grid will show any Message Creators currently queuing/processing.
Creator History Tab
The History grid will show each time the Message Creator was run and whether it was run successfully or not. If successful will show how many messages were sent. The Down Chevron will show details about each message sent. If not successful will show the error which prevented the Message Creator from running.
Actions Panel
The side Actions Panel allows the user to:
Accessed from the System menu
The Process Agent is a Windows Service installed with the website. The Process Agent is used to automate imports and send emails.
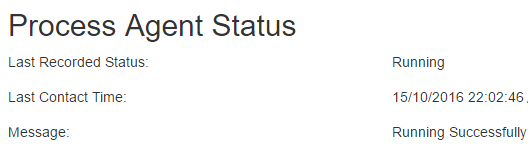
The Process Agent screen shows whether the Process Agent is running successfully
Last Recorded Status
The Process Agent periodically contacts the SQL Server to record its status. If the Process Agent is running successfully it will display ‘Running’.
Last Contact Time
The Process Agent periodically contacts the SQL Server to record its status. If the Process Agent has not updated the last contact time recently then a message will display to suggest there might be a problem with the Process Agent.
Message
If the Process Agent encounters a critical message it will contact the SQL Server to record this message.
The installer creates a Windows Task Scheduler on the server called ‘Start College Live Process Agent’ which triggers the Process Agent to restart if it stops with an error for any reason. Sometimes this can happen if the server has been restarted and a service which the Process Agent relies on has been started yet.
Accessed from the System menu
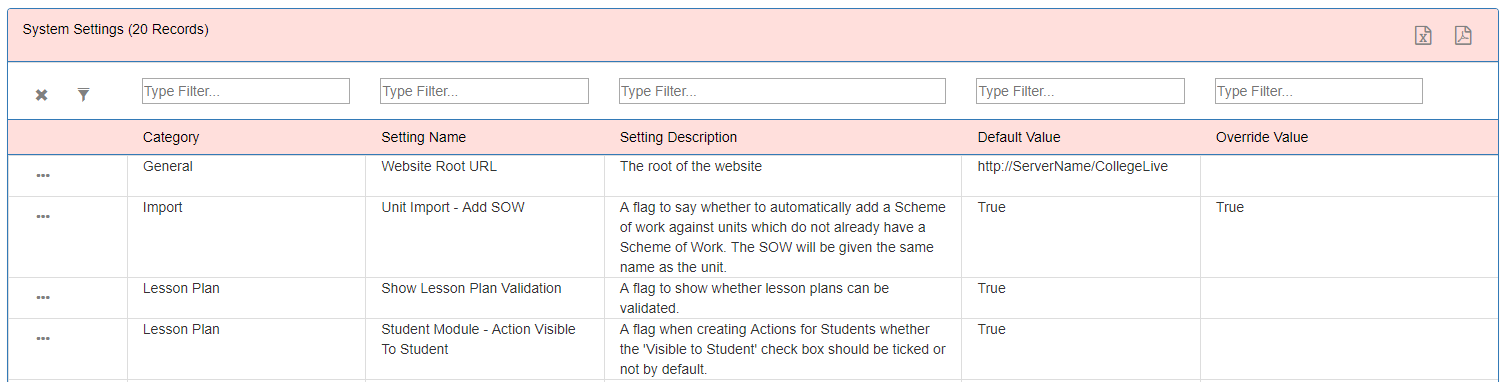
The system settings can be altered and viewed from this screen. Clicking the details record at the start of the row allows the user to edit the setting by filling in the Override Value text box. The original value is shown in the default value. Each system setting sits within a category to be able to find the setting more easily.
Website Root URL
The root url of the website. This is mainly used for messages when constructing urls within emails to link back to the system.
Process Agent Website Root URL
When importing data the Process Agent may need to call back to the Website. This will be the website url from the perspective of the Process Agent. This may differ from the website root url if there is a proxy website setup. Note that when using Windows Authentication if the Application Pool is using the ApplicationPoolIdentity you will need to change this to a different account such as NetworkService in order to avoid 401 Unauthorised Authentication errors.
Process Agent Website Username
The username the Process Agent uses to call back to the website when using windows authentication.
Process Agent Website Password
The password the Process Agent uses to call back to the website when using windows authentication.
Process Agent Website Domain
The domain the Process Agent uses to call back to the website when using windows authentication.
Use LDAP
Whether to use LDAP to authenticate user passwords. True will use LDAP. False will use the Password against the user in the system
LDAP Server Path
The LDAP URL in the form LDAP://CN=Users,DC=xxxx,DC=yyyy,DC=zzzz
Use MFA Email
Use Multi-Factor Authentication when using username and password based login methods. If set to true the user will also be required to add a Verification Code sent by email.
Use MFA SMS
Use Multi-Factor Authentication when using username and password based login methods. If set to true the user will also be required to add a Verification Code sent by SMS.
Use Azure Active Directory
Whether to use Azure Active Directory as the default method for authenticating users. A further guide called ‘College Live Microsoft 365 Integration’ is available for further guidance about how to enable this feature.
Student Import - Set Accounts as Enabled
Whether to set Student User Accounts as enabled after the Student Import.
Parent Import - Set Accounts as Enabled
Whether to set Parent User Accounts as enabled after the Parent Import.
Other User Import - Set Accounts as Enabled
Whether to set Other User Accounts as enabled after the Other User Import
Accessed from the System menu
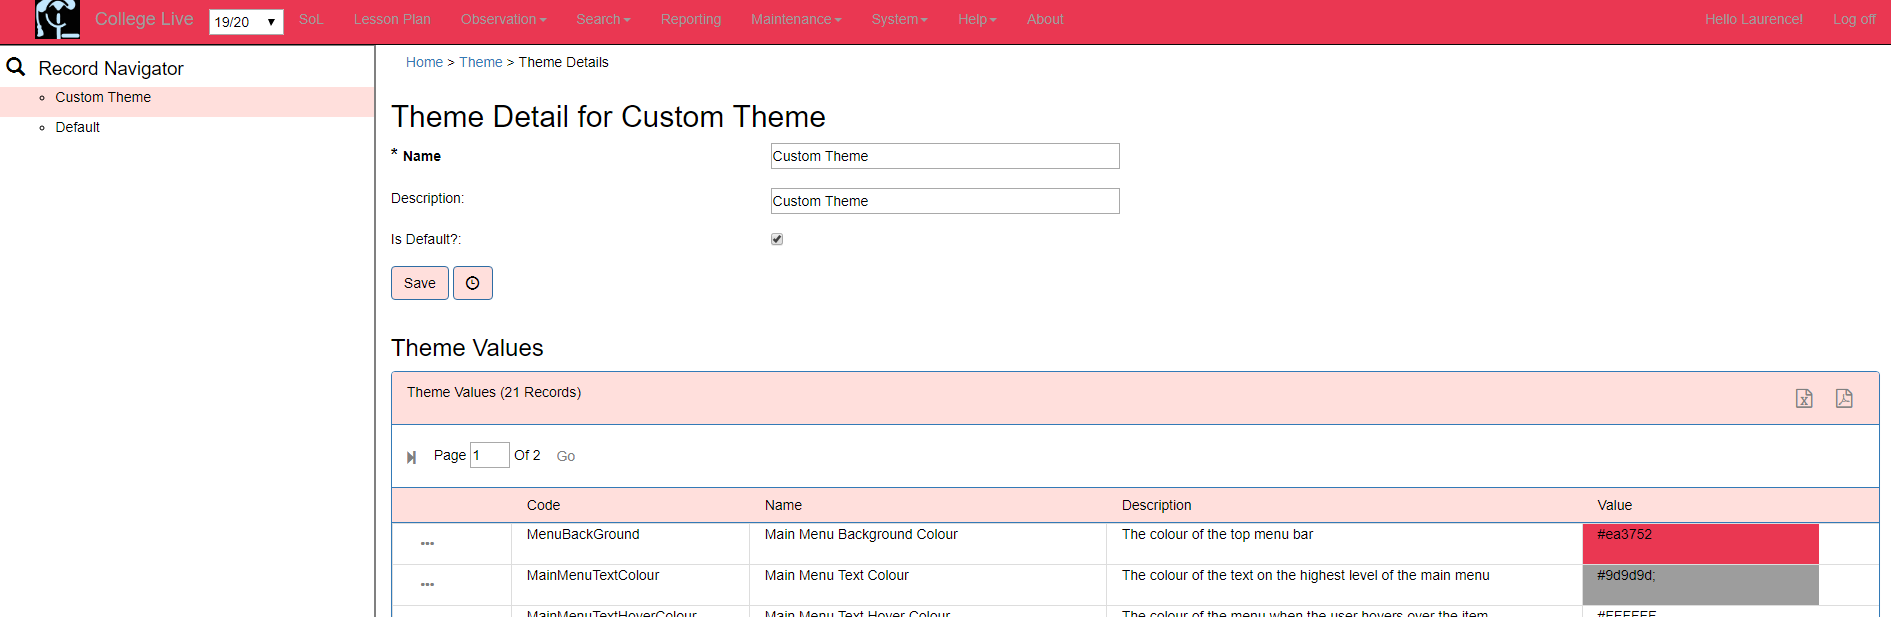
A college can change the theme of the website including colours, the name of the products and images.
The themes page shows a list of available themes. The system will ship with a ‘Default’ theme. A College can create a new theme which can be given a name and description and set as default. Default themes will be used throughout the website. When creating a new theme the user can choose the theme to copy from.
The theme details page allows the theme name and description to be set as well as whether the theme is the current default theme.
The theme contains a list of theme values which change different elements of the website as follows…
Name | Description |
Main Menu Background Colour | The colour of the top menu bar |
Main Menu Text Colour | The colour of the text on the highest level of the main menu |
Main Menu Text Hover Colour | The colour of the menu when the user hovers over the item |
Sub Menu Text Colour | The colour of the text on the sub menu |
Page Background Colour | The background colour of the page body |
System/Maintenance Primary Colour | The primary colour of the System/Maintenance/System pages. |
System/Maintenance Secondary Colour | The secondary colour of the System/Maintenance/System pages. |
Scheme of Work Primary Colour | The primary colour of the Scheme of Work pages. |
Scheme of Work Secondary Colour | The secondary colour of the Scheme of Work pages. |
Lesson Plan Primary Colour | The primary colour of the Lesson Plan pages. |
Lesson Plan Secondary Colour | The secondary colour of the Lesson Plan pages. |
Lesson Observation Primary Colour | The primary colour of the Observation pages. |
Name of the College Live Product Name | The name shown on the menu bar and other places of the College Live product |
Name of the Planning Live Product Name | The name shown on the menu bar and other places of the Planning Live product |
Name of the Observation Live Product Name | The name shown on the menu bar and other places of the Observation Live product |
URL Link for College Live Logo | Link for College Live Logo which appears on the menu bar |
URL Link for Planning Live Logo | Link for Planning Live Logo which appears on the menu bar |
URL Link for Observation Live Logo | Link for Observation Live Logo which appears on the menu bar |
URL Link for College Live Favicon | Link for College Live Favicon image which appear on the browser tab |
URL Link for Planning Live Favicon | Link for Planning Live Favicon image which appear on the browser tab |
URL Link for Observation Live Favicon | Link for Observation Live Favicon image which appear on the browser tab |
Please note that the user changing the themes will only notice the change once they refresh the page but the theme will still have been applied to the website whenever the default theme is altered.
Accessed from the System menu
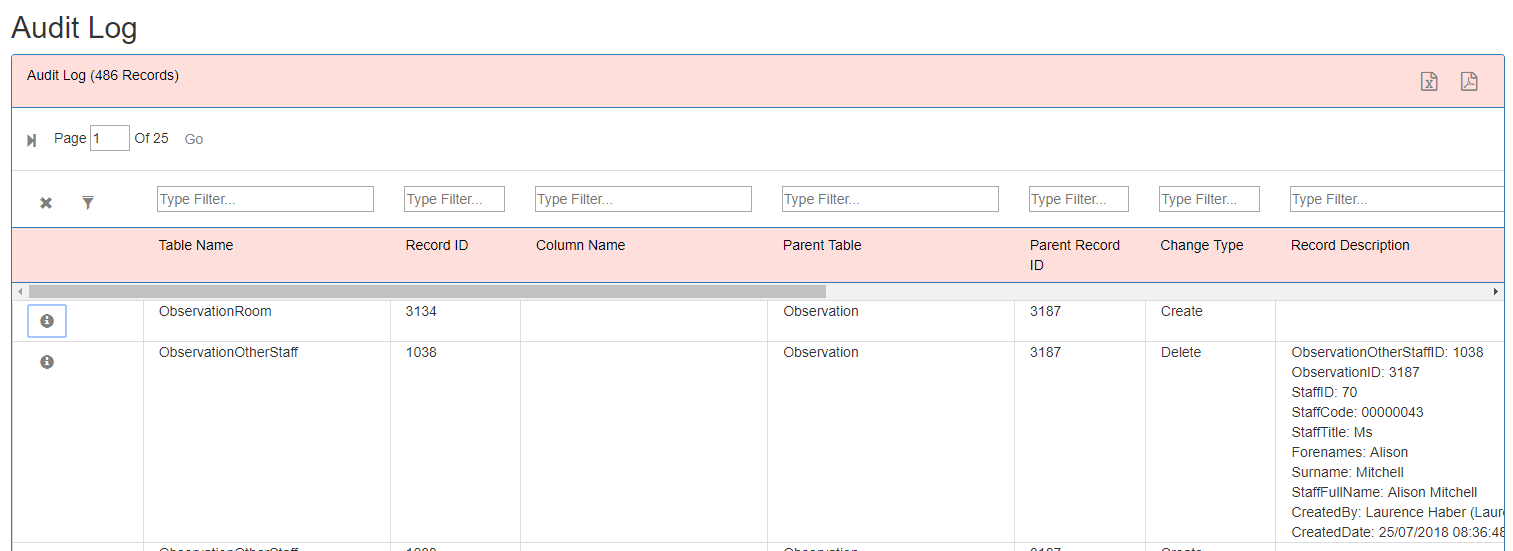
The Audit Log shows detailed changes to data within the system and allows investigation to be made into what the change was, who made the change and when the change was made. Please note that not all data is audited in the system in this level of detail.
The Grid contains various columns. Each row represents an individual change:
Information Icon
Clicking the information icon against the row will go back to the database and retrieve the information for the record so it can be correctly identified.
Table Name
The table where the record in stored e.g. Observation
Record ID
The primary key identifier of the record e.g. 12. This combined with the table name could allow the database to be interrogated to find more information about the record.
Column Name
The column in the table which is being changed e.g. ObservationDate
Parent Table
The name of the table which holds the parent data. This could be the same as the table name. For example ObservationTeacher has a parent table of Observation.
Parent Record ID
The primary key identifier of the record which holds the parent data. This can be used in conjunction with the Main table to group changes together e.g. all changes related to a particular observation.
Change Type
The type of change e.g. Delete, Create or update.
Record Description
A text field to identify the record with some more meaningful information.
Before
The text before the record was updated.
After
The text after the record was updated.
Edited By
The user who made the change.
Edited Date
The date was the change was made.
AuditLogID
The ID of the change in the AuditLog table
Accessed from the System menu
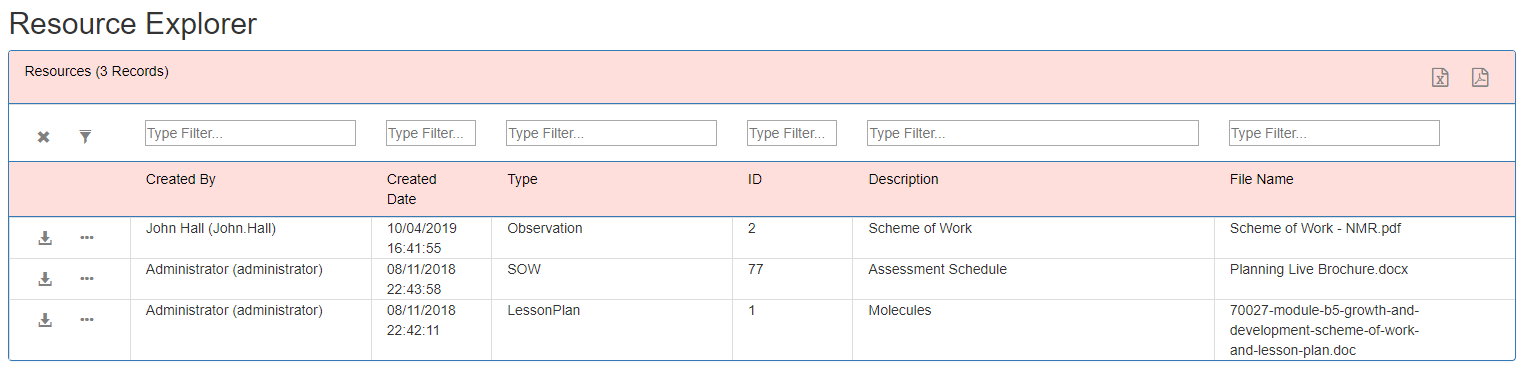
The resource explorer shows all resources within the system created in the academic year. These could be resources added to schemes of work, lesson plans or observations etc.
Resources which are files can be downloaded. Resources which are hyperlinks will link to the url. The details button will take the user to the record where the resource was added e.g. the scheme of work or observation.
The columns include:
Accessed from the System menu
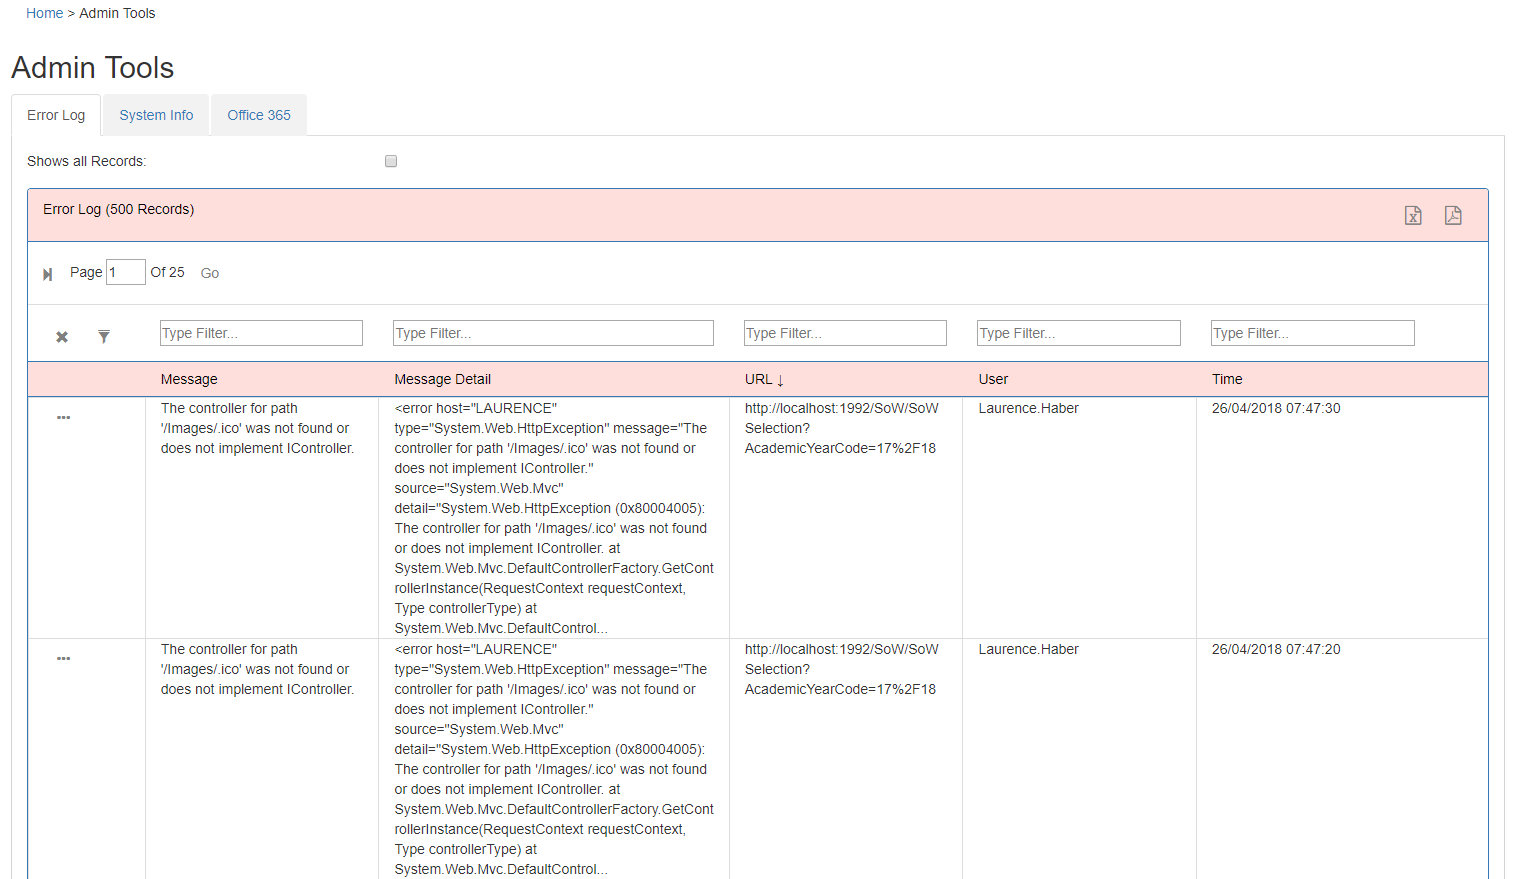
Error Log
When a user causes the system to encounter an error message the system stores the message so that more detailed analysis can be performed to work out why the error was produced. The error log shows each individual error. If errors are encountered they can be sent to support for investigation.
By default only the last 500 errors are shown. To see all the errors tick Shows all Records’.
Type
The technical nature of the error.
Message
A short overview of the message.
Message Detail
A full stack trace of the error message. This is required by support to be able to fully investigate the problem. Click the detail button at the start of the row to see the entire message detail.
URL
The URL of the page which produced the error.
User
The logged in user who encountered the error.
Time
The date and time when the error message was produced.
System Info
Information about the system is displayed on this tab.
Server
The name of the web server
Website Version
The version number of the website.
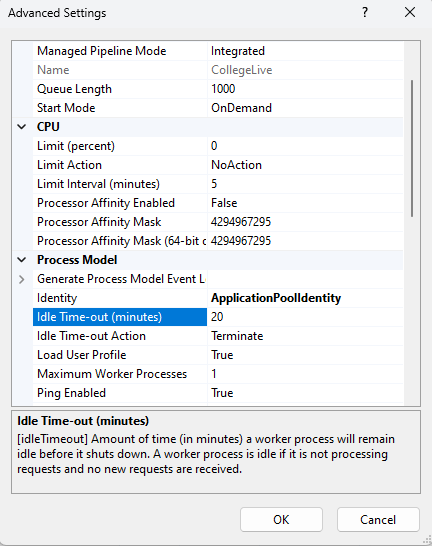
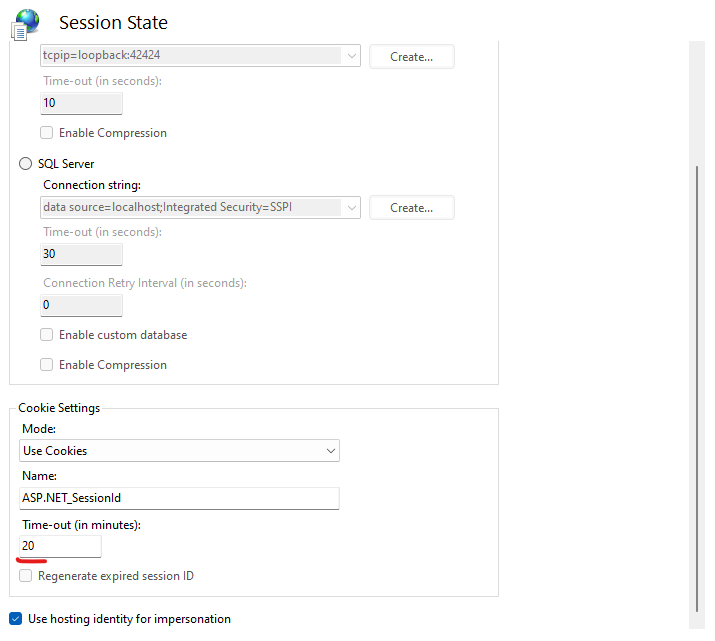
Website Timeout
The time before the user’s session will timeout due to inactivity. This is the lowest value between the Session Timeout and the Forms Authentication Timeout (when windows authentication is not used) in IIS. The default IIS values will usually be 20 minutes. This can be altered by altering the settings within IIS. Users are given a warning message 2 minutes before the session will timeout warning them.
The following should be changed:
CPU Usage
The % CPU usage on the web server.
Memory Usage
The % memory usage on the web server.
Database
Information about the SQL Server database the system is connecting to including the Server Name, Database Name, Database version and how it is connecting.
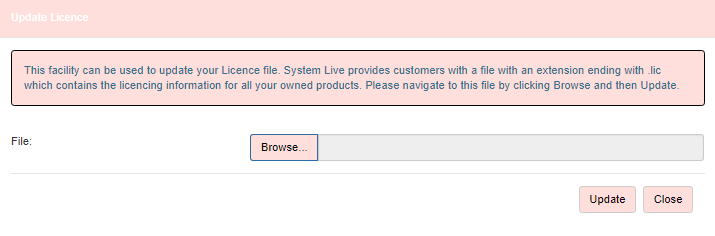
Licences
Shows the licences from the .lic file in the UserArea in the root of the website as well as whether the licence is valid or not. On startup system contacts the System Live server to verify the licence keys are correct.
The Actions Panel has an Update Licence function which allows the college to import a new licence file into the system. This might be appropriate if a college purchasing a new product.
The file ending in .lic can be browsed for and then updated. Please note that in order to be able to modify the licence file in the website the user will need write permission on the Licence.lic file in the UserArea folder of the web server. For a standard installation this will mean providing write permission on the IIS_IUSRS account.
Once the licence file is updated new functionality will display within the website.
Microsoft365
This tab is designed to troubleshoot problems with connecting to Microsoft 365.
Connection to Microsoft Graph Website: When the website first starts up it checks if the website can connect to the website https://graph.microsoft.com/v1.0. This is needed so that the College Live can access Microsoft 365 calendar information. If the website cannot connect to this url then the system will not be able to use the Microsoft365 functionality. The flag here shows whether the connection has been made. If it is not ticked most likely the firewall on the webserver is preventing the system from connecting to the following website. Once fixed click the Refresh button to try the connection again.
The college will also need to add a certificate to their website so that it start https in order to access this functionality for security reasons.
Once this connection is made the user can try to connect to Microsoft 365. Then the user can click the ‘Download User File’ and ‘Download Calendar’ buttons. The ‘Download User File’ tries to connect to the User’s Microsoft 365 account and download information about them. The ‘Download Calendar File’ tries to download calendar information for the user. Both files generated might give a clue as to why the Microsoft 365 functionality is not working for the user.
Accessed from the Search menu
Organisation Structure Definition
The college can decide how many structure levels to use and what each of these levels should be named. This will decide whether columns/labels are visible throughout the system and what they are called. There are various settings against each level which affect how the system interacts with these levels.
Clicking the detail row will allow the user to edit the level.
Organisation Structure List
This tab shows a list of organisation structure, along with the manager of the area and where the area sits within the structure hierarchy.
If the user has the Permission ‘Can view all Organisation Structure’ then they will see all the areas. Only users with this permission can add new Organisation Structure. If the user does not have this permission then they will see just the areas which they are manager of. Managers of organisation structure receive an enhanced permission level which allows them to see information and perform actions that standard users cannot do, for example see all Schemes of Work in the college. Only staff which are a Manager will see this page. There is also a permission called ‘Impersonate Manager of Organisation Structure’ which will allow the user to see this page and also the extra functionality which a Manager of Organisation Structure gets. This is useful for an administrator who is not a Organisation Structure Manager to still be able to see the functionality available to them.
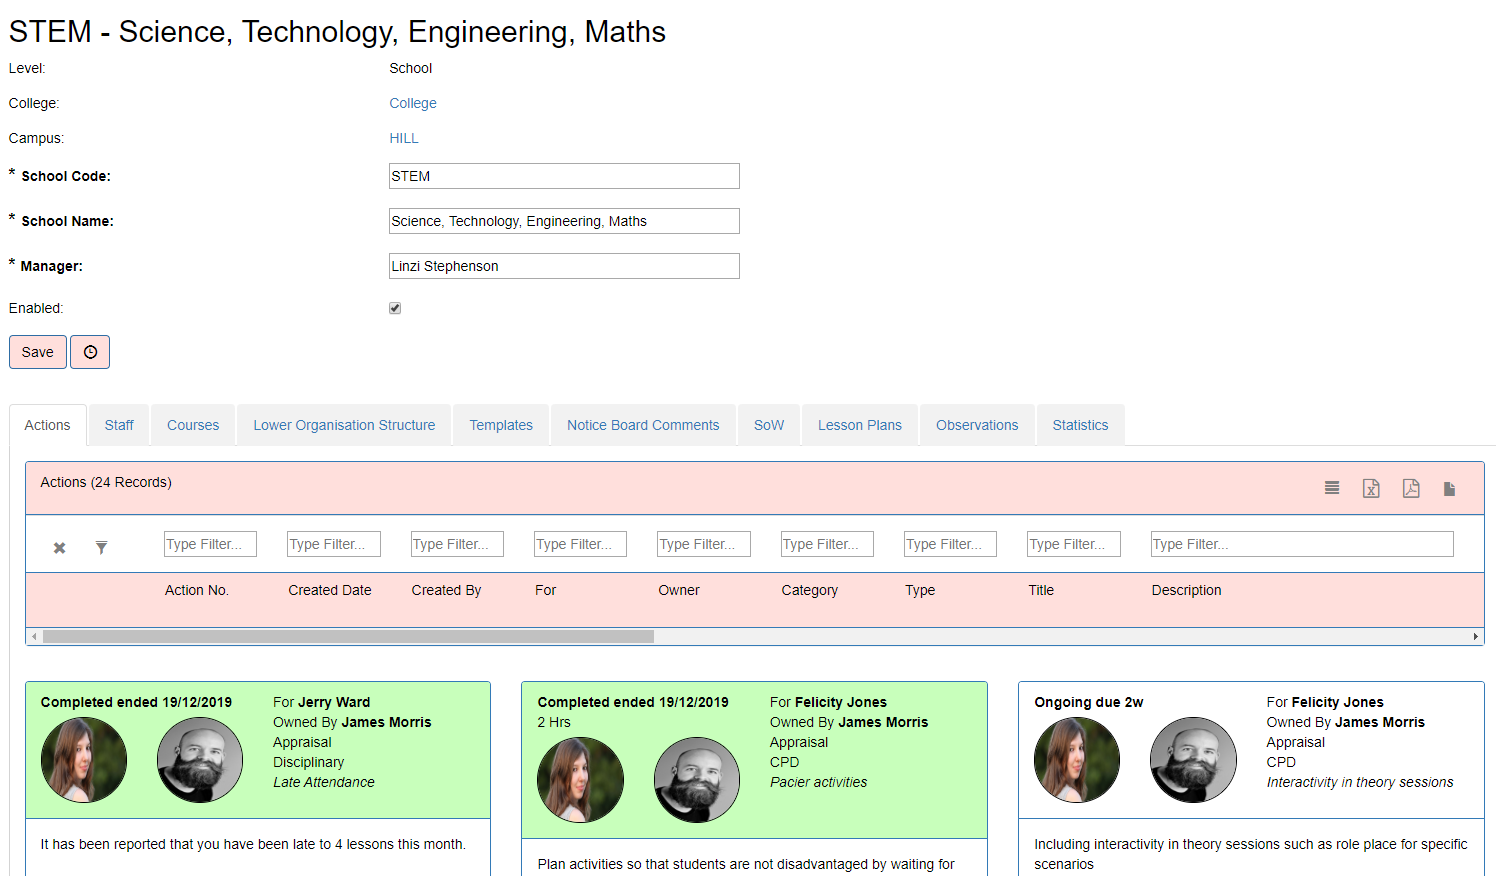
Clicking the detail button at the beginning of the row will take the user to the Organisation Structure Details screen. From the details screen the manager can:
Action Tab
A list of all Actions within the Organisation Structure. Actions can be added to the Organisation Structure within this tab if the provider is licenced for Action Live.
Staff Tab
The staff tab shows all the staff within the area. Staff can be removed or added as appropriate. The user can select from any enabled staff member in the system. The Head of the Area can make the staff member a validator. This means that they can set Schemes of Work and Lesson Plans as validated.
When the member of staff logs in they will only see courses in their area to add Schemes of Work and Lesson Plans.
Staff added to lower levels will also be visible. For example when viewing a Campus then all staff assigned to Departments will be visible.
The mentors and mentees for each member of staff will also be shown.
Course Tab
The course tab shows all the courses within the area. The user can select from any course in the system. Courses added to lower levels will also be visible. For example when viewing a Campus then all courses assigned to Departments will be visible.
When adding a new course the user can tick ‘Replace Temporary/Old Course’ to replace an existing course. The user can select the course to replace. This will copy all the Schemes of Works and Lesson Plans from the old course group onto the new course and disable the old course so it is no longer available. The Planning Process often starts before the new academic year which can be before new courses have been added into the MIS system. Teachers can still plan for new courses not yet in the system by creating a temporary course or they could use an old but similar course. Once the real course is known the Manager of the Area can replace these temporary or new courses with the actual course.
When adding a new subject Observation the system will try to place the observation into the correct organisation area based on which area the course sits in.
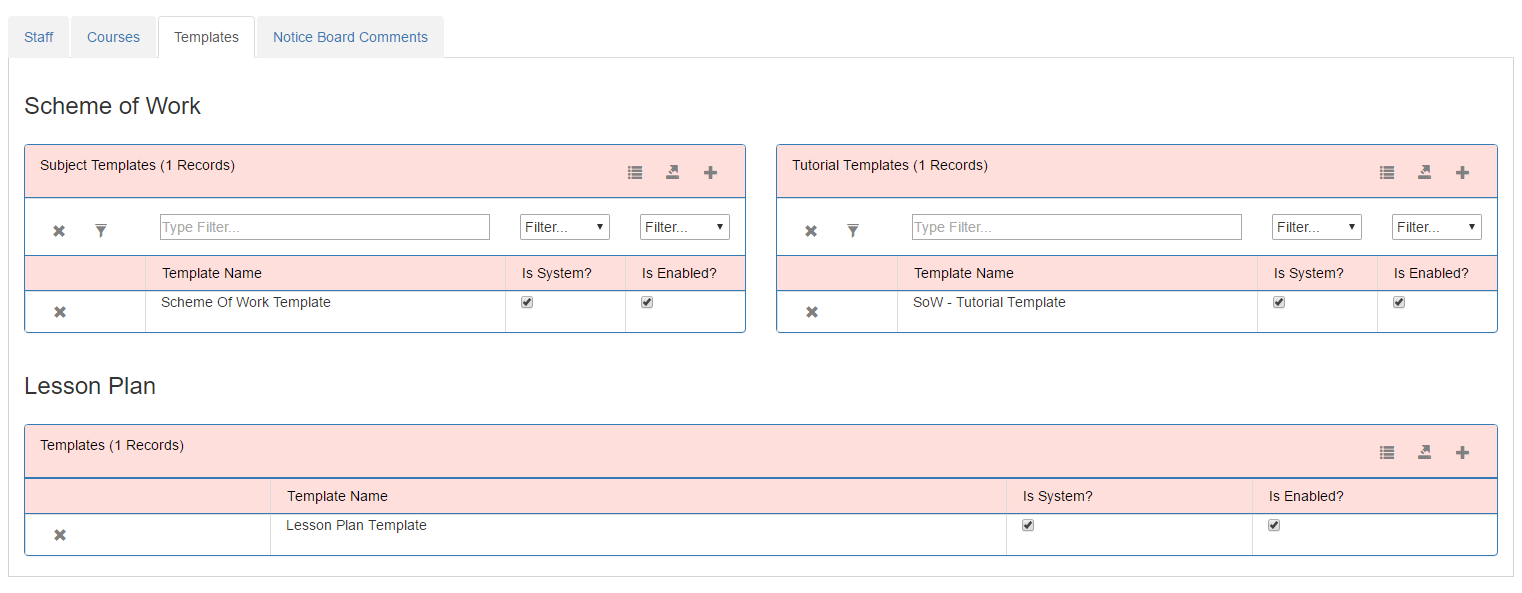
Templates Tab (Planning Live only)
This tab will only be displayed if the system setting ‘Managers Define Templates’ is set to true.
The templates tab allows the Manager to allocate templates for Schemes of Work and Lesson Plans. Templates govern the look of the Scheme of Work and Lesson Plans. This allows Managers to tailor them to their area. When the Organisation Structure is created any default templates will automatically be associated with the area as long as the setting against the level definition ‘can add templates’ is set to true. For example templates might be added at the department level and not school level.
The Manager can add a new template by clicking the add new button on the grid. This will allow the Manager to choose from an existing system template or create their own template. When a new template is created the user must select an existing template to use as the basis, which can later be modified.
When members of staff create new Schemes of Work and Lesson Plans or edit existing ones they can only select templates from the list of templates the Manager has allocated. Templates assigned to higher levels will also be shown here. For example templates allocated to a School will be shown against each underlying department.
Notice Board Tab (Planning Live only)
The Notice Board tab allows Managers to put notices on the home page for Planning Live for the staff to see. The Manager is limited to 5 notices. Existing notices can be disabled to remove them from the homepage. This feature is a useful way for Managers to convey important information such as deadlines to their staff.
Schemes of Work Tab (Planning Live only)
A list of Schemes of Work within the area. For subject based Schemes of Work these are any Schemes of Work whose Course lives in the area. For Tutorial based Schemes of Work these are any Schemes of Work whose staff lives in the area. The user will be able to go directly to the Scheme of Work by clicking the ‘...’ button.
Lesson Plan Tab (Planning Live only)
A list of Lesson Plans within the area. For subject based Lesson Plan these are any Lesson Plans whose Course lives in the area. For Tutorial based Lesson Plans these are any Lesson Plans whose staff lives in the area. The user will be able to go directly to the Lesson Plan by clicking the ‘...’ button.
Notification Tab (Notification Live only)
A list of App Notifications sent within the Organisation Structure with the ability to create new notifications.
Observation Tab (Observation Live only)
A list of Observations within the area. Observations can be placed within an organisation structure area. The user will be able to go directly to the Observation by clicking the ‘...’ button.
Mentoring Tab (Observation Live only)
View/Add Mentoring pairings for staff within the area.
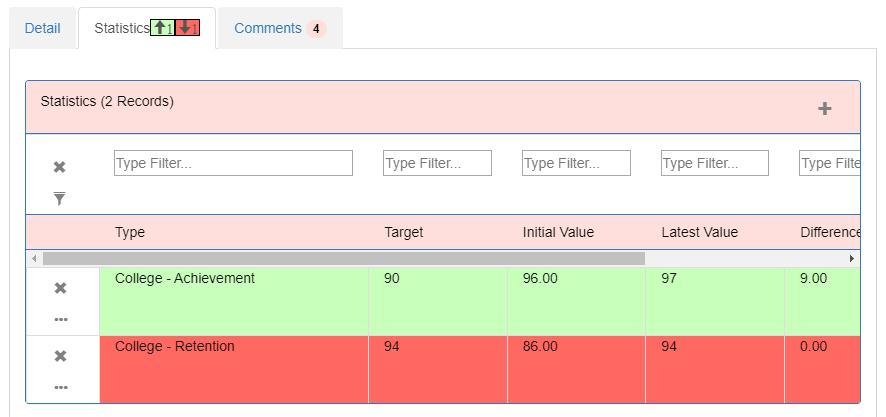
Statistics Tab
All the statistics imported against the organisation structure within the Statistic Organisation Structure import.
Progress Tab
Progress Tracker to record professional judgements across the year for Grade Live colleges.
GradeBook Tab
GradeBook for Grade Live colleges.
Accessed from the Maintenance menu
The homepage Notice Board allows notice board messages to be edited, added and deleted from the homepage. The page is split into 3 tabs for each User Type: Staff, Student and Parent. This means that different user types can be shown different messages which are more appropriate for the user type. Messages can either be flagged as ‘Is Main’. Main messages will appear at the top of the homepage. Non main messages will appear within the ‘Notice Board’ section of the homepage along with any messages set by the Manager.
Each Product i.e. Planning Live, Observation Live, Action has its own Homepage. Each message can be assigned to one or more products. This will then appear on the product’s homepage section.
Accessed from the Maintenance menu
When adding posts to the Wall each post need to have a category assigned. Categories can be set up by the college under Maintenance > Wall Post Category. Each category has:
This allows a lot of flexibility. Wall categories could be very restricted or open to all. Wall categories could be added by fewer people but available for all to view or comment on, etc.
Accessed from the Maintenance menu
The Rooms tab allows user to edit, add and delete rooms. A room has a code, description, photo and room type. If the college hold the rooms on a SQL Server database then they can be imported into the system using the Room import.
The Rooms Type tab allows users to edit, add or delete room types. A Room Type consists of a description e.g. classroom, workshop etc.
Accessed from the Maintenance menu
Templates govern how the Scheme of Work, Lesson Plans, Observations, Observation Moderations, Action Types and ILP Editable Sections will look. This includes labels, guide text, visibility of text boxes etc. The system ships with a standard template for Schemes of Work (both Subject and Tutorial) and Lesson Plans and Observations and Action Types. The College will probably wish to alter these to fit their processes and/or create additional templates for different types of courses or observations. Schemes of Work, Lesson Plans, Observations, Observation Moderations and Actions can be associated with a template.
The screen splits out Templates into Subject Scheme of Work, Tutorial Scheme of Work,Lesson Plans, Observations, Moderations, Action Types and Editable Sections. Subject schemes of work are for courses as opposed to tutorials. Colleges will often have a different mechanism for schemes of work for courses and tutorials. New templates can be added from this screen. A new template needs a name to identify it. The user can either create a blank template or select an existing template to use as a basis for the new template.
The side Actions Panel allows the user to:
Clicking the details button against the row allows the user to modify the template.
Template Details
Template Type
Either Subject Scheme of Work, Tutorial Scheme of Work, Lesson Plan, Observation, Action Type or Editable Section.
Template Name
A unique name to identify the template.
Is Fixed
These are templates shipped with the system and cannot be deleted. They can still be modified.
Is System (Schemes of Work and Lesson Plan Templates only)
These are templates which have not been created specifically by the Organisation Structure Manager for their own use. These are available for use outside of a particular area.
Is Default
For Scheme of Work and Lesson Plan templates flagged as default will automatically be allocated to Organisation Structure when they are created (as long as the organisation structure level definition is set to ‘can add template’). For Observation templates, when creating a new observation the template flagged as default will be selected by default.
Is Enabled
Unticking this flag will mean that the template can no longer be selected in the system.
Master Scheme of Work (Scheme of Work template only)
The Scheme of Work Template can be optionally associated with a master scheme of work. This means that when the user creates a new scheme of work of this type all the data from the master scheme of work including underlying lesson plans will be copied into the new scheme of work. The only elements of the master scheme of work which will not be copied are the Teachers and Owners. This option is particularly useful for Tutorial or Cross College schemes of work to standardise the scheme of work creation across a broad spectrum of the college e.g. all functional skills level 2 courses.
Student Visibility (Scheme of Work and Lesson Plan templates only)
The Template decides how Schemes of Work and Lesson Plans will be made available to Students and parents. The options against the Template can be split up into those which are automatic and those where the visibility has to be manually set.
Scheme of Work - Automatic
Scheme of Work -Manual
Lesson Plan - Automatic
Lesson Plan - Manual
Validation Period (Scheme of Work templates only)
The Scheme of Work can be associated with a Validation Period. The Validation Periods are defined under Maintenance > Validation Period. This allows the scheme of work to be validated once or more than once as appropriate. For example some colleges might wish to validate once per year, others once per term. Altering this will alter the Validation section on the Scheme of Work Detail tab. Note that if the scheme of work does not have any validation period associated then the validation section will not appear. The scheme of work will appear different if the scheme of work is associated with just one validation period or multiple validation periods.
Teacher Visibility/Organisation Structure Manager Visibility (Observation Templates only)
The Template decides how Observations will be made available to Teachers and Managers. The options against the Template can be split up into those which are automatic and those where the visibility has to be manually set.
Automatic
Manual
Observation Evidence (Observation Templates only)
The template can be associated with an Observation Evidence checklist set up within the Maintenance > Observation Evidence page. This allows observers to quickly tick off preselected evidence lists within the observation or quickly drag a piece of evidence into a text box. If no list is selected then the observation will not show an observation evidence action.
Observation Grade Scheme (Observation Templates only)
The template can be associated with a Grade Scheme. The Grade scheme dictates the list on the Observation Detail tab under the Overall Grade section. Different Observation Grade Schemes can be set up within the Maintenance > Observation Grade Scheme page. If no observation grade scheme is selected then the overall grade section on the observation will not appear.
Additionally when using the Grade Automation below the grade scheme allows a numerical score to be converted to a grade. For example 1.75 might be converted to a Good.
Observation Grade Automation Operator (Observation Templates only)
Used in conjunction with the Grade Automation grid. The Grade Automation grid allows the template to automate the overall grade based on observation fields which have an input type of ‘Overall Grade Scheme’. For example the college might decide that the overall grade is based on 3 fields on the Observation Section A tab. If the Grade operator is set to Average and for example the field values are 1,2 and 4 then the system will work out an average of 7/4 = 1.75. The Observation Grade Scheme then converts this value to a grade based on a range. Say ‘Good’ lies between 1 and 2 then this observation will be given a Good. The operators available are:
Observation Permission Group (Observation Templates only)
Only users within the permission group(s) can be added as observers to the particular observation type.
Action Category (Action Type Only)
Places the action type within a category. Action categories can be maintained under Maintenance > Action Categories. Please see the Action Live Documentation for more details. When adding actions the user can optionally select the category. This will restrict the types to just those in the category. It is also extensively used throughout the system for reporting.
Action Tag List (Action Type Only)
Actions can optionally have tags associated with them. These tags lists can be created from the Template > Template List screen and associated to the action type. Each action can be given multiple tags and is a way to categorise actions in a similar way to action types. The advantage is that tags can be used across different action types.
Action Stage Group (Action Type Only)
Decides on the Action Stages which can be selected on the comments tab of the action. Action stages record the progress of the action. The default action stage has the stages of Not Started, Ongoing, Completed, Not Completed and Cancelled. Other action stages can created under Maintenance > Action Stage. Please see the Action Live Documentation for more details.
Allow Email (Action Type Only)
If this option is ticked then the user can send emails to staff related to the action when adding an action or creating comments. Note that if the action is created through the Mobile App the Default For and Default Owner will receive an email.
Allow Notification (Action Type Only)
If this option is ticked then the user can send notifications to staff related to the action when adding an action or creating comments. Note that if the action is created through the Mobile App the Default For and Default Owner will receive a notification.
Show Action Hours (Action Type Only)
If this option is ticked on the comments tab the user can say how many hours have gone into the action so far.
Show Action Progress (Action Type Only)
If this option is ticked on the comments tab the user can say the % progress gone into the action so far.
Default For (Action Type Only)
When this type of action is selected the For Staff in the action will be automatically populated with this member of staff.
Default Owner (Action Type Only)
When this type of action is selected the Owner Staff in the action will be automatically populated with this member of staff.
Default Due Days in the Future
When this type of action is selected the due date will be automatically populated x number of days in the future from now.
Permission Group Share (Action Type Only)
When adding the action these permissions groups are automatically added to the share tab of the action. These users then see these shared actions under Actions > Shared Actions.
Permission Group Use (Action Type Only)
Only users in these permissions groups can select actions of this type.
Statistics Grid (Action Type Only)
Select statistics for organisation structure and staff to be tracked against the action. These statistics need to firstly be set up for each year (See the Statistics Columns section for more details).
Description Bank (Action Type Only)
Predefined action description text. When adding a new action of this type the user can select from a list of predefined text to quickly populate the action description field. This can be useful for standardising certain types of actions across your organisation.
Once these columns are enabled and given appropriate names they will be able to be selected within the grid by clicking add.
Choose the statistic. Optionally a default target can be set which defaults the target value for this statistic against the action. Also can choose the ‘Auto Add’ option. This means that when a new action is added the statistic is automatically monitored otherwise the user has to add the statistic manually.
Table Name (Editable Section Only)
The SQL database table to save the Editable Section. This will be saved within the Student schema. The table will contain the following columns:
Creating the template will create the SQL table. Changing the table name will create a new table if it does not exist. Multiple templates can share the same table name.
Allow Multiple Records (Editable Section Only)
This option decides whether one record can be added for each student or multiple entries. If there is one entry for each student there will be a series of inputs with a save button on the top of the section If there are multiple entries per student then this will appear as a grid with an add button and a delete/edit button against each row. The add/edit button will open a popup with a series of inputs.
Allow Bulk Add (Editable Section Only)
This option decides whether the template is available on the ‘Bulk Add ILP’ on the Group Details page’s side panel. Allows data to be added for multiple students at once. Only available if ‘Allow Multiple Records’ is ticked.
Allow Resource (Editable Section Only)
When this is checked the template has a section called ‘Resources’ where files or hyperlinks can be attached to the record. In order for the user to be able to add/delete records from the Resource grids the user’s permission group will need to be able to edit the first field within the template.
Copy Into Action
The Copy Into Action allows the user to copy the entire content of a template into the current template. This rapidly allows templates to be made identical before further modification takes place. Clicking ‘Copy Into’ will show a list of templates. The user can select the template which they wish to copy into the current template.
Download SQL File (Editable Section Only)
This will download a SQL file to be able to interrogate the data within the Student.[TableName] schema. Administrators can use this SQL in their reporting. As the fields in the table are named Input1-60, this will alias each field with the template input name to be able to interrogate the data more easily. For example ‘T.Input1 AS [Subjects Student is planning to apply for]’
Add to Each Organisation Structure Action (Schemes of Work and Lesson Plan Only)
Adds the template into each organisation structure. The levels which are affected are governed by the organisation level setting ‘Can Add Templates’. If multiple levels have the setting ‘Can Add Templates’ then only the highest level will have the templates added.
Edit Template
The Edit Template button allows the user to edit a specific part of the template.
The Tabs can each be edited. The Tab can be renamed or turned on/off for different Permission Groups. An overall Guide Text Comment can be added where a college can describe to users what is expected on each tab.
Input Areas can be edited on most of the tabs on the Scheme of Work, Lesson Plan and Observation.
Label Text
The label above the text box can be altered. Formatting of the text can be applied.
Guide Text
Guide Text can be added to give more information for how the staff or student should fill it in. Different guide text can be given for different user types: Staff, Students and Parents. Formatting of the text can be applied. Note that students and parents are not appropriate in Observation Live.
Input Type
The input can be either Text Area, Rich Text Area, Dropdown or Observation Grade Scheme.
Template Default Text
The text to display if there is no data already within the input. This can be used as a prompt for how to fill in the input or default value in the dropdown list. Note that if this is a date field the format should be yyyy-mm-dd e.g. 2018-09-30. If this is a check box then this should be true/false.
Statistic (Observation Templates Only)
Each statistic column against either the course, group or staff can be associated with the input field. For example, if the statistic column of ‘Group - Attendance’ were to be selected then the Group’s Attendance will be shown above the input field for the observer to comment on. The group’s attendance figure would update every night but once the observer saves text into the input field the group’s attendance for today will be stored against the observation itself.
Required
In some cases the field can be made required. The user can choose from the following.
Format
Only available if the input type is Text Box. When saving the field the Format is checked whether it is valid. If invalid the user will get a warning message saying that the data is incorrect with a message about which input and why. Examples include Email Address or Number or Whole Number etc. New Formats can be added from the Template > Format tab.
Template List
The list to associate the dropdown with. These configurable list of values can be altered from the Template > Template list tab.
Observation Grade Scheme List
The list of observation grades associated with the dropdown list. These configurable list of values can be altered from the Maintenance > Observation Grade Scheme.
Text Box Height
The height of the Text Area in pixels.
Width
The relative width of the text area when viewed on PC sized monitors. Choose a value from 0 to 12. The page is essentially split up into 12ths. 12 would take up 100% of the page width, 6 would take up 50% of the page width etc.
Order
The order in which the input areas appear within the tab.
Can be Viewed/Edited By:
Decides which Permission Group can view or edit the input. For Action Type templates this is not permission groups but is who the action is for/creator/owner or viewer. If neither view or edit then the input will not appear. If just view the input will appear read only. If view and edit then the input will appear and can be altered.
The below example shows how labels and guide text and input types affect the look of the input.
Schemes of Work Content
Default Lessons can be added. When the user saves the start dates, number of weeks and lesson per week on the scheme of work then default lessons will be automatically populated. For example Lesson 2 in tutorials always involves talking about careers. This information can be auto added for every tutorial. This can subsequently be modified by the user.
The Lesson columns can be renamed and turned on or off. Up to 6 text columns can be displayed.
The relative column width can be altered for the 6 columns. There are 10 units of width. For example if the Scheme of Work content has 3 columns. The first one could be give a width of 7, the second 2, and the third 1. This will mean that the first column will take up 70% of the available width, the second 20% and the third 10%. For the Scheme of Work content it is important that the widths of the visible columns add up to 10.
Lesson Plan Content
Default Activities can be added. When users add an activity against the lesson they can choose from a default activity to auto-populate the row. For example the first 5 minutes of the lesson always involves taking a register. This can subsequently be modified by the user.
The Lesson Activity columns can be renamed and turned on or off. Up to 6 text columns can be displayed.
The relative column width can be altered for the 6 columns. There are 9 units of width. For example if the Scheme of Work content has 3 columns. The first one could be give a width of 6, the second 2, and the third 1. For the Lesson Plan content it is important that the widths of the visible columns add up to 9.
Template List Tab
The Template List tab allows administrators to create a list of options to be selectable within the template.
The tab shows all list names. New lists can be added, existing lists can be edited and lists can be deleted.
Clicking the detail button allows the user to change the list. There are 2 types of dropdown lists - Manual and SQL.
For manual types values can be added, deleted and edited from the list. The items can be ordered. If the order is left blank the list will be ordered alphabetically. Each item can be either enabled or disabled. If the item is disabled then it will not appear within the list.
The above example shows a list called Activity Type with various values. If this list was associated with a section of the template the user will be shown a list with the 4 values to choose from
For SQL Types the user will be able to add their own dynamic SQL:
Dynamic Parameters can also be passed into the SQL:
Format Tab
The system ships with the following Formats:
New Formats can be created:
Academic Years
Accessed from the Maintenance menu
This screen shows each academic year. Clicking the details button allows the academic year to be modified.
Enabled
Enabled academic years can be selected within every academic year dropdown in the system for instance on the top menu. It is recommended to only enable 2 or 3 academic years, this can be the next academic year, this academic year and the previous academic year. This should keep the system streamlined. Administrators should make sure that the current academic year is always enabled.
Can Add Temp Course (Planning Live only)
The Planning Process often starts before the new academic year which can be before new courses have been added into the MIS system. Teachers can still plan for new courses not yet in the system by creating a temporary course.
When this setting is enabled when creating a new Scheme of Work the user can select the tick box ‘Can't see your course then tick here’. This will allow the user to add in a new course.
The administrator should decide when temporary courses can be added into the system. When the courses are fully known and imported into the system then the administrator can turn the setting off to stop further temporary courses from being added.
Copy Academic Year Action
The Academic Year screen has an Action to Copy Academic Years. This should be primarily used at the beginning of the Academic Year to quickly populate the new academic year.
There are various options to copy including
Holidays has the extra option of moving the dates by a number of days. For example if a holiday went from 16/10/2017 to 20/10/2017 and the holidays were moved by 1 day the new holiday would go from 17/10/2017 to 21/10/2017. This is to take into account that weekdays shift each years. Also note that this number can be negative e.g. -6.
Organisation Structures also has the option to copy
As this tool is primarily used at the start of the academic year then data will only be copied if the section being copied does not already include data. The option clear data first will firstly remove data from the section before adding it back in and should be used with caution if the data is not needed.
There are various parts of the system which show statistical information which has been imported. This page allows these statistics to be configured.
The page displays a grid with the following columns:
The data can be altered by clicking the ‘...’ button.
It is up to the college to decide which statistical information might be appropriate for courses, groups, staff and organisation structure.
This screen only decides what the columns are called and whether they are displayed. In order to actually populate this data the following imports would need to be set up and run for columns which are set to ‘Can Edit Manually’ as false:
If ‘Can Edit Manually’ is true then these columns can be edited from within the Statistic tab on the Details page if the user has the permission ‘Can Edit Manual Statistics’.
For the Student and Enrolments tabs the Journey Bands can also be set.
The Group Profile tab shows information about the students and enrolments within the group.
Student Information
The Student Information tab shows all the students in the group with their Photo, Student Ref, Date of Birth, Ethnicity, Learning Difficulty and up to 4 User Defined import fields. The photo can also display a colour border around it. These can be imported via the student import and configured within the System > System Settings to change column names and visibility.
Each row may provide a link to an online ILP (Individual Learner Plan) and ALS (Additional Learner Support) if this has been set up within the enrolment import by the administrator. If this is set up then the student’s ILP e.g. ProMonitor will appear in a separate tab and provide a very quick access method to the student’s data.
Each row also contains an email button if the student has an email address which will create an email in the user’s default email client. For the group profile on the scheme of work and lesson plan page this link contains a direct link to the scheme of work and the lesson plan. Each row contains a … button which will take the user to the student page within the system to be able to see an overview of the student within the system e.g. all schemes of work, lesson plans, actions etc.
Colleges with Journey Live will also see details about each student’s Journey score here.
Student Overview
The student overview section shows a breakdown of the number of learners by Ethnicity, Learning Difficulty, Age and up to 4 User Defined Import fields.
Enrolment Information
The enrolment information tab shows the target grades, course attendance, course punctuality. It also shows the GCSE Maths and English Grades, and the Initial Assessment Maths and English grades gained by the student where these are available. Colleges with Journey Live will also see details about each enrolment’s journey score here.
College Live products come with sophisticated inbuilt reporting technologies.
The dashboard reporting home page can be accessed from the menu.
This comprises of various dashboards depending on which products your college owns and which dashboard your user has permission to. Please see the Permission section for more detail about changing permissions.
Dashboards are arranged in sections. Each product has its own section. Each dashboard within the section provides a link which takes the user to the specific dashboard.
A dashboard is made up of various sections. The sections which might be shown on a dashboard include:
Label
Formatted text describing the features of the dashboard. This can include pictures or hyperlinks.
Column Chart
A vertical chart with columns on the x-axis and values on the y-axis.
Pie Chart
Line Chart
Scatter Chart
A point chart with numerical values on the x and y axis.
Gauge
A dial with an arrow pointing to a value. The gauge might also be colour coded at different values.
Headline
A series of headline figures displayed in a text format.
Webpage
A web page which loads up within the dashboard.
Grid
A filterable and sortable and exportable data grid often with hyperlinks to different pages in the system. Please see the General grid section for more details about how to use the print.
Each section has the following key features
Side Panel
The side panel may contains various actions including:
Full Screen Mode
This will open up the dashboard without the top menu and the side panel. This is useful for example if the dashboard should be displayed in a lobby with key data displayed.
Print Dashboard
Clicking this action will open the webpage in a printable format.
Import Dashboard
Some dashboards may contain an import option. Colleges can ask System Live to create custom dashboards for the college. System Live will then provide you with a .dash file which can be imported into the dashboard. Once imported the dashboard will show the new sections.
Dashboards
The dashboards which the user has access to will be displayed here. This is a quick way of navigating between different dashboards.
Filters
A dashboard may contain filter options. Filters allow the user to restrict the data shown within the dashboard.
Each filter contains:
The entire dashboard can be reloaded by clicking the reload button. Alternatively an individual section can be updated by clicking the refresh button against the section.
The dashboard filters can be saved and later re-applied when loading the dashboard by bookmarking the url after clicking the Reload button. The url contains all the information required to load up the dashboard with all the filters.
Accessed from the Communication menu
The Wall is a cross between a forum and the wall you would find within social media applications such as LinkedIn or Facebook. The concept is that it is a collaborative zone for members of staff to post about aspects of teaching and learning so that other members of staff can view and comment on these posts.
The wall can be used within all products. A few examples on how it might be used below:
When viewing the Wall itself the user will see all the posts which they have permissions to see. The list can be filtered or sorted on the top section in the same way a standard grid can be filtered. For example the user could search for certain categories or posts by a certain user. By default the wall shows those most recently added or modified first. The side panel also shows a list of all the wall categories and how many posts there are of each. Clicking these links will open the page for just this category. You could save this link in your browser if you want to access just this category regularly.
Each post shows:
New posts can be added by either:
Only users who have permission to edit the wall page will see these options. Once clicked this will open a popup which contains:
Clicking save will add the post to the wall for users to view.
Accessed from the Communication menu
The calendar brings together time based information across all modules.
The user can decide which information to show within the calendar or not show the information at all.
The months in the calendar can be navigated forwards and backwards.
Each event will appear in the calendar under the date. Dates with information against them will appear with a grey background. Clicking the event will take the user to the appropriate page where this data lives.
Clicking the date itself will show more information under the calendar about the events within the date.
The Actions page allows the user to search for various actions. For staff there are several tabs
Bulk Update
The Bulk Update includes the ability to update more than one action at once. Updates available include:
The ‘Bulk Update’ option is only available for users with the permission ‘Can Bulk Update Actions’.
To use this feature:
There is the option to Copy the Action to the next academic year if the user wishes to roll over the action. This still keeps a copy of the action in the current academic year. When choosing to copy and update actions together there is also the option to choose the update order: either ‘Copy Then Update’ or ‘Update Then Copy’.
For example if you change the action stage from ‘Ongoing’ to ‘Cancelled’ and copy actions. If the option ‘Copy Then Update’ is selected then the copied action will still have the action stage of ‘Ongoing’ whilst the original action will be set to ‘Cancelled’. If the option ‘Update Then Copy’ is selected both the original action and the copied action will both be set to ‘Cancelled’.
Note then only actions where the action type and organisation structure exists in the next academic year can be copied. Please ensure that the next academic year is set up correctly before attempting to copy.
Quick Filter
The side panel contains a list of action stages which is a quick way of filtering the grid for a certain stage e.g. all those ongoing for example.
Actions lists appear in various parts of the system. The data can either be viewed in a grid or scorecard format. The user can go to the grid format by clicking the icon on the top right of the grid. And go back to the scorecard by clicking the icon.
Each action could contain the following information:
Actions can be filtered for or sorted from within the list. More details about the action can be displayed by clicking the ‘...’ button where the action can also be edited. The LP button will take the user to the lesson plan where the action is due. The OB button will take the user to the Observation where the action was created.
Actions can be printed individually or in bulk in a formatted pdf document. When printing in bulk the system will only print actions which are visible in the grid and so apply the same filters applied to the grid.
Note for administrators: Colleges who wish to alter the print format of the observation can go into the root folder of the website within UserArea > Reports and ensure a file named ‘ActionDetail.rdl’ is present. If the folder is not present then it should be created. The file can be copied from the Reports folder in the root of the website. This file can be then be altered using Microsoft Report Builder 3.0. When printing the observation the system will use the report definition in the userarea folder. To return to the default option simply delete the file.
Comments for the action can be quickly viewed by clicking the comment button at the beginning of the row rather than having to click the action itself. The button will also show the total number of comments.
Records in bold are those not viewed by the user or have since been modified since the user accessed the action. The action can also be flagged to be viewed later by clicking the flag button at the beginning of the row.
Actions will change colour depending on the stage. By default completed actions will appear green and actions which failed to complete will appear red. However these stages and colours can be altered if the provider owns Action Live. Please see the Action Live documentation for more details. The due date will appear red if the action’s due date has passed and it is still ongoing.
The action popup appears on each action grid to be able to edit the action or when adding a new action. This can be done from various parts of the system including an Observation, Lesson Plan, Action Page, Staff Action page, Organisation Structure Action page. The functionality does depend on the type of action.
Adding a New Action
Actions can be added by clicking the + button on the top right of some action grids.
Action For
Actions can be set for yourself or another member of staff or a student. Choosing the staff option will show a dropdown where any member of staff can be selected. Choosing the student option (only available within Lesson Plans) will show students within the associated group. Typing part of the name will restrict the list. Once created only the owner can change who the action is for.
Owner
The owner is the person responsible for completing the action.
Within an observation action by default this shows the manager of the organisation structure for the observation but another member of staff can be selected. Within a standard Action this will show the user creating the action.
Action Title
The title for the action to quickly identify it.
Action Category
A list of action categories. This is optional and is used to restrict the action types. The system will automatically work out the category based on the type.
Action Type
A list of predefined types set up within the system e.g. Improvement Plan. This is essentially a way of group actions. The list of action types will depend on the category selected and whether the user has the appropriate permission to view the action. See the Action Type section for more information about how action types can be added or modified.
For Lesson Plans only Lesson Plan action types will be shown.
Action Description
The main text field to give a detailed account of the action.
For Observation actions the Description can be populated from the text within the observation itself. The appropriate observation field can be selected and the update button clicked to update the description.
For action types which have a description bank the description can be populated. The appropriate description can be selected from the bank and the update button clicked to update the description.
Action Tags
A list of tags which can be associated with the area. The tags available are determined by the action type selected.
Start Date
The date when the action is due to start.
Due Date
The Date when the action is due to complete.
Created In Lesson (Lesson Plan only)
The lesson in which the action plan was created. This defaults to the current lesson being viewed.
Due In Lesson (Lesson Plan only)
The lesson in which the action is scheduled to be due to complete. The dropdown list will show all the lessons within the scheme of work with their associated dates and lesson number.
Send Email
A flag to email the staff/student and owner of the action when it is created. This relies on the staff/student having a valid email address and the system configured to be able to send emails. The action type determines whether the email option is available.
Send Notification (Notification Live Only)
A flag to send a notification to the staff/student and owner of the action when it is created. The action type determines whether the notification option is available.
Detail
Once an action has been created then it can be edited by clicking the details button against the row or by clicking the save and edit more details button.
Once saved the details tab will show additionally information.
On the top right of the action there will be a ‘flag’ button which allows the comment to be flagged to be able to be found easier later. There will also be a print button which will print the action in a formatted pdf.
The tabs available to edit will be determined by the action type. Actions may be simple with just a details tab or more complicated. Different tabs may be visible or editable to different users depending on their association with the action e.g. the creator may be able to edit more than who the action is for. The tabs available are:
Tabs A - C
Up to 3 configurable tabs can be added to the action type. Each of these tabs can have up to 20 input fields. These input fields can be text boxes, dropdown, check boxes etc. Each input/tab can be given a custom label and who can edit each input can be decided. This for example allows more precise feedback from the staff member who the action is for.
Share
Actions can be shared with different users or groups of users. These users will see all their shared actions on the action selection > Shared actions tab. The action type can be used to automatically share actions with a group of users when that action type is created. For example the Senior Leadership Team may wish to have certain types of comments shared with them.
The Users grid will show all the users which have been added through the permission groups as well as users who have been directly added within the users grid.
Statistics
Allows monitoring of statistics against the action. Statistics can either be updated nightly against the action from the imports or manually inputted against the action by the user. Each statistic can be monitored against a target value. From this information the college can see the impact of actions throughout the course of the action. This will show many statistics against the action are above or below target.
The Statistics grid shows all the statistics being tracked and shows the following information:
If the action type has been set to ‘Auto Add’ then these statistics will be added by default when adding the action. The user can still define their own target by clicking into the row. The Action Type templates defines the automatic statistics from the imports that are available to be monitored against the action. Please see the General Documentation for more details about configuring these.
The user can also add statistics to track. The user can either monitor ‘Default’ or ‘Custom’ statistics. The automatic statistics are the statistics which will be updated nightly with the imports. The user can add a statistic defined against the action type and also a target value for comparison.
Alternatively the user can monitor a ‘Custom’ statistic.
These are not automatically updated. The following information needs to be set up:
Once custom statistics are set these need to be manually updated on the ‘Comments’ tab.
Statistic Timeline
The change over time of these statistics can be overlaid with the action/comments timeline and action progress/hours. The impact over time of interventions can be directly seen against the statistical information. The graph shows:
Resources
This screen contains 2 grids
The total number of resources is shown in the tab itself.
Comments
Comments have three main functions:
The total number of comments will appear in the tab itself.
New Comment
A new comment can be added from here.
Comment: The comment text.
Send Email: Staff or student associated with the comment will receive an email saying that a new comment has been added.
Send Notification (Notification Live Only): Staff or student associated with the comment will receive a notification saying that a new comment has been added.
Set Action Reviewed: The action can be set as reviewed or not reviewed. Only the comment creator or owner can edit this status.
Set Action Stage: The current status of the action. Four statuses are available by default:
However for providers with Action Live different stages can be set up for different action types. Different stages may be available to different users e.g. the person who owns the action may be the only one who can set the stage to complete.
Set Action Progress %:
The current progress of the action from 0 - 100%. The Action Progress % visibility is determined by the action type. Choosing the stage can be set to automate the progress for providers using Action Live. Please see the Action Stage section in the Action Live documentation for editing this functionality.
Set Action Total Hours.
The total hours so far associated with the action. The visibility is determined by the action type.
Update Statistics
Update any ‘Custom’ statistics being tracked from the Statistics tab.
Existing Comments
This grid will display a thread of all comments against the action including who created the comment, when it was created, the comment itself, the stage, completion, outcome, total hours, progress % and each of the statistics being tracked. This way tracking of progress can be monitored.
The user who created the comment will be able to edit or delete the comment.
Accessed from the Search menu
The Course Selection screen is split out into 3 tabs.
My Courses
Displays all the courses where the user is either an owner or teacher of a scheme of work, or the user is associated with the course through the timetable import.
All Courses in Area
Displays all Courses in the user’s organisation structure area. For Managers shows all the courses in their area. For other staff shows all courses in the areas which they sit within.
All Courses
Displays all courses in the academic year regardless of whether or not there is a scheme of work against them. The user needs to permission ‘Can View All Courses’ to be able to access this tab.
Clicking the details button will take the user to the Course Detail page.
The screen is split up into various tabs
Enrolments
Enrolment information imported into the system against the course.
Groups
All the groups imported against the course.
Journey Scores
The Journey scores for each student on the course.
Observations
All the Observations against the course. Clicking the details button against the row will take the user to the Observation.
Progress
Progress Tracker to record professional judgements across the year for Grade Live colleges.
GradeBook
GradeBook for Grade Live colleges.
SOW
All the schemes of work against the course. Clicking the details button against the row will take the user to the scheme of work.
Lesson Plans
All the Lesson Plans against the course. Clicking the details button against the row will take the user to the Lesson Plan.
Aims
If the Course is associated with a Qualification Aim and information against the Aim has been imported then this will show information about the Qualification Aim for example Sector Subject Area or NVQ Level.
Organisation Structure
All the Organisation Structure which contain the course. Clicking the link will take the user to the Organisation Structure page. Please note that the user needs to have permission to the Organisation Structure page or be a Manager of an Organisation Structure to be able to view this page.
Statistics
All the statistics imported against the course within the Statistic Course import.
Accessed from the Search menu
On the search menu there is the option to search for Groups. There are 3 tabs
Each tab contains a filterable grid so for example if the code of the group is known then the grid can be quickly filtered. Clicking to ‘…’ button will take the user to the details screen for the particular group.
This screen shows details about the student and various tabs which display
Where appropriate the ‘...’ button will take the user to the appropriate record e.g. to view the scheme of work in more detail.
Accessed from the Search menu
The search staff screen allows the user to search for any member of staff in the system. The screen can be filtered for the particular member of staff. The screen gives the user an overview of the staff within the system.
Clicking into the staff details of a record will show information against the staff as well as the following information.
The Action ‘Merge Staff’ is available from the side panel.
The Staff Merge tools allows you to search for a legacy staff and copy all the data from the legacy record into this staff record. This should be used if Staff Codes change. By default the grids below will be filtered for the email address of this staff record but you can apply a different filter. Once happy click the record in the grid to highlight it.
The option 'Delete Legacy Record' will also delete the legacy staff or user record after the merge.
The option 'Merge User Record' will allow you to search for a legacy user and copy all the data from the legacy record into this staff user record. This should be used if the User Name also changes.
The ‘Ask AI’ option will allow the user to ask questions about the staff’s observations and actions.e.g. ‘Suggest an action to improve the quality of this teacher's teaching and learning’. In order to use this functionality the user needs to have the permission 'Can Use AI Staff’ and the Gemini AI needs to be configured under System > Gemini AI.
Accessed from the Search menu
On the search menu there is the option to search for students. There are 3 tabs
Each tab contains a filterable grid so for example if the surname of the student is known then the grid can be quickly filtered. Clicking the ‘…’ button will take the user to the details screen for the particular student.
This screen shows details about the student and various tabs which display
Where appropriate the ‘...’ button will take the user to the appropriate record e.g. to view the scheme of work in more detail.
Accessed from the Search menu
If you use either Observation Live or Action Live you can now tap into the Teaching Resources facility. This allows your college to add all Resources related to teaching in one central place for example Using IT, Questioning techniques, etc. When adding an action for a teacher either from a Lesson Observation or ad-hoc action using Action Live then teaching resources can be added to the action. For example the observer has identified Lesson Pace as an issue in the lesson. The action can be to improve Lesson Pace, with the Lesson Pace teaching resource attached to the action. This provides the teacher with a quick link to the resource and the ability to monitor progress e.g. the teacher has now read the resource and embedded it within their teaching.
A Teaching Resource essentially comprises of a richly formatted resource text and/or attached documents/links. Teaching resources sit within categories e.g. Teaching & Learning, Procedures, etc. Your college has full control over the categories and the teaching resources which sit within each category.
Teaching Resources can be viewed under the Search > Teaching Resource menu. The first page shows each category. A category consists of the following:
The main page also shows:
Users who have permission to edit teaching resources will also be able to:
The side panel displays a list of all teaching resources attached to you with a quick link to the teaching resource page.
Clicking the … button against the category will show the user more information about that category.
Teaching Resource Category Detail page
The top part of the page shows information about the category. Users who have the permission to edit teaching resources will be able edit the category detail.
The lower part of the page shows all the teaching resources within the category. A teaching resource consists of the following:
Users who have permission to edit teaching resources will also be able to:
The side panel displays a list of all teaching resources attached to you with a quick link to the teaching resource page.
Clicking the … button against the resource will show the user more information about that resource.
Teaching Resource Detail page
The teaching resource page shows all information about the teaching resource.
A member of staff can attach themselves to the teaching resource at the top of the page by adding their stage of completion - Not Started, Ongoing, Not Completed, Cancelled, Completed. They can also add a brief note to describe how they are getting on with the resource. Note that the teacher can completely remove themselves from a resource by completely removing the stage and saving.
Users who have permission to edit teaching resources will also be able to:
The side panel displays a list of all teaching resources attached to you or within the category with a quick link to the teaching resource page.
If the teaching resource has been added to a member of staff through an action then the side panel will display a quick link to the action. Any change of the stage of completion will be logged against the action as a comment e.g. Lesson Pace.