Grade Live Documentation
Grade Live consists of two main parts:
GradeBook
The GradeBook lets tutors set and mark work across the year. The system is highly flexible and allows for GradeBooks to be created for all different types of qualifications e.g. Vocational, A-Levels, GCSE, Functional Skills, Degrees, etc.
The Tutor has full control over their GradeBook and can decide how their GradeBook is structured for example:
The GradeBook allows for up to a 3 level hierarchy of gradable elements. The Tutor can decide how many levels to use and what each level is called. Within each level the tutor can decide what they want to record. For example, for an assessment the tutor can decide to record the expected date for that assessment. Or the tutor might want to set a Target Grade for a Unit. Many more configuration options are available. This allows the tutor to make their GradeBooks their own.
The tutor can also copy configurations from other similar qualifications already set up within Grade Live by themselves or other tutors.
The tutor can manually add elements to their GradeBook and quickly see how all elements relate to one another. Depending on the configuration the following options are available:
The tutor can also copy GradeBook elements from an already configured GradeBook elsewhere within the system or a library of elements. This could be from a previous academic year for example or from a gradebook provided by another college!
Heads of Departments can validate Gradebooks to make sure they have been set up correctly. The college can then analyse which GradeBooks have been validated and which have not.
Marking work is really easy and flexible in GradeLive with just one highly flexible input form.
The tutor can pick any element or set of elements to mark. The tutor can pick any student or multiple students within their group. This is highly flexible and lets the tutor easily mark the work they need to mark. For instance:
For each GradeBook Element depending on the configuration options chosen by the tutor the following can be inputted:
The tutor can quickly bulk update information in the markbook e.g. set all criteria as complete for a student. Or the tutor can apply more complicated automation e.g. ‘Unit Grade is P,M,D when all P,M,D Criteria are Completed’ or ‘Unit Mark is Average Assessment Mark’.
The tutor can also quickly see any overdue or upcoming assessments. If the tutor so wishes they can allow students to give feedback for the element.
The GradeBook can be exported to Excel beautifully formatted.
The college can create their own printable versions for different qualification needs.
We believe that the data entered into the GradeBook should be transparent across the college to easily see problem groups or students. The data can easily be analysed at college, department or course level.
The information that can be easily analysed includes for each GradeBook include:
The information that can be easily analysed includes for each student include:
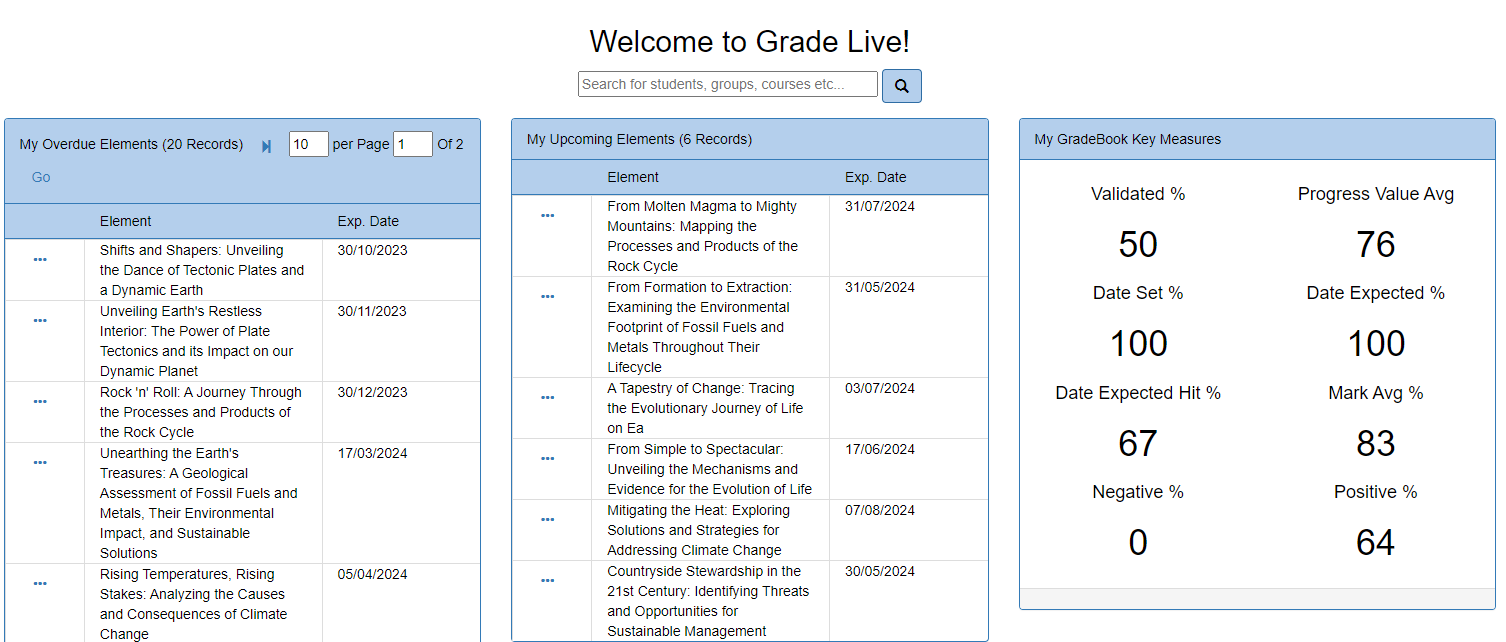
When the tutor logs in, their homepage will show key information such as overdue assessments or upcoming assessments and an overview of all their GradeBooks with quick links to their GradeBook.
When students/parents log into the website they can also see the information entered into their GradeBooks.
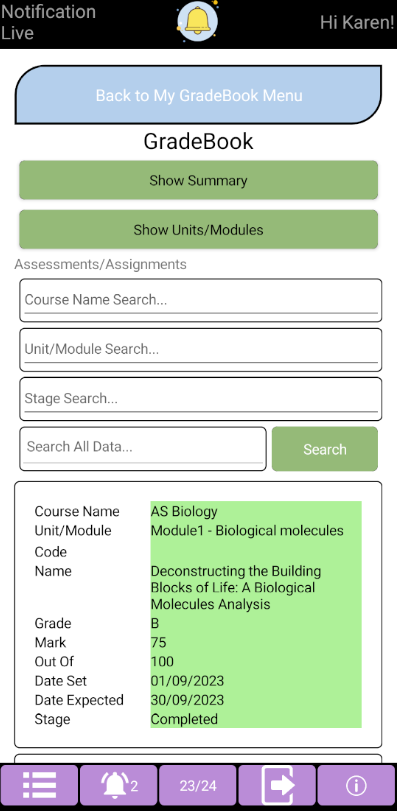
Or for colleges using Notification Live GradeBooks can be displayed within our mobile app.
Grade Live links with Planning Live for Schemes of Work and Lesson Planning so that any units created in Grade Live can have a scheme of work created against them.
For colleges using other systems we can transfer GradeBooks from these into Grade Live to make the transition easy!
Progress Tracker
Tutors enter their professional judgement for how well each student is progressing for each of their courses at different points in the year. Grade Live standardises and streamlines the way a college tracks student progress. The college can define the progress options available. For example Below Target, On Target, Above Target. Optionally the college can ask tutors to enter the Grade that they believe they are working towards and a comment to back this up. The tutor will be able to choose a grade from a list of appropriate grades for the qualification.
The college can define the Progress Periods across the year. For example 6 Progress Periods P1 to P6 - October, December, February, March, April and May.
The Tutor can quickly enter the Progress within the current Progress Period. This can be entered by group or by course or by student or by department.
The way that progress changes over time can be visualised at student, group, course or department levels. Each Progress option can be colour coded to be able to quickly analyse progress. For example red, amber, green.
Each Progress option can be given an equivalent numerical value e.g. Below Target = 0, On Target = 50, Above Target = 100. Our sophisticated reporting lets the college analyse the data by splitting it in many different ways. This includes:
This allows for sophisticated Heat Maps to be created to easily spot problematic areas.
Grade Live compromises of the following main components: a Website, a SQL Server database and a Windows Service.
Website
The website provides the front end of the system where all staff, students or parents will login to access. This website can be hosted locally on the college’s intranet and/or made available externally. Typically the website can be accessed from a url which appears as follows http://ServerName/CollegeLive or www.college.ac.uk/CollegeLive. Colleges will often embed this link on their intranet page for a seamless experience.
Prerequisites
Windows Server 2012 or above
IIS7 or above
10 GB Hard Drive
3Ghz Quad Core Processor
8GB RAM
.NET 4.6.2 Installed
Please note that hardware requirements are estimates and may be higher or lower depending upon the volume of concurrent users. Additionally if the server has other systems installed that are taking up resources then the resources available to the system may be considerably lower. Please contact support if unsure.
Database
The data behind the system is stored within a SQL Server Database.
Prerequisites
SQL Server 2014 or above
100 GB Hard Drive
3Ghz Quad Core Processor
8GB RAM
.NET 4.6.2 Installed
Please note that the Website and Database can be hosted on the same server. However the resources required will be higher to accommodate this.
Windows Service
The Windows Service known as the Process Agent will perform background processes required by the system. This includes scheduling data to be imported into the system and sending messages.
Installation
The Installation Wizard should guide the users in how to install the Website, Web Service, SQL Server Database and Process Agent.
Configuration
Once installed there are various steps required before using Grade Live. This outlines the minimum steps required but other steps might be needed.
User Authentication
The college will need to decide how they want users on the website to be authenticated. There are 4 methods:
In order to use windows authentication the following settings are required in IIS. Under the website navigate to authentication. Make sure that ASP.NET Impersonation and Windows Authentication are turned on, and that Anonymous Authentication and Forms Authentication are turned off.
In order to use any of the other authentication methods the following settings are required in IIS. Under the website navigate to authentication. Make sure that Anonymous Authentication and Forms Authentication are turned on, and that ASP.NET Impersonation and Windows Authentication are turned off.
The system ships with a default administrator account with username: administrator and password: Password. This should be altered as soon as possible to have a password of your choice.
Imports
The system requires data from other systems to be used. The required imports are as follows:
Other useful imports include:
Progress Periods
The college will need to decide the progress periods required. The college can have any amount of progress periods. For example P1 - October, P2 - December, P3 - February etc. This can be maintained under Maintenance > Progress.
Progress Targets
The college will need to decide the list of options available within the Progress dropdown. For example Below Target, On Target and Above Target. The colour coding for each option should be decided. This can be maintained under Maintenance > Progress.
Targets
Decide whether to import National Target Grades and Personal Target Grades in the enrolment import or allow these to be edited within the system.
GradeBook Configuration
Decide on the default GradeBook configuration options when the tutor first sets up their GradeBook. This should be setup to reflect the most common provision across the college. This can be maintained under Maintenance > GradeBook.
Online Demo
There is an online demo for GradeLive which can be found here http://www.demo.system-live.com
This can be useful to see an example of how the system can be configured. This can show you an example of how progress is recorded. The system can be logged in with different types of users.
To access the demo site the following credentials should be used.
Type of User: Administrator
Username: Administrator
Password: Password
Type of User: Head of Campus
Username: Kady.McPhee
Password: Password
Type of User: Head of School
Username: Linzi.Stephenson
Password: Password
Type of User: Head of Department
Username: James.Morris
Password: Password
Type of User: Teacher
Username: Felicity.Jones
Password: Password
Type of User: Student
Username: Karen.Nelson
Password: Password
Type of User: Parent
Username: Parent
Password: Password
Please feel free to try out the demo site and edit information. Please note that the demo site may be regularly reset so any changes will be lost.
Grade Live has many General Features used throughout. Please see the General Documentation for more details.
Please see the General Documentation for more details.
When you first login to Grade Live you should see a search box.
This allows you to search for Students, Courses, Groups, Staff or Organisational Structure. Type in what you want to search for a click search or press enter.
This will look for the characters in your search text anywhere within the above categories. For example here typing ‘Bio’ has found both the Course and the Group because their codes both contain ‘Bio’.
Other sections include
The maintenance pages required before recording progress can be found under Maintenance > Progress
Progress Periods
The college will need to decide the progress periods required. The college can have any amount of progress periods. For example P1 - October, P2 - December, P3 - February etc.
Note then when a Progress Period is created and there are enrolments for the academic year a record will be created for each enrolment for that progress period in the ProgressEnrolment table. This will mean that the Progress Period cannot be deleted without deleting the data first within the ProgressEnrolment table.
Progress Targets
The college will need to decide the list of options available within the Progress dropdown. For example Below Target, On Target and Above Target.
Progress Grade Sets
This is used if the college wishes to record progress grades. When adding progress grades users can select from a list of available grades. These Grade Sets group grades together for different types of qualifications. The system ships with several grade sets:
Each grade set contains a list of grades within that set e.g. A*-E would contain A*, A, B, C, D, E and U for example. When adding progress grades the system automatically creates a list for the user to choose from. The system will look up the qualification aim of the enrolment whose grade is being set and look for the most appropriate Progress Grade Set based on the National Target and Personal Target grades for all the enrolments within that qualification aim.
Progress can be recorded in several parts of the system
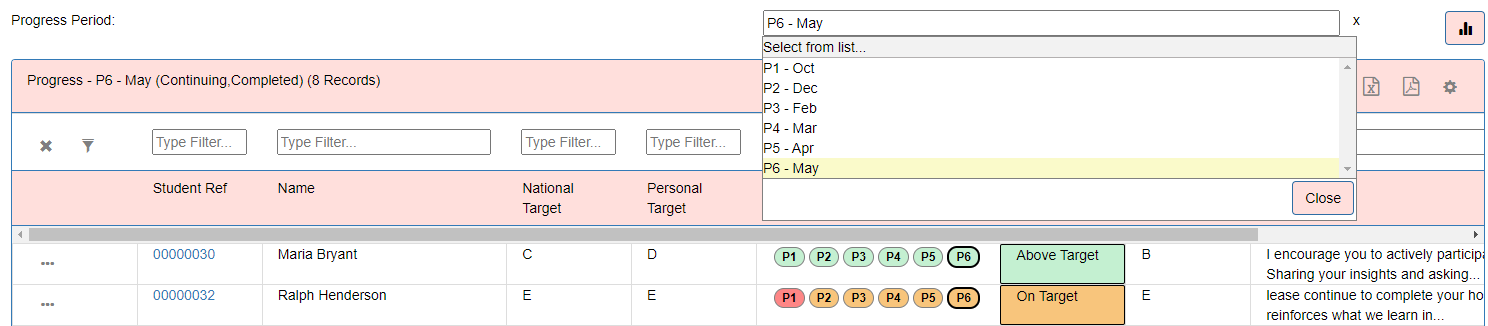
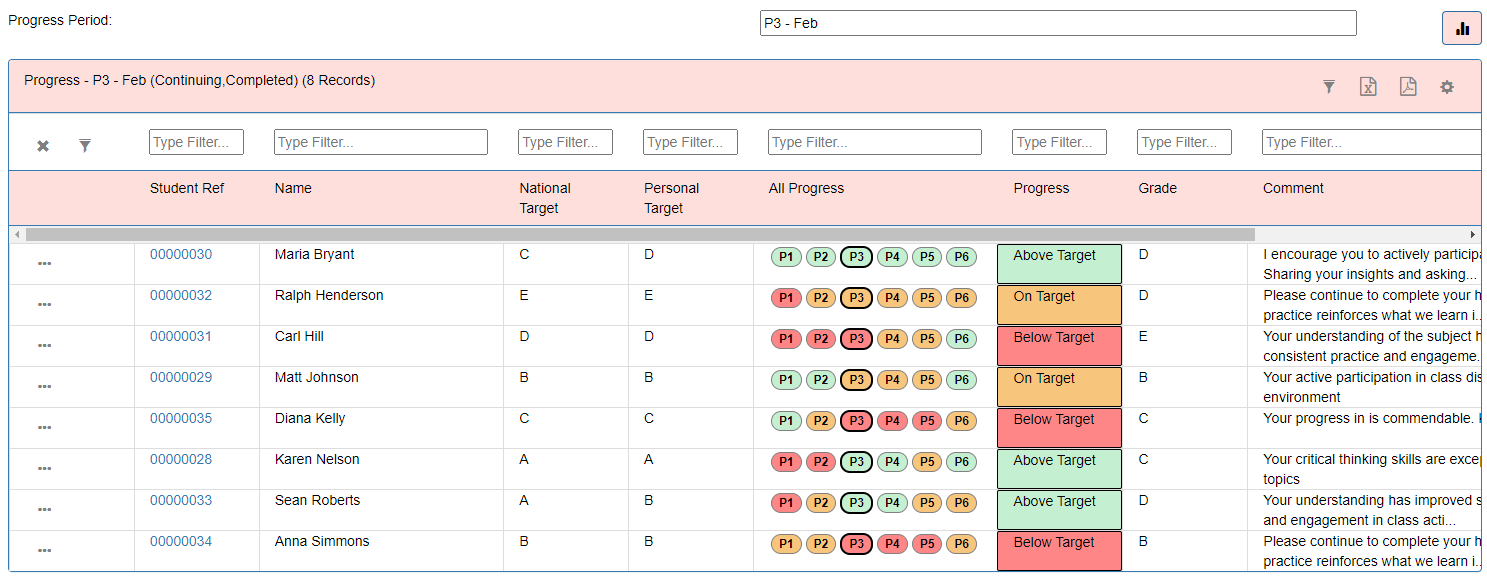
The user can select the progress period to view from the dropdown list. This defaults to the current progress period.
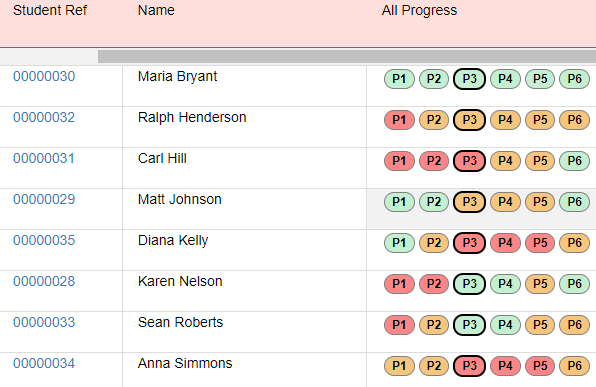
The grid will show a list of enrolments. The columns displayed will vary depending on the area the system being viewed:
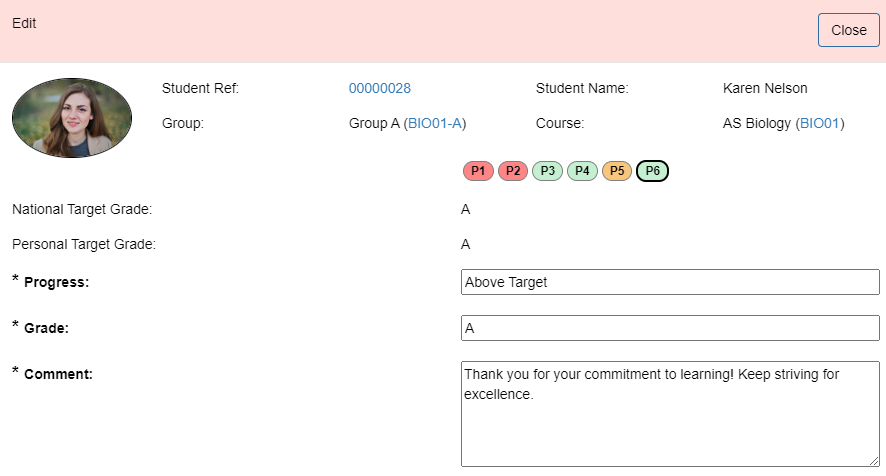
Clicking the … button will let the user alter the Progress, Grade and Comment.
Note that in order to be able to save this data the user will require the ‘Can Edit Progress’ permission.
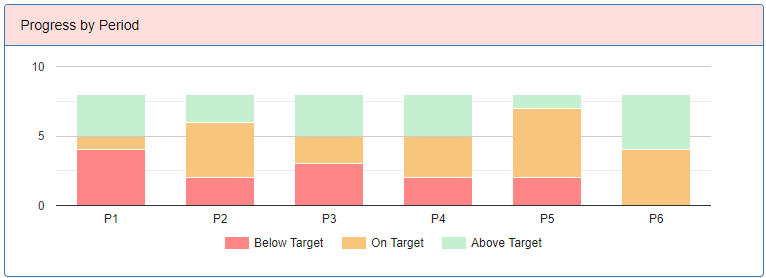
The Chart button will display the information as a stacked bar chart with the number of each progress options recorded by period.
There are two ways of entering national and personal target grades into the system.
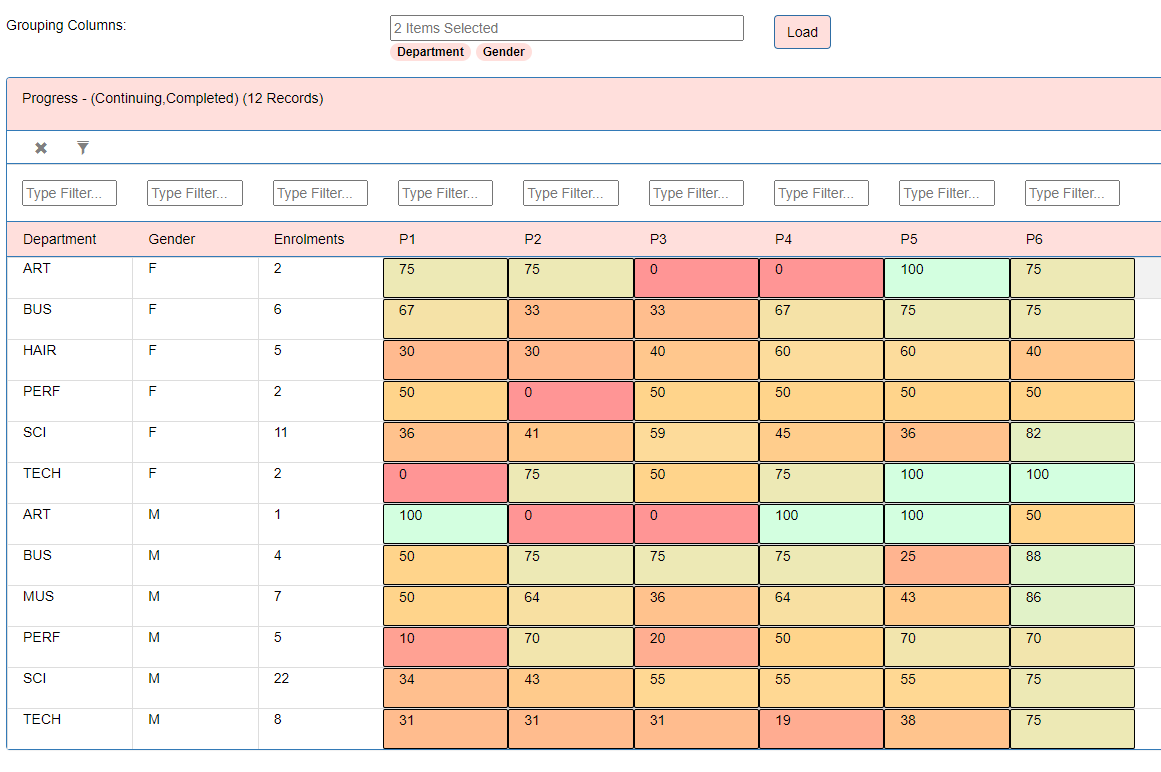
Progress Reporting can be found under Reporting > Progress Reporting.
The user can choose which column or columns to group the data by. Then click the Load button.
This will show the number of enrolments against each grouping column and pivot each period.
The number shows the average value based on the value entered within Maintenance > Progress Targets. The information will display as a heat map based on the colour for that progress target. Colours can be blended together. For example On Target = Orange = 50 and Above Target = Green = 100. A value of 75 will be a blend of Orange and Green. A value of 90 will be blended more towards the green. This allows the user to quickly visualise good or bad areas.
The grouping columns include:
The GradeBook Maintenance page can be found under Maintenance > GradeBook and allows high level setup of the GradeBook. Here there are 4 tabs:
Element /GradeBook Tabs
This determines the default settings when a GradeBook is first configured. This should be setup to reflect the most common provision across the college. Tutors can change these settings from within each GradeBook.
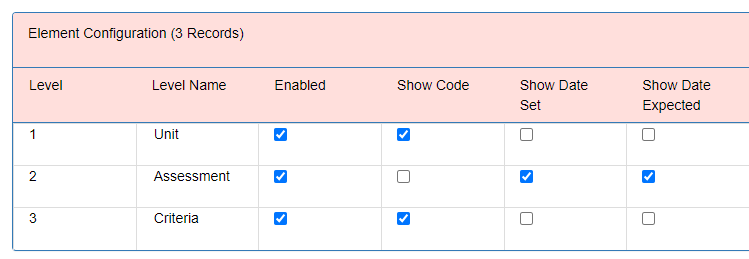
The Elements tab determines visibility and labels against the different levels of GradeBook elements. This largely affects the Elements tab in the GradeBook when creating or editing elements. An element is an individual entity in the GradeBook which can be marked. Each GradeBook can have up to 3 levels of elements e.g. ‘Unit, Assessments and Criteria’, ‘Modules and Assignments’, etc.
The GradeBook tab determines the visibility and labels against the different levels of GradeBook Elements This mainly affects the GradeBook tab when marking individual elements.
Reports Tab
Grade Live ships with a ‘Standard’ Report. These reports can be selected when printing the GradeBook in a document format. This produces a report in a formatted excel document. The college can create their own document reports. This can be used for specific qualification requirements.
To create a new report click into the Standard report and choose download. This creates an .rdl file which can be modified in Microsoft Report Builder 3.
When printing the report only the elements visible in the GradeBook grid will be passed to the report. The Dataset called GradeElementEnrolment contains 1 row per element. The college can use this dataset to display the data in any way they choose.
Only the .rdl report is saved then a new report can be created in the Reports grid and the .rdl file can be uploaded against the report. The description field can be used to give me information about the report when hovering over the report item.
Element Library
This displays a grid of all the existing gradebook elements within the academic year. This grid can be exported to excel and sent to us periodically to help us build a national library of GradeBook Elements. This library can be used by tutors to populate their GradeBook with existing GradeBooks which match their course.
When marking elements in the GradeBook the current progress stage can be selected. This list of stages comes from the ‘GradeBook’ Action Stage Group under Maintenance > Action Stage. This contains the following default stages:
Each stage can be colour coded.
The GradeBook reports refer to the ‘Completion’ and ‘Outcome’ fields against these stages.
The college can create their own stages or modify these existing stages.
The GradeBook can be viewed on the GradeBook tab on the Group Details page. The GradeBook Tab is split into 4 different tabs:
Permissions are required in order to use this tab.
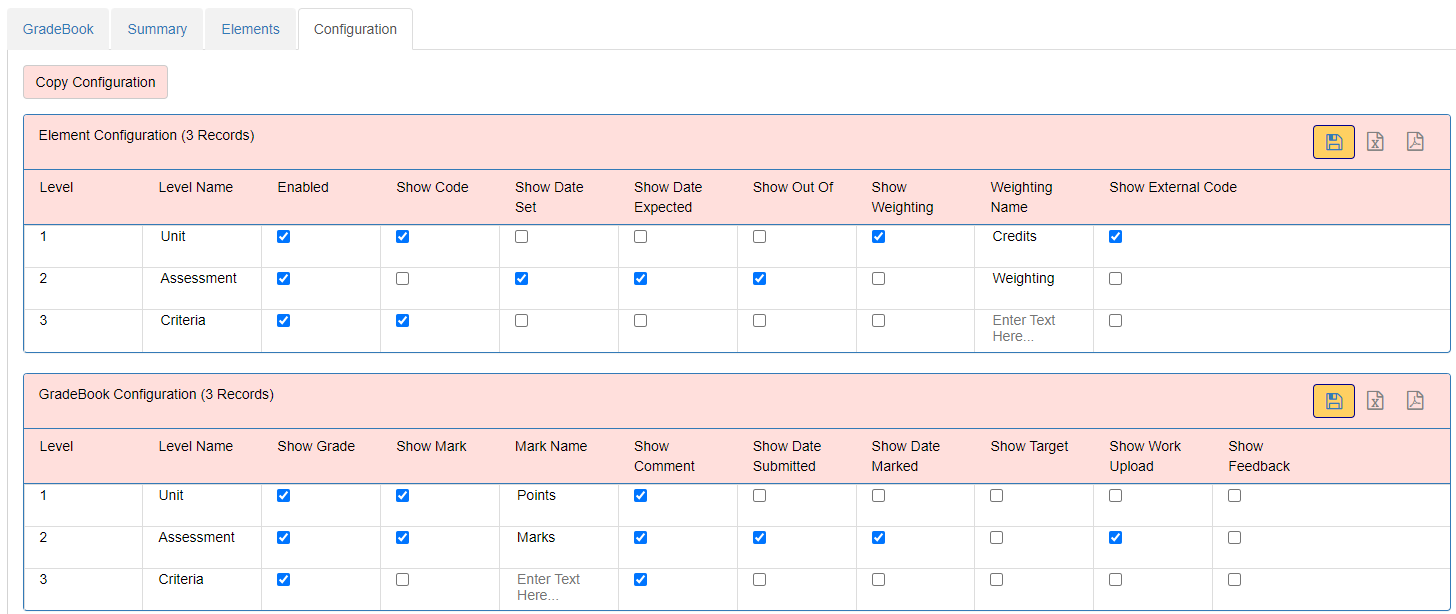
Configuration Tab
The first time the GradeBook is used the user will be taken to the Configuration tab.
The configuration defaults to the default system GradeBook configuration options set up by the college. The tutor can alter these settings to change labels and visibility. Please refer to the GradeBook Maintenance section for more information about what each of these options does.
The Copy Configuration button allows the tutor to copy the configuration from an existing GradeBook. This opens a popup where the tutor can search for a Group within an academic year and course. The courses can be restricted to:
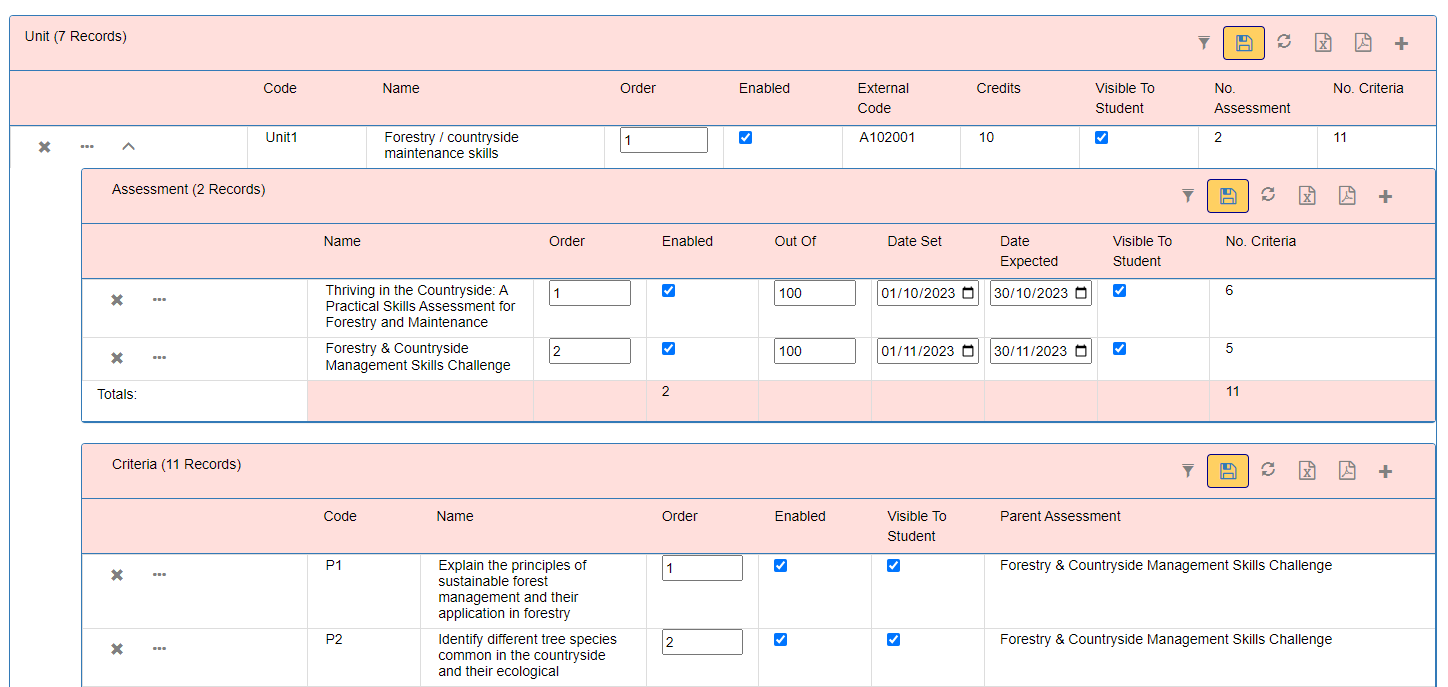
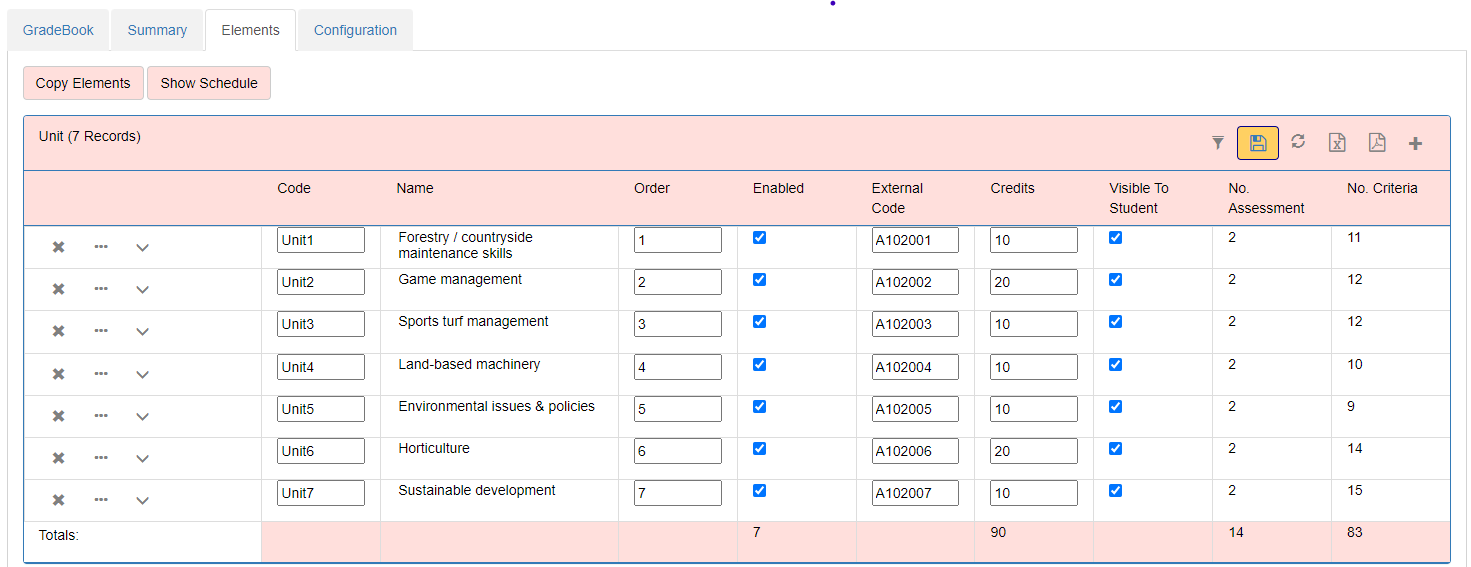
Elements Tab
The elements tab allows the tutor to set up the elements for the GradeBook. An element is an individual entity in the GradeBook which can be marked. Each GradeBook can have up to 3 levels of elements e.g. ‘Unit, Assessments and Criteria’, ‘Modules and Assignments’, etc.
The grid shows all elements which are at Level 1 e.g. Units. The name of the level is determined by the ‘Level Name’ configuration option
Existing Elements can be modified directly on the grid or by clicking the … button. New elements can be added by clicking the + button The columns available depend on the Configuration options selected for the GradeBook and can include:
The grid will show how many 2nd and 3rd level elements there are within each 1st level element. The names of these levels are determined by the ‘Level Name’ configuration option e.g. assessment and criteria. The number of assessments and criteria are shown within the grid. In order to add 2nd or 3rd level elements the chevron should be clicking against the row.
This will show level 2 or level 3 elements depending on whether these elements are enabled on the configuration. Level 2 or Level 3 elements can be added to other parent elements if required. For example a criteria could have two parent assessments. Or an assessment could live within 2 different units.
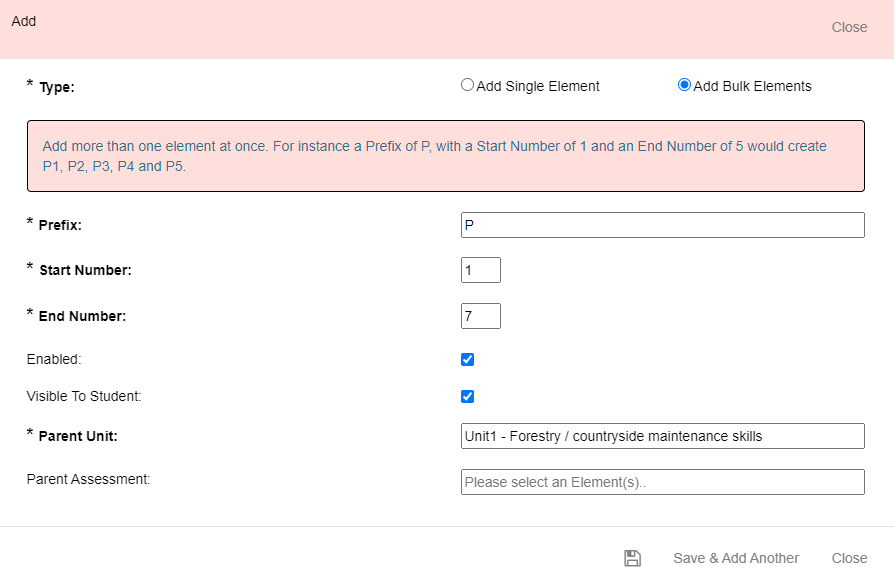
When adding new elements the tutor can choose to ‘Add Single Element’ or ‘Add Bulk Elements’. When choosing Bulk Add the user can select a Prefix e.g. P, a start number e.g. 1 and an end number e.g. 7 to create multiple elements at once. This would create the elements P1, P2, P3, P4, P5, P6 and P7. The ‘Add Bulk Elements’ option is only available if the ‘Show Code’ configuration option is selected.
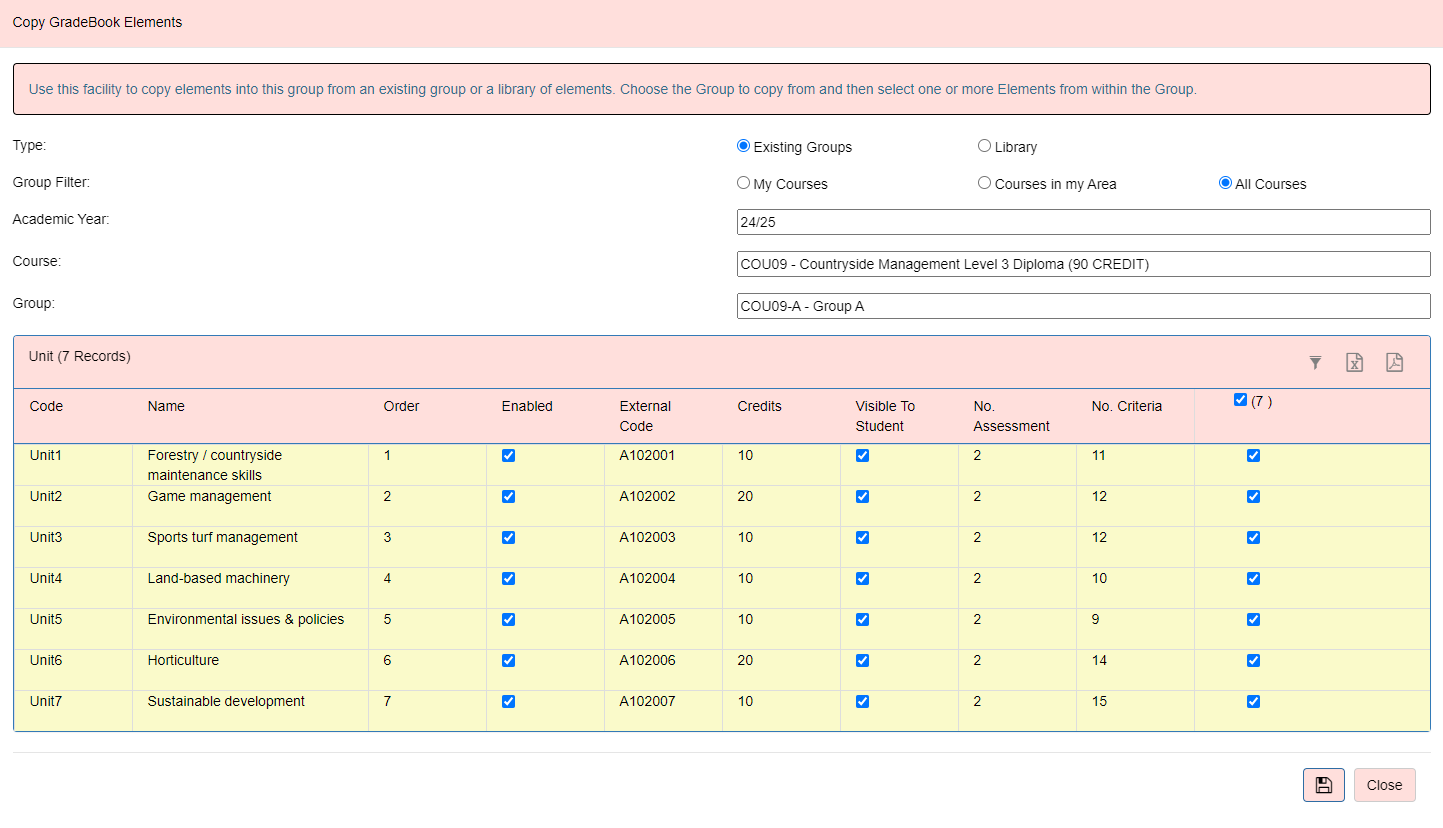
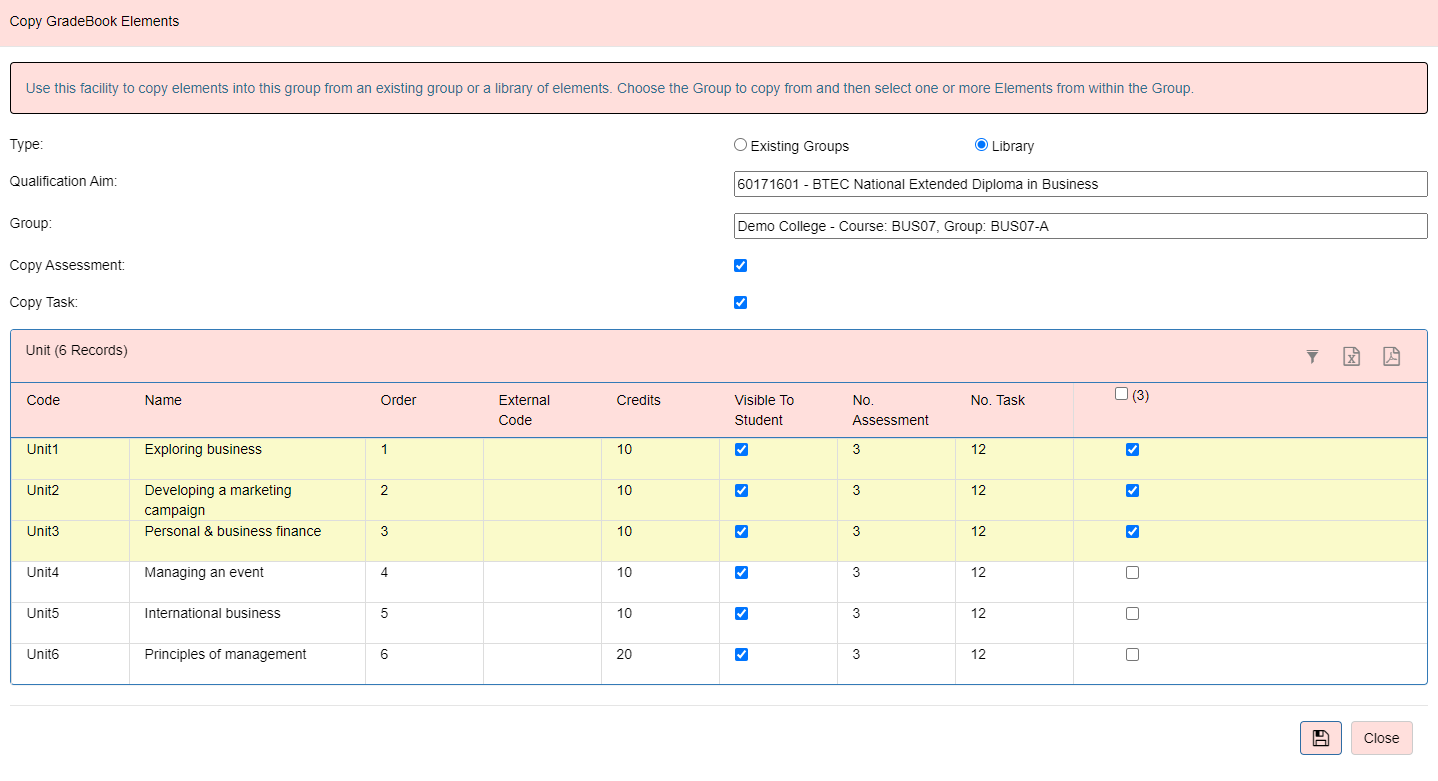
The Copy Elements button allows the tutor to copy elements from an existing group or an imported library.
For the existing group option the tutor can select the group to copy from. All the Level 1 elements within the group will be displayed. The tutor can select one or more elements to copy over.
The tutor can also choose to copy all the level 2 and level 3 elements over as appropriate.
For the library option the tutor can select the Qualification Aim and see a list of groups within that aim. Once the group is selected all the elements in the library for that group will be displayed. The tutor can select the elements they wish to use within their gradebook.
An import is available called GradeBook Element Library to be able to import the library. There are several use cases for this. Firstly if the college is using the system for the first time they could import the library from the markbook in ProMonitor. The tutor can then decide if they wish to copy all or some of the elements over into the GradeBook in GradeLive. The system ships with a default ProMonitor import which will automatically do this for the college.
The second exciting use case will be that we will be creating a library of GradeBook elements from colleges. The college can point the import at our library and pull in gradebooks from other colleges and choose the one that best matches their course. The library table is called GradeElementLibraryProvider on the CollegeLive database. This could save tutors time as gradebooks for the same qualification are often very similar across colleges.
In order for us to collate the library from colleges we may ask you to periodically provide us with your existing gradebooks. This can be found under Maintenance > GradeBook > Element Library tab. This grid can be exported to excel and emailed over.
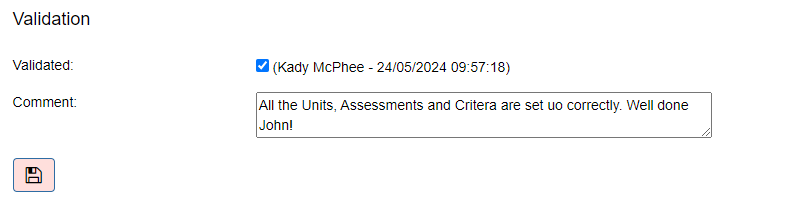
The validation section allows a member of staff to say they have validated the GradeBook Elements and leave a comment. This validated flag is used within reporting. Only staff who are managers of an organisation structure or the member of staff has been flagged as a validator within the organisation structure detail > Staff tab can edit the validation.
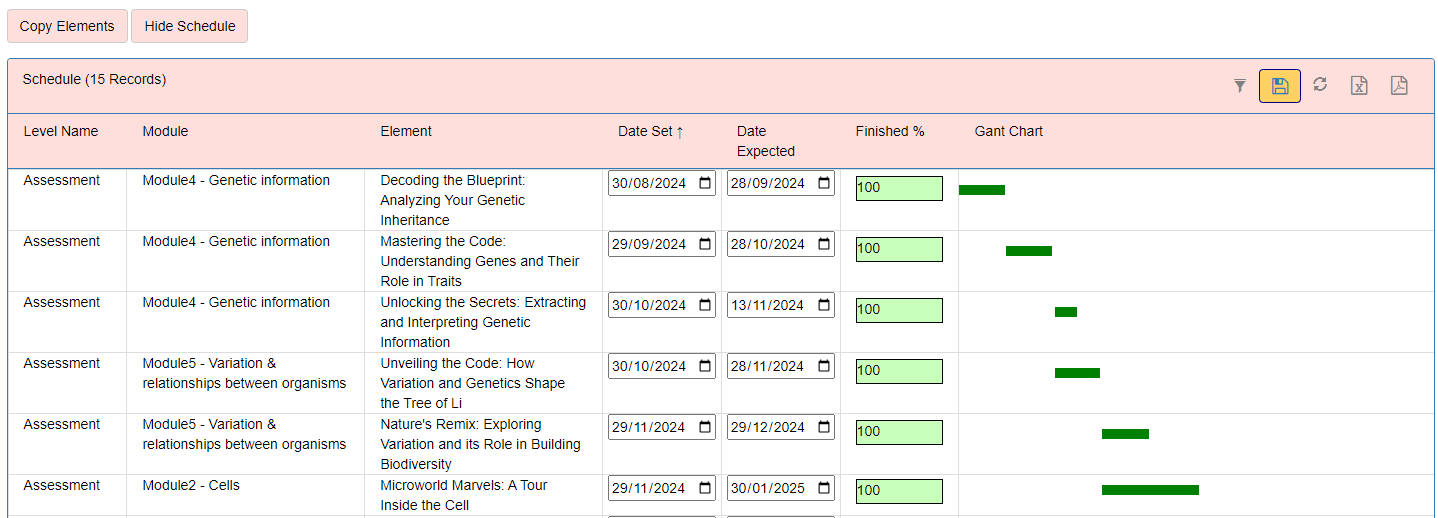
The tab has a ‘Show Schedule’ button. This will show any enabled elements whose level is set to show either ‘Date Expected’ or ‘Date Set’. The user can easily change the date set and date expected for all elements. A Gant chart will be visible showing an indication of the length of time between the date set and date expected and where it fits within all the assessments. The Finished % column will show the number of student elements which have an outcome i.e. set to completed or not completed.
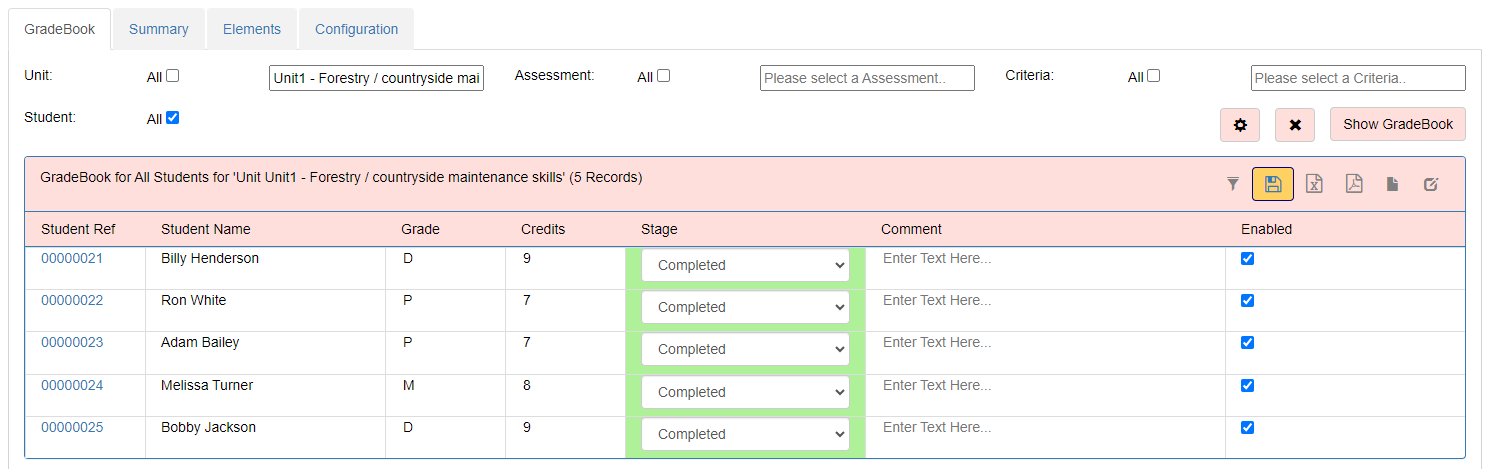
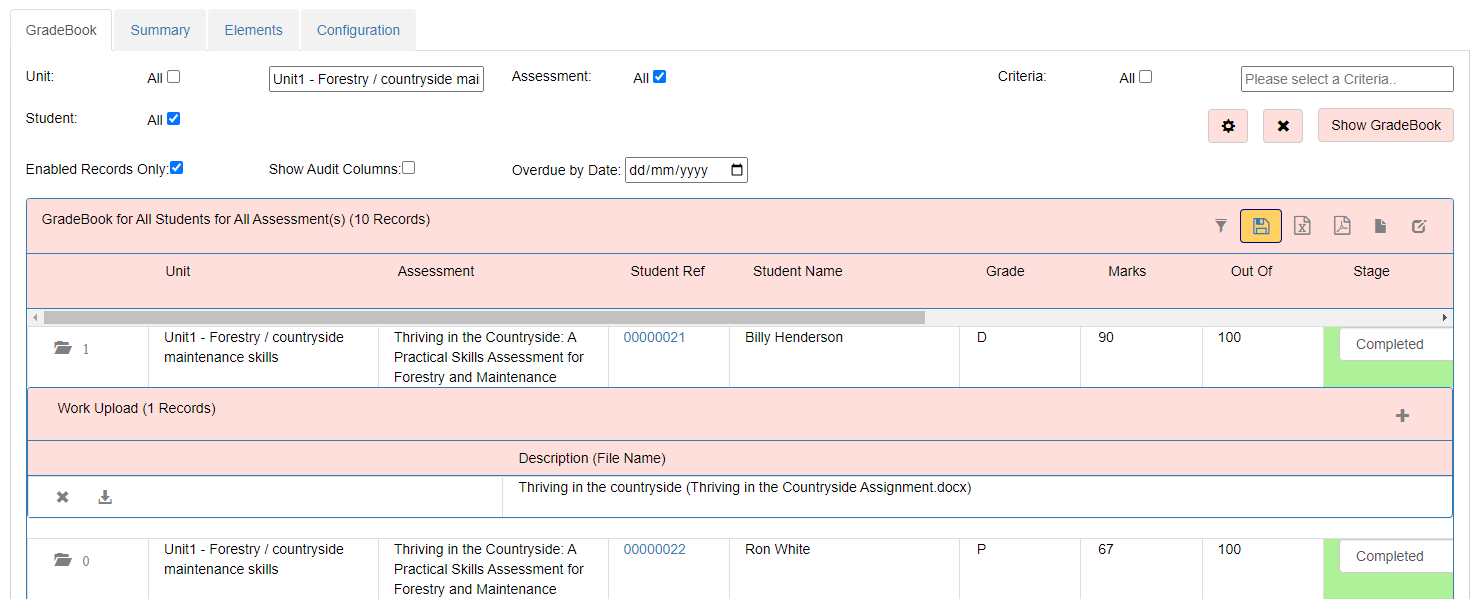
GradeBook Tab
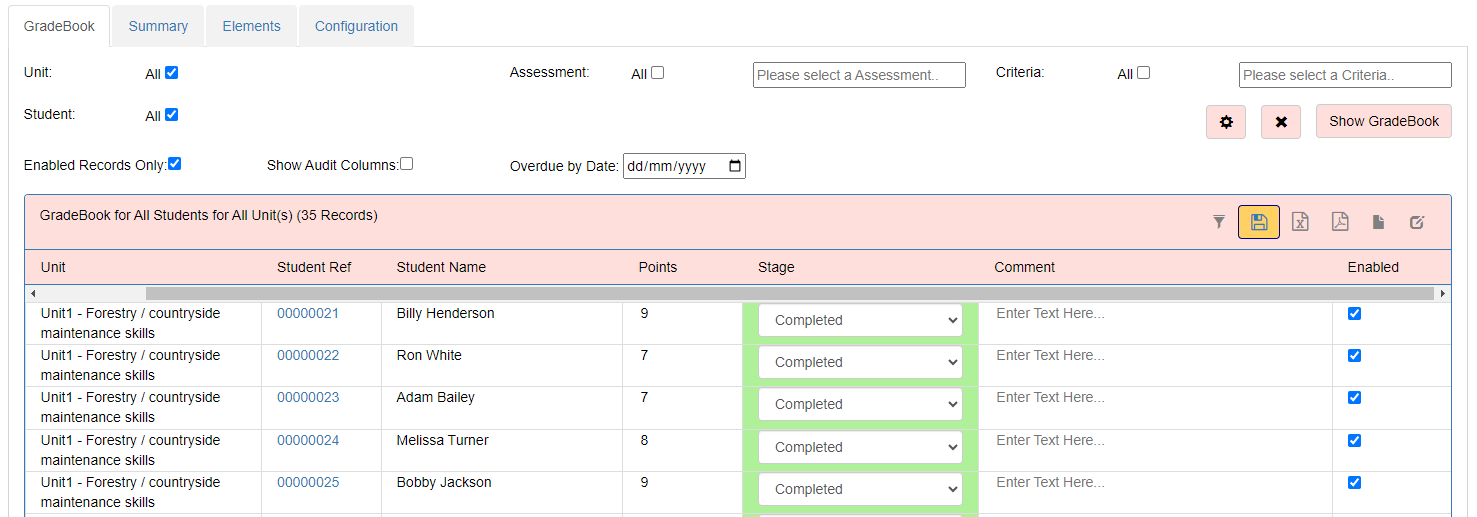
The GradeBook Tab is used for marking each GradeBook Element. The tutor will be able to select an element or group of elements to mark. The tutor will be able to select a student or groups of students to mark. This means that any combination of students/elements can be selected by the tutor. The tutor can tick all elements or choose a selection of elements. Lower level dropdown lists will be restricted to just those child elements. For example once a unit is selected then the assessments dropdown will only show assessments within that unit.
Once the elements and students are selected click ‘Show GradeBook’ to mark the work.
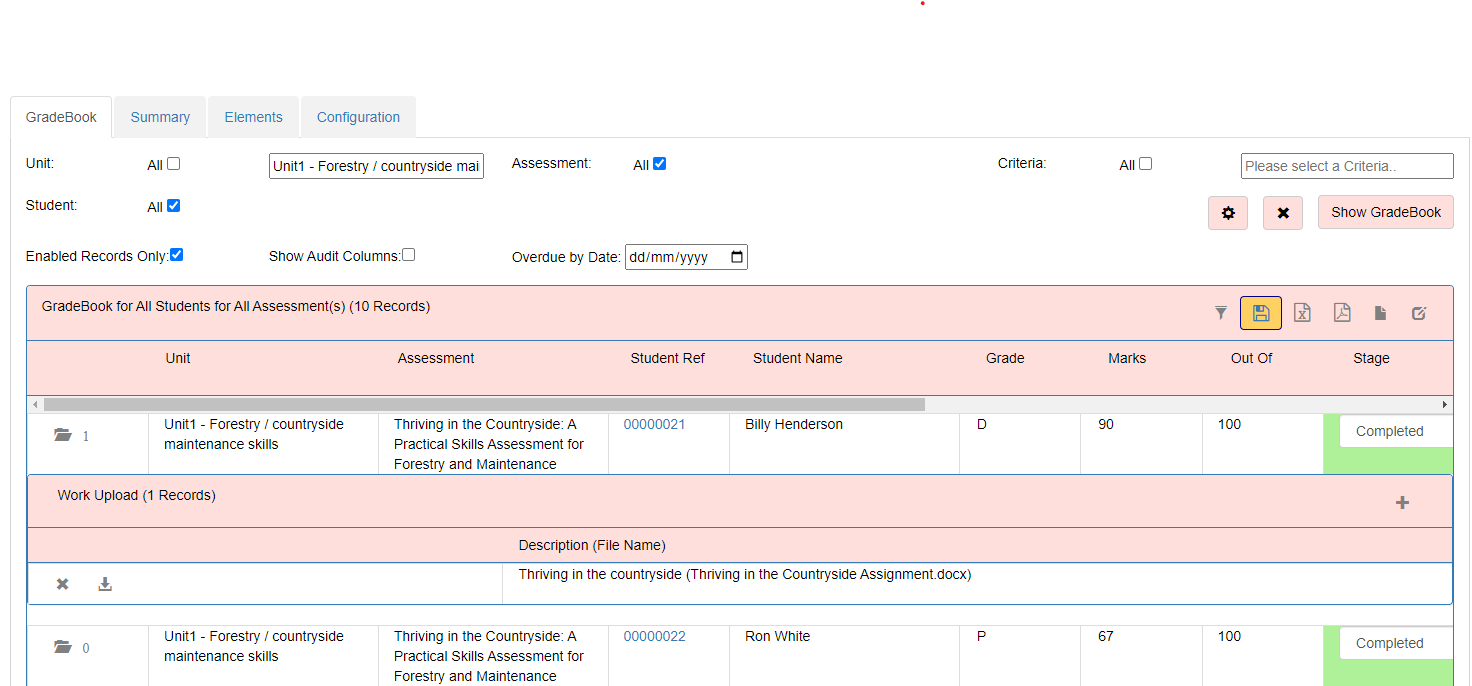
Clicking the settings button will show further options:
Clicking the x button will set all the options back to default.
The fields available to mark depend on the configuration options for that level. These could include:
Data can be entered directly into the grid and then click the save button to save. In fact any interaction with the grid will save the data e.g. filtering or moving to the next page.
If the configuration option ‘Show Work Upload’ is selected then the tutor can upload a document to the element. This document can be later downloaded. The number of documents against the element are shown on the first column. If the configuration option ‘Allow Work Upload Student ’ is selected then the student can also upload a document to the element.
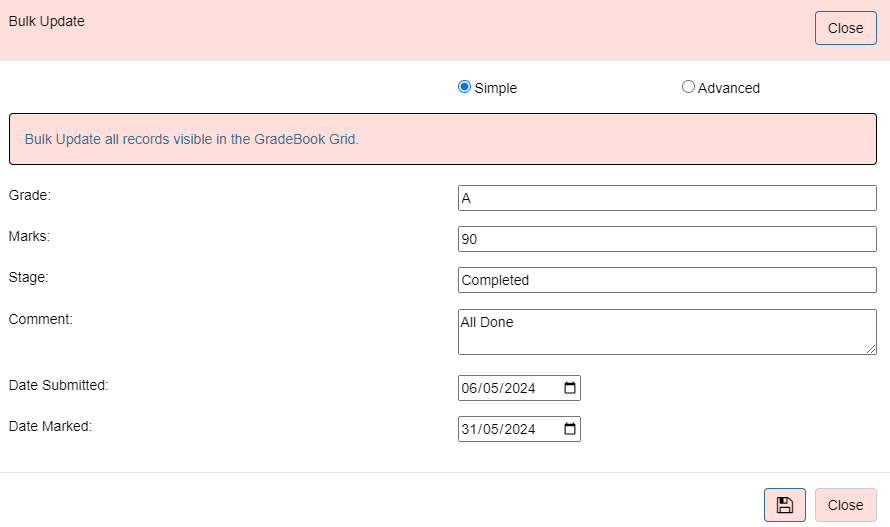
The ‘Bulk Update GradeBook record’ button on the grid will let the tutor update multiple records at once.
There are two options - Simple and Advanced.
The Simple option will update all elements in the grid. This can be very useful for marking all work as complete for example.
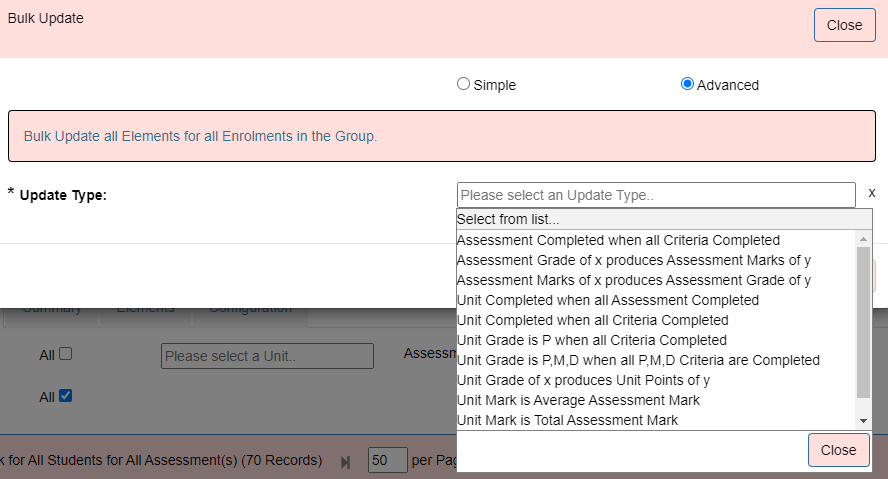
The Advanced option applies an update across all elements in the GradeBook. There are various update types. These depend on the configuration options.
Options include:
These option names depend on the names of the levels in the configuration. The Grade to Mark options will ask the user to supply a grade to convert to a mark e.g. a grade of P produces a mark of 7. The Mark to Grade option will ask the user to supply a lower and upper mark to convert to a grade e.g. a mark between 60 and 70 produces a grade of B.
The ‘Create Document Report’ against the grid will produce a formatted excel document for the records selected in the grid. The tutor can select the report. By default only ‘Standard’ is available but the college can create their own custom reports for different scenarios. Please see the GradeBook Configuration for more information about how to do this.
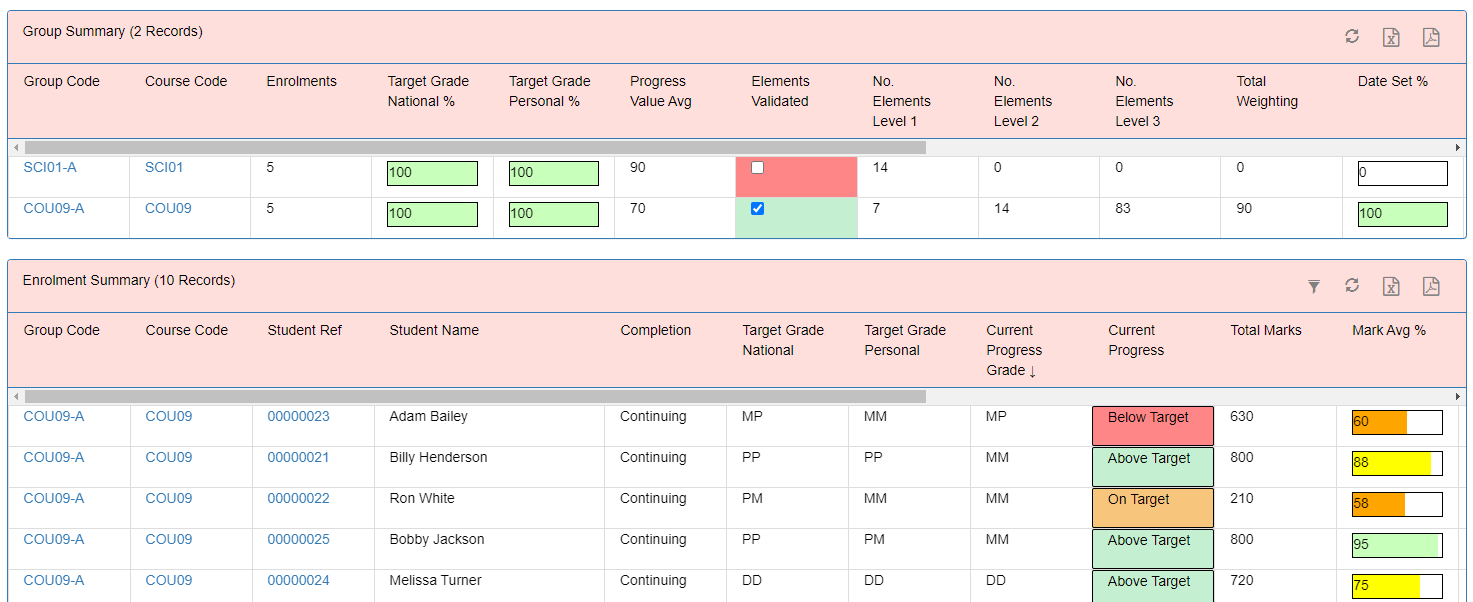
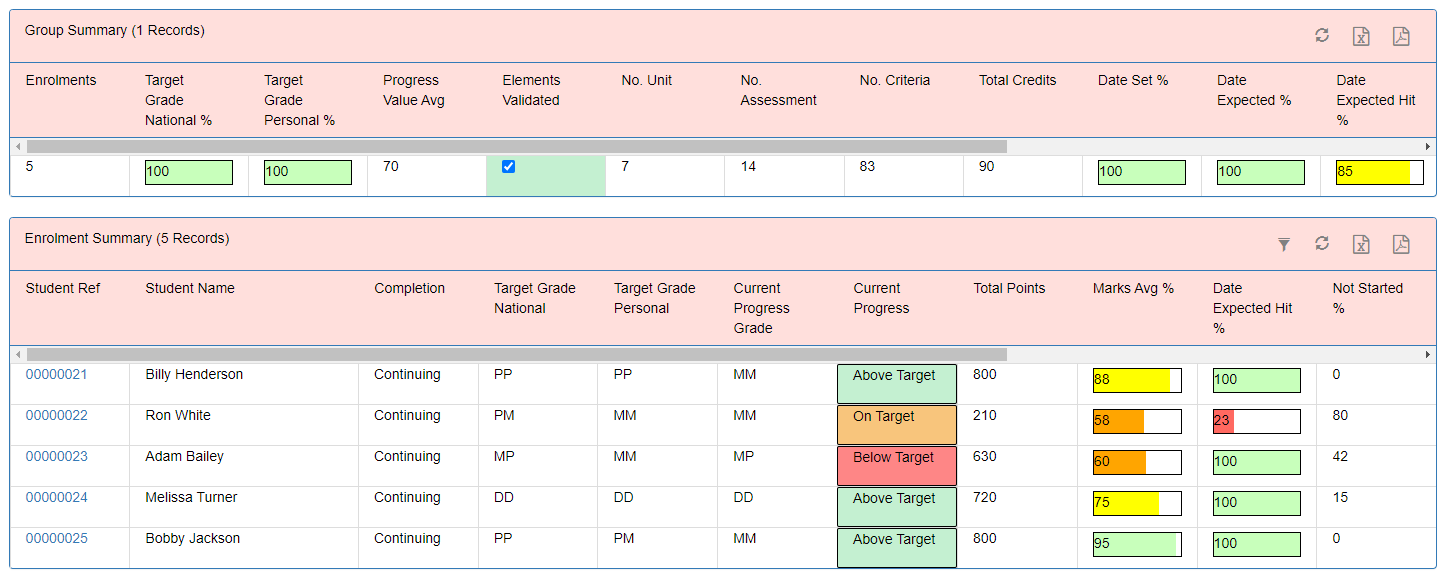
Summary Tab
The Summary tab gives an overview of the Group and of each Enrolment.
Group Summary
This grid shows a summary of the GradeBook for the Group
Enrolment Summary
This grid shows a GradeBook summary for each enrolment within the Group:
As well as the GradeBook and Progress tabs the following tabs can be useful for Grade Live.
The GradeBook tab shows the following tabs:
The Calendar shows GradeBooks Elements expected dates on a calendar. Please see the General documentation for more details.
The user can decide which information to show within the calendar or not show the information at all.
Allows users to be added, details changed and associated to permission groups. Can be used to set up and email passwords.
Allows Permission Groups to be created or altered. Please see the Permissions section in the General Documentation for more information.
Sets up connections to SQL Server Databases used for Imports, Message Creator and Dashboards.
Import data into the system.
Course/Group
Required by the system. Imports all Courses and their groups into the system.
Enrolment
Required by the system. Imports all enrolments into the system.
GradeBook Elements
Import GradeBook Elements against each group. This can be used to bulk flood the system with elements if a datasource is available. This can also be used to import elements into Grade Live from a legacy system.
Organisation Structure
Imports Organisation Structure and their Managers. Up to 4 levels can be imported e.g. Campus > School > Department > Team. This is useful for reporting and for the managers to keep track of their area.
Organisation Structure Course
Imports the courses assigned to each Organisation Structure.
Organisation Structure Staff
Imports the Staff members assigned to each Organisation Structure.
Room
Imports a list of Rooms into the system. Required if the college wants to use the timetable import.
Staff
Required by the system. The staff import creates staff user accounts including passwords. Staff Users can be associated with a teaching staff member. There is a distinction between users and staff in the system. Users do not need to be staff and staff do not need to be users. A user can log into the system and in most cases will be a teaching staff. However there may be users who are not teaching staff for example the IT Administrator or Head of Quality. On the flip side a college may have a member of teaching staff who is not a user of the system. This will mean that the member of staff can be used within the system but they will not be able to login.
Students
Required by the system. Imports all students into the system.
Timetable
The timetable import will import each Lesson Date, Start Time, End Time, Room and Teacher for each Group. This allows staff to be able to log in and see their groups and students.
Recommended Order Import
The order in which the imports are imported is important as imports rely on other data being present and should be as follows.
View pending emails and emails sent. Allows the system to be setup to send emails.
View pending SMS and SMSs sent. Allows the system to be setup to send SMSs.
Allows Message Creators to be generated which allows you to create your own custom emails or sms to be sent out on an adhoc basis or scheduled periodically.
View the status of the Process Agent. The Process Agent performs various background jobs including imports and sending messages.
View and edit system settings which change the overall functionality of the system.
System settings used in ILP Live include:
A college can change the theme of the website including colours, the name of Grade Live and images.
View audit log changes
View resources.
View details error log and system status.
Managers can see their particular areas. Please see the General documentation for more information about how to use the Organisation Structure page.
This screen allows academic years to be turned on or off and information copied between academic years such as the Progress Periods.
Please see the General documentation for more information about how to use the Academic Years page.
Grade Live ships with sophisticated reporting which allows the college to slice and dice the Grade Live data within the system. Please see the General documentation guide for more information about Reporting.
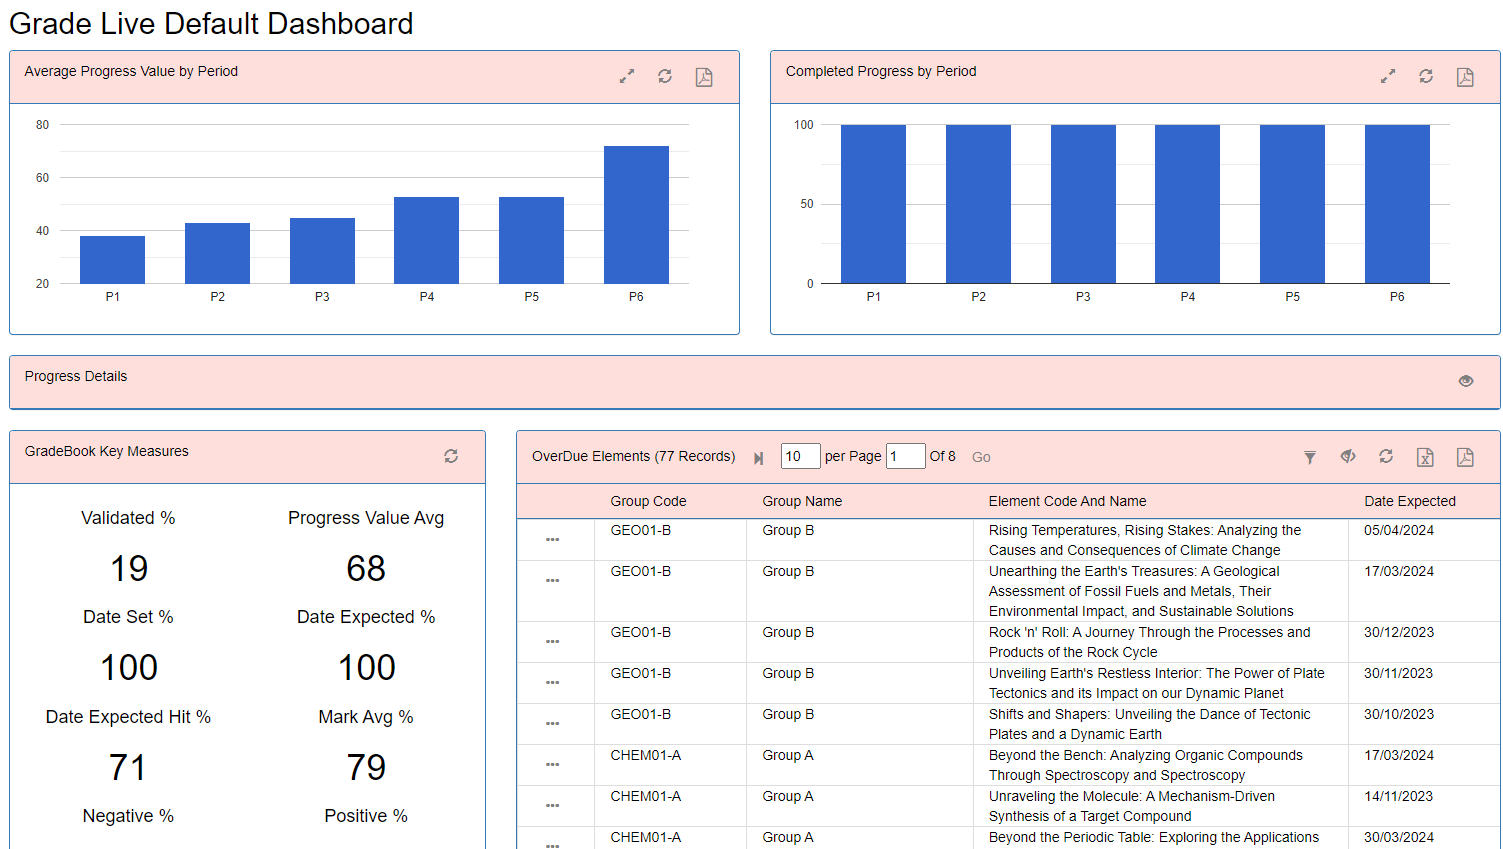
The reporting can be accessed from the Reporting > Dashboard Reporting. The will open up the Reporting Homepage.
The default dashboard contains the following sections which are all filterable in the side panel:
Average Progress Value by Period
The average progress value for each progress period.
Completed Progress by Period
The percentage of progress filled out for each progress period.
Progress Details
Detailed information for each enrolment's progress for each progress period.
GradeBook Key Measures
An overview of the GradeBooks
Overdue Elements
Any element where the Date Expected date has passed and the stage completion is Ongoing or ‘Not Started’ . This will only show elements with a Date Expected.
GradeBook Enrolment Summary
An overview of each GradeBook Enrolment.
GradeBook Group Summary
An overview of each GradeBook.