Notification Live Documentation
Notification Live is our mobile application designed for colleges.
It can be used by different roles associated with the college including staff, students, parents, applicants etc.
Users can search for their colleges on the Google Play or Apple App store and download onto their phone then login with their college credentials.
The App can be branded with the college’s logo, name and colour themes.
The App has two main components - Push Notifications and a menu/page builder to show any information you want to users.
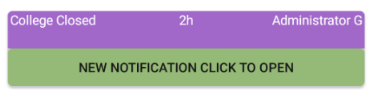
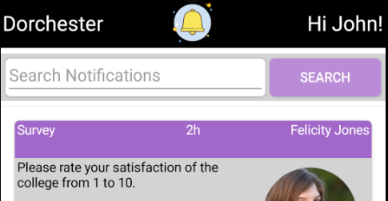
Push Notification popup on the user’s mobile device in much the same way as a text message. They can be clicked to view more information. The college can send bulk notifications e.g. the college is closed today, you have the following lessons this week. Or staff can send ad-hoc notifications for example for all the students in their class.
Notifications are fully tracked to see how many have been sent, received, opened and replied.
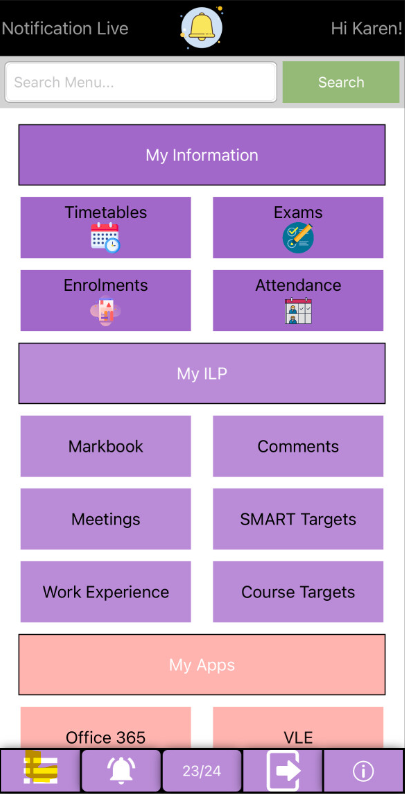
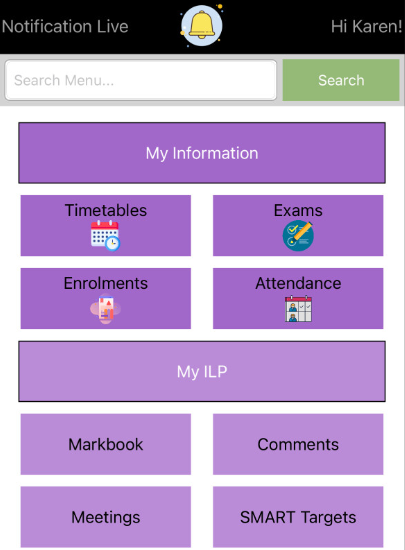
The page builder allows the college to build menus up to 3 levels deep and decide on the text, colour and icon for each menu. The college can build different menus for each type of user or allow anonymous access for certain menus.
The college can decide the information to show on each page. Options include:
Adding/Viewing AdHoc Notifications 11
Notification Live compromises of the following main components: a Website, a Web Service, a SQL Server database, a Windows Service and a Mobile App.
Website
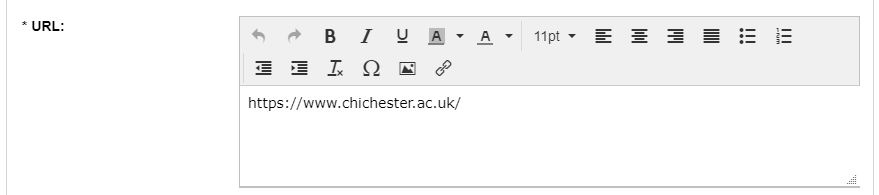
The website provides the front end of the system where all college staff will login to access. Used primarily for configuration and sending notifications. This website can be hosted locally on the college’s intranet and/or made available externally. Typically the website can be accessed from a url which appears as follows http://ServerName/CollegeLive or www.college.ac.uk/CollegeLive. Colleges will often embed this link on their intranet page for a seamless experience.
Prerequisites
Windows Server 2012 or above
IIS7 or above
10 GB Hard Drive
3Ghz Quad Core Processor
8GB RAM
.NET 4.6.2 Installed
Please note that hardware requirements are estimates and may be higher or lower depending upon the volume of concurrent users. Additionally if the server has other systems installed that are taking up resources then the resources available to the system may be considerably lower. Please contact support if unsure.
Web Service
The Web Service is used by the Mobile App to communicate. The Web Service needs to be externally facing and have SSL enabled. Port 443 needs to be enabled to communicate.
Prerequisites
Windows Server 2012 or above
IIS7 or above
10 GB Hard Drive
3Ghz Quad Core Processor
8GB RAM
.NET 4.6.2 Installed
Database
The data behind the system is stored within a SQL Server Database.
Prerequisites
SQL Server 2014 or above
100 GB Hard Drive
3Ghz Quad Core Processor
8GB RAM
.NET 4.6.2 Installed
Please note that the Website and Database can be hosted on the same server. However the resources required will be higher to accommodate this.
Windows Service
The Windows Service known as the Process Agent will perform background processes required by the system. This includes scheduling data to be imported into the system and sending messages.
Mobile App
A Mobile App for Google Android or Apple iOS devices which can be downloaded from the Google Play or Apple App Stores.
Prerequisites
Device with Android v4.4 or above
or
Device with iOS v8 or above
Installation
The Installation Wizard should guide the users in how to install the Website, Web Service, SQL Server Database and Process Agent.
Configuration
Once installed there are various steps required before using Notification Live. This outlines the minimum steps required but other steps might be needed.
User Authentication for Website
The college will need to decide how they want users on the website to be authenticated. There are 4 methods:
In order to use windows authentication the following settings are required in IIS. Under the website navigate to authentication. Make sure that ASP.NET Impersonation and Windows Authentication are turned on, and that Anonymous Authentication and Forms Authentication are turned off.
In order to use any of the other authentication methods the following settings are required in IIS. Under the website navigate to authentication. Make sure that Anonymous Authentication and Forms Authentication are turned on, and that ASP.NET Impersonation and Windows Authentication are turned off.
The system ships with a default administrator account with username: administrator and password: Password. This should be altered as soon as possible to have a password of your choice.
System Password or college Password for Mobile App
Users will need to enter a username and password to access the Mobile App. Passwords can be configured within Notification Live for each user, or LDAP configuration can be used so that users use their college network credentials to login. Please see the System Setting sections for information about configuring LDAP. Please see the Manage Users section for information about setting passwords.
Even if using LDAP, users without a college account will fallback to the password within Notification Live e.g. for parents.
Multi-Factor Authentication
The college can decide to turn on Multi-Factor authentication. When logging into the App the user will be prompted for a Verification Code sent to the user’s email address or texted to the user’s mobile. Two system settings are used to turn this option on - ‘Use MFA Email’ and ‘Use MFA SMS’
Emails and SMS
Notification Live can be used to send out emails and SMS for example to send a link to the mobile app. For emails the links to your Exchange server need to be set up. For SMS the account credentials for Janet Txt need to be configured. Please see the Email and SMS sections for more details.
Notification Setup
Each college needs to add their own Google Firebase Key under System Settings in order to send push notifications. This will normally be added during the installation phase by System Live.
Imports
The system requires data from other systems to be used. At a very minimum staff/users and students need to be imported with the staff and student import. Other useful imports include:
Branding
The college will want to change the default branding to include their logo, name and college colours. Please see the Themes section for more details about branding.
Sending Links to App
The college can bulk send either SMS or Emails to users with a link to download the App from either Google Play store or Apple App store. This will include information about how to log in with their username and password. Please see the System Settings and Manage Users section for information about how to do this.
Menu/Page Builder
The college will need to decide what information to show in the App. Notification Live comes with a Page Builder which mostly requires no technical expertise (some areas may require SQL knowledge).
The page builder allows the college to build menus up to 3 levels deep and decide on the text, colour and icon for each menu. The college can build different menus for each type of user or allow anonymous access for certain menus.
The college can decide the information to show on each page. Options include:
The college can decide to make one of the pages the homepage.
Please see the Page Builder section for more details.
Sending Notifications
The college will need to decide how notifications are sent out.
Notifications can be sent out in bulk by an administrator. These can be one off notifications e.g. college closed today. Or can be scheduled every week based on data within the college e.g. these are your lessons this week, or you have the following assessments due this week. Please see the Message Creator section for more details about how to create these.
Notifications can also be sent on an adhoc basis by staff. For example a teacher could send a notification to all students in their groups or a head of department could send a notification to all students in their area.
Online Demo
There is an online demo for Notification Live which can be found here http://www.demo.system-live.com
This can be useful to see an example of how the system can be configured. This can show you sample Notifications. The system can be logged in with different types of users.
To access the demo site the following credentials should be used.
Type of User: Administrator
Username: Administrator
Password: Password
Type of User: Head of Campus
Username: Kady.McPhee
Password: Password
Type of User: Head of School
Username: Linzi.Stephenson
Password: Password
Type of User: Head of Department
Username: James.Morris
Password: Password
Type of User: Teacher
Username: Felicity.Jones
Password: Password
Type of User: Student
Username: Karen.Nelson
Password: Password
Type of User: Parent
Username: Parent
Password: Password
Type of User: Applicant
Username: Applicant
Password: Password
Please feel free to try out the demo site and edit information. Please note that the demo site may be regularly reset so any changes will be lost.
Notification Live has many General Features used throughout. Please see the General Documentation for more details.
Please see the General Documentation for more details about how to login to the website. The website is just for staff users to login. Teachers can use the website to send ad-hoc notifications out. Administrators can use the website to send bulk notifications or to configure the system.
Once the user has downloaded the app they can enter their username and password to login. The Password can be Revealed/Hidden by pressing the ‘Eye’ button.
The Text above the Username can be configured by the college under the Theme ‘NotificationLiveLoginMessage’.
If the college has turned on multi-factor authentication then the user will be emailed or texted a 6-digit code. This needs to be entered into the Verification Code box and then the User clicks the ‘Log In’ button again to enter the App. The System Settings which turn these options on are ‘Use MFA Email’ and ‘Use MFA SMS’.
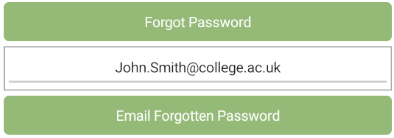
Below the Login button there is a ‘Forgot Password’ button. When pressed the user can enter their email address and request their username and password to be emailed to them. If the user is set up to be authenticated using LDAP they will just receive the message to use their college username and password to login so this is primarily aimed at parents who have forgotten their password.
There is an option to use the test environment for administrators only (users with the permission ‘Can Use Test Environment App’). This will connect the app to your test environment rather than your live environment once logged in. This is useful for trying out new ideas before they are made live for all users to access. To Activate this option first log into the live environment with your admin account then go to the About screen within the App and click the Activate 'Use Test Environment' Login Option button. Once you have logged out of the app the ‘Use Test Environment’ option should be available to select.
The first page after logging into the system is the homepage. This displays your user with appropriate timely information about the notifications you have sent out.
Notification Overview
Users
For students and parents of students within your groups.
Latest Sent Notifications
The last 10 notifications sent by your user. Shows the Title, Number of notifications sent and the percent Opened. Click the … button for more information about the notifications.
Latest Replies
The last 10 replies sent back from the notifications. Shows who sent the reply, the reply text and reply option sent back.
Notice Board
Administrators can set messages for everybody to appear on the Notice Board. This can provide standard users instructions regarding the Notification process.
My Groups
The Side Panel shows all your Groups. Clicking on the groups allows you to quickly create a notification for all students in that group.
Under Communication > Notifications
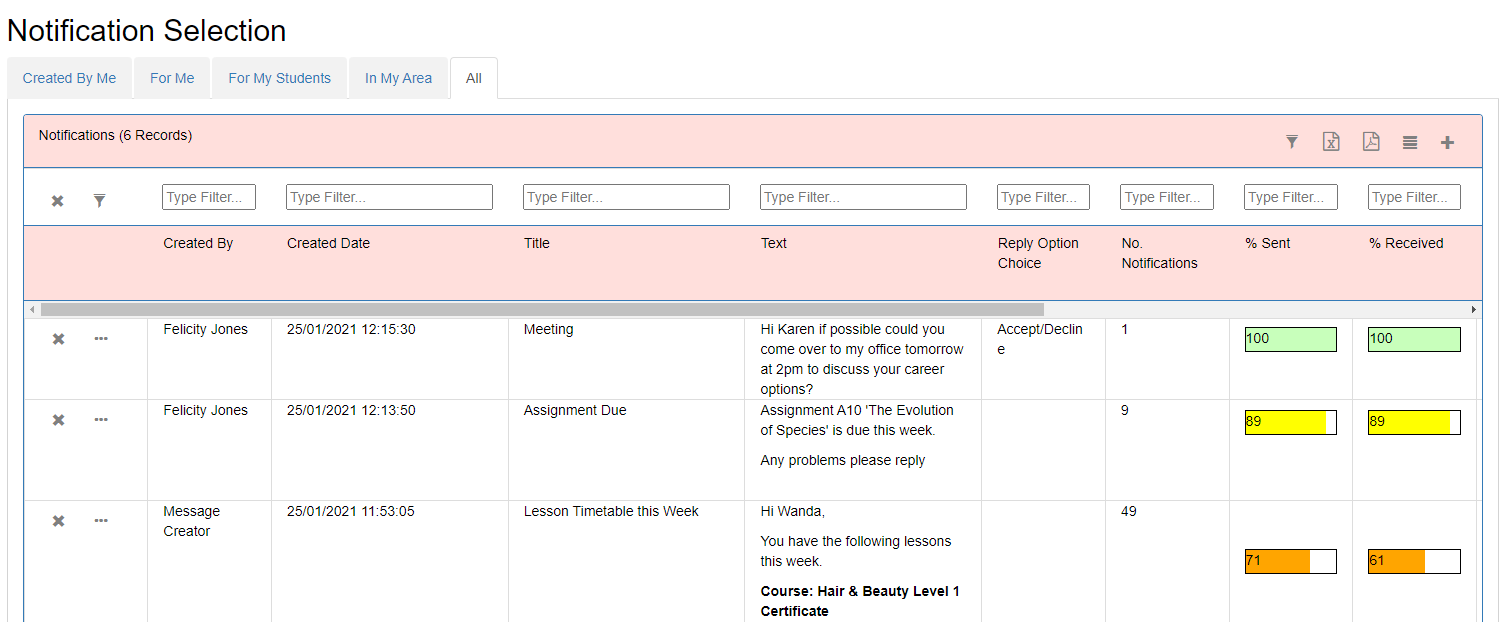
This page allows you to view notifications and create new notifications.
4 Tabs are available:
By default the grid shows each group of notifications. So if you sent a notification to 10 students the row will show an overview of all 10 notifications. You can see each individual notification by clicking the button on the grid.
The grid shows the following information
Clicking the … button will show more detailed information about the group of notifications including the status of each individual notification - whether it has been sent, opened, etc.
Notifications can be added by clicking the + button
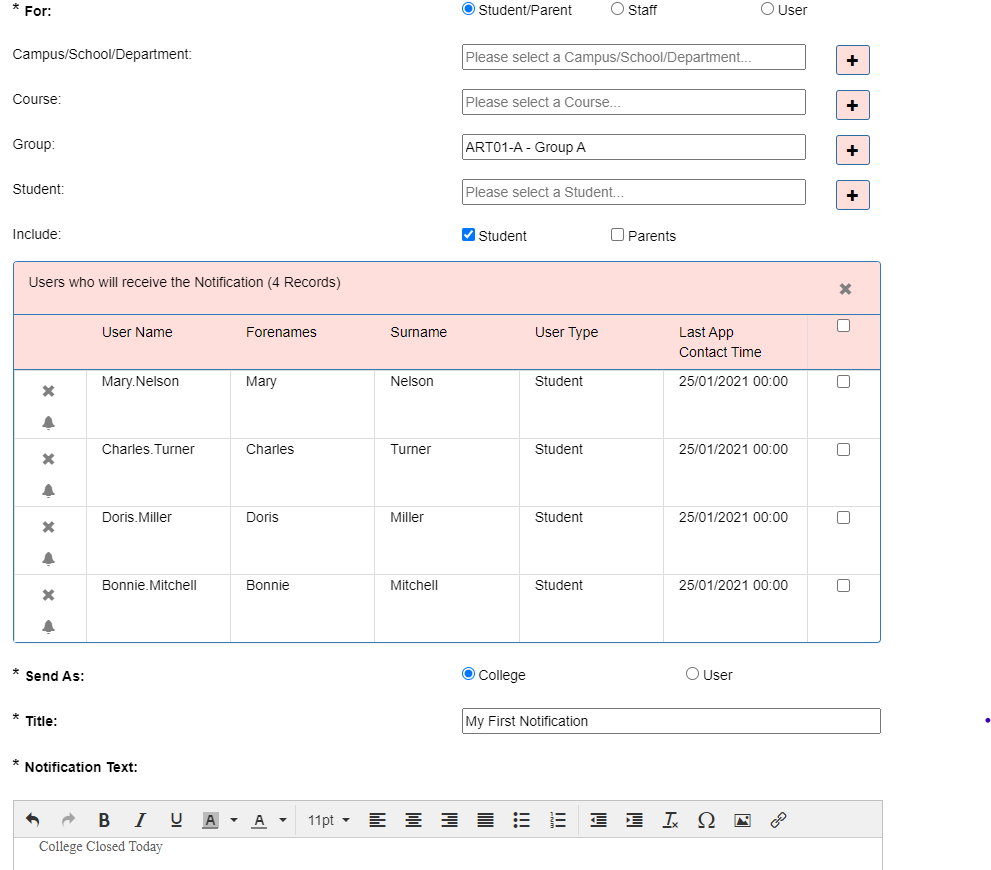
For:
The options change depending on which is selected.
For Student/Parent
For Staff
For User
Note that only users with the permission ‘Can Add Bulk Notifications’ will be able to add all users within an organisation structure or permission group at once.
The system tries to work out an appropriate organisation structure to associate with the notification but this can be altered as appropriate and is mainly used for reporting purposes.
Once added the users who will receive the notification will appear in the grid. They can subsequently be removed individually or in bulk. The Notification Icon at the beginning or the row will show all previous notifications for the user.
Next choose whether to ‘Send As’ College or User. College means that the notification comes through with the App Logo and the name of the App as the creator. User means that the notification comes through with the photo and name of the member of staff who creates the notification. This option is only available for users with the permission ‘Can Add Bulk Notifications’. If the user does not have this permission then the notification will always be sent as ‘User’.
Next choose the Title and Notification Text and any resources to send.
The ‘Schedule Date/Time’ option means that the notification can be scheduled to be sent at a later time. Leaving this option blank will send the notification immediately.
The notification can be replied to if appropriate (if none of these options are selected then the user will not be able to reply to the notification).
The Link to Page option allows the notification to be linked to any page within the menu. A button will appear within the notification which when clicked will go directly to the page.
If a bespoke list of users has been created. For example all users going on a field trip then this list can be saved to be reused later. Under ‘Custom User List Name’ if a name is supplied then the list of users will be saved under that name. If the name already exists the list of users will be overwritten with the new list. This list can be quickly accessed under the ‘User’ radio button. All user lists can be maintained under System > Manage Users > User Lists.
Click the save button to create the notification. These will then be processed and sent to the Mobile devices in due course.
Other Places to View/Add Notifications
The Notification Selection page is not the only place to View or Add Notifications. Other locations include:
These pages will just show/add new notifications specific to the element viewed. For example choosing a group will allow the user to send a notification to just that group.
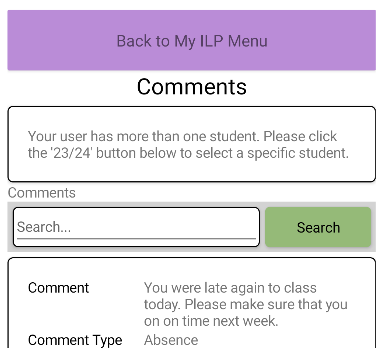
If you use ProMonitor for student tracking, the Student Detail page can be embedded as a custom page into the ILP to quickly add a notification for a student. The custom url can be added in the form <WebsiteRootURL>/Search/StudentDetail?StudentRef=<LearnerRef>&StudentSelectionTab=MyStudent&AcademicYearCode=<AcademicYearID>
Similarly a custom page can be added on the Student Group page to quickly open up the Group page in Notification Live for a teacher to quickly add a notification for the entire group. The custom url can be added in the form <WebsiteRootURL>/Search/GroupDetail?GroupCode=<StudentGroupCode>&CourseCode=<CourseCode>&GroupSelectionTab=MyGroup&Tab=Notification&AcademicYearCode=<AcademicYearID>
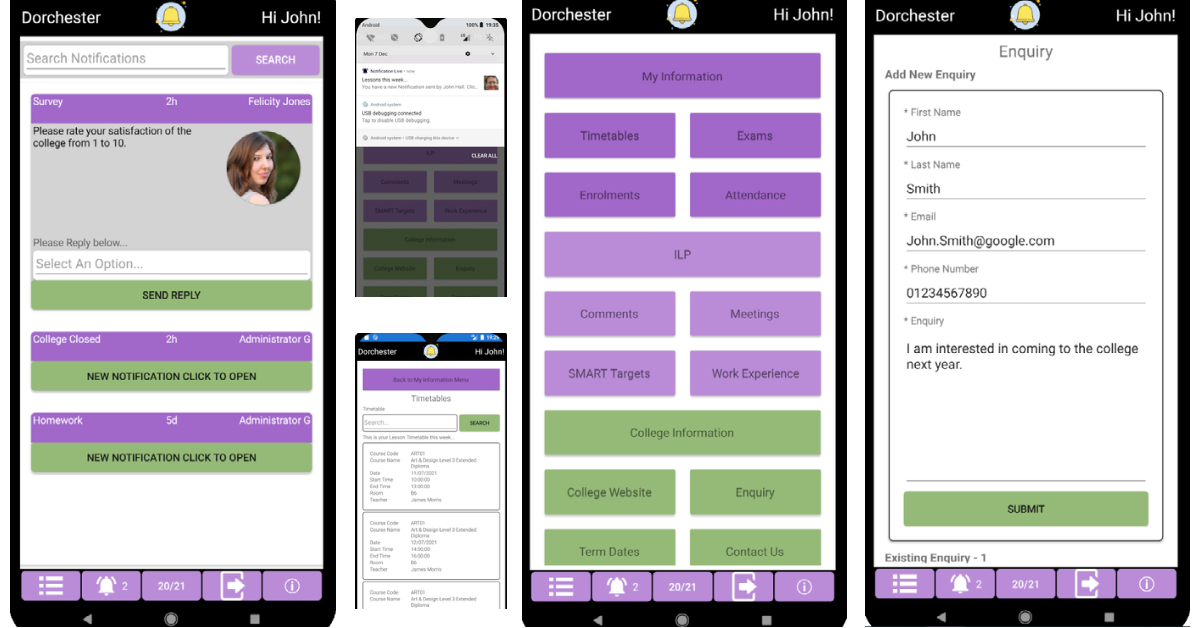
Mobile App
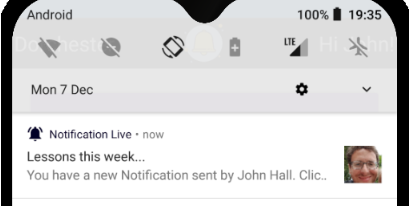
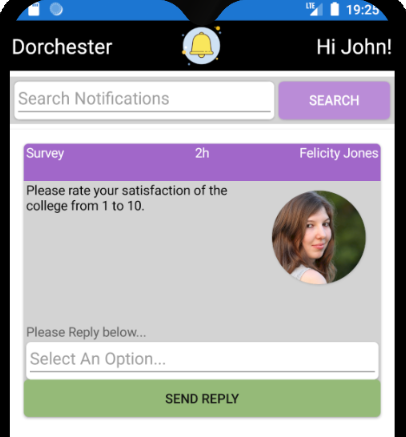
When the user first logs into the App they are asked if they consent to receiving notifications. If they allow permission when the user receives the notification within the App it will appear as a notification much like a text message.
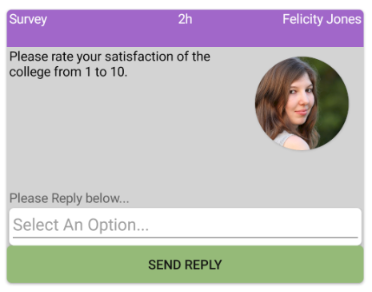
The Notification will show the title and who sent the notification.
Clicking the notification will open the mobile app on the notification page.
The notification will just show the Title, how long ago it was created and the user who created it. Clicking the notification will show further details.
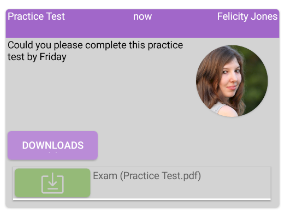
The extra details include the message itself.
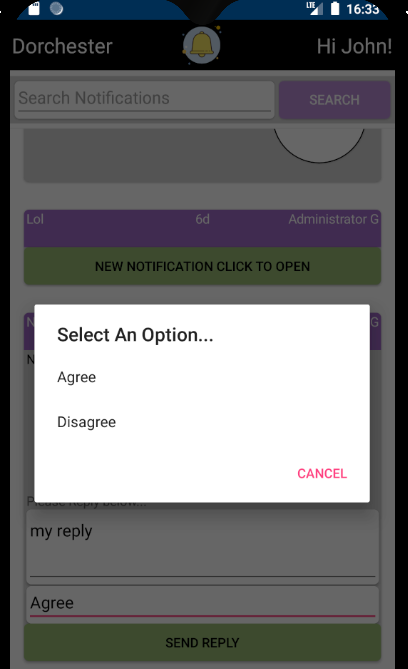
Depending on the notification options when sending the notification the user may be able to reply either by text or choosing from a list of options (or both).
If attachments have been added to the notification they will also be able to download these onto their mobile device.
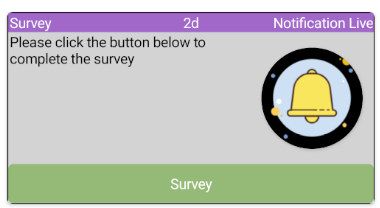
If the notification has been linked to a menu page then a button will show which when clicked will go directly to the page.
In addition the user can search for a particular notification. This will filter the list for a particular text string in either the title, the message body or the user who sent the notification.
The lower panel allows the user to quickly navigate back to the notifications page in the app. The number next to the icon shows the number of unopened notifications.
The Message Creator under the System menu allows the college to send bulk notifications. This allows for many possibilities.
Please see the Message Creator section of the General Documentation for more details about how to use this feature.
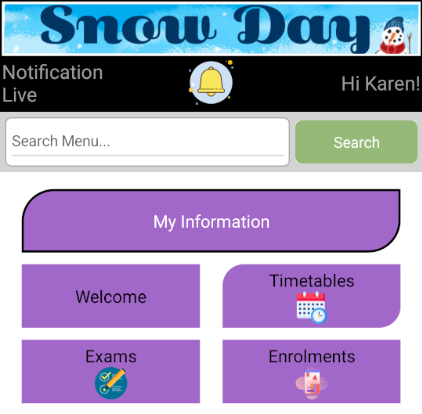
Under the System Menu. This facility allows the colleges to create their own menu structure and decide what appears within each page. Different pages can be set up for different permission groups so for example students could see different information to parents.
The main page screen shows all the pages in the top level of the menu. The college can have up to 3 levels of menu. 2nd level menu items can be added to 1st level menu items. 3rd level menu items can be added to 2nd level menu items.
Mobile App
Pages can be viewed by clicking the menu item in the bottom menu.
The Search button will search for any pages which contain the search text under the Page Name, Page Description or Search Tags.
Adding New Pages.
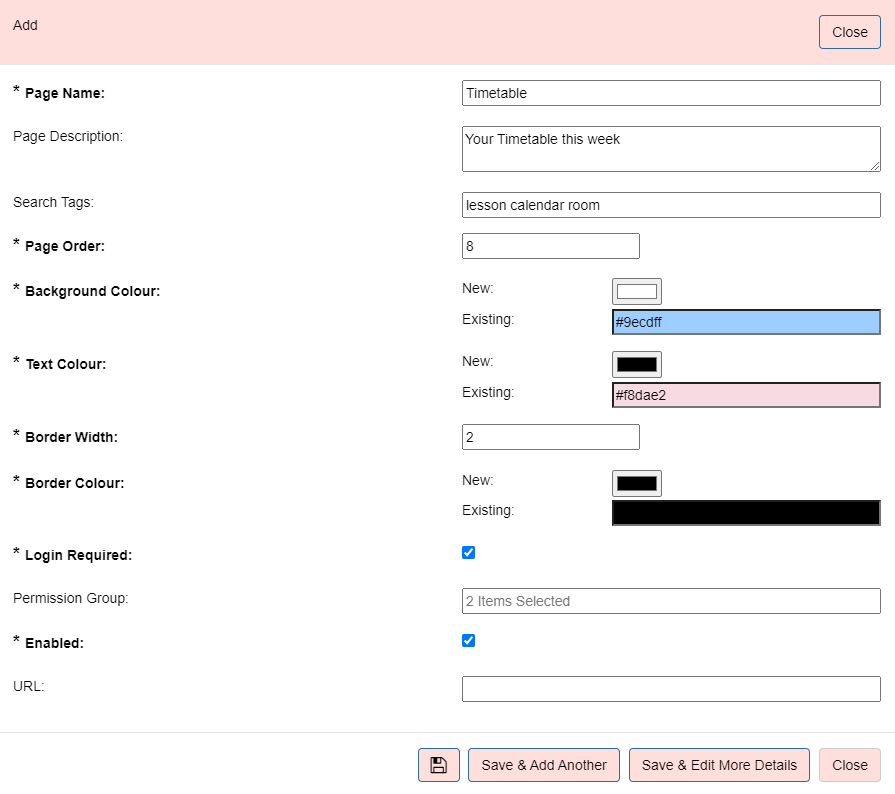
Clicking + will allow the college to create a new menu item.
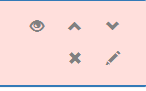
The main grid allows the user to:
The side Actions Panel allows the user to:
Homepage
The Homepage tab sets the page which will be first loaded when the user opens the App. Different permission groups can have a different homepage set.
If no homepage is set for the permission group then the App will load the Notification page.
The App homepage button will navigate the user back to the Homepage.
Search Text
The Search Text tab will show a list of all the search terms created by users of the mobile app.
This will allow the college to see searches that are being made that do not result in any hits. The college can then potentially add search tags or create new pages to accommodate this.
Page Details
Once the page is created allows any of the above options to be altered.
In addition the user can add an icon to the page which appears alongside the text in the app.
The Side panel Action called ‘Move Page’ allows the page to be moved around to sit within a different page within the menu. Firstly choose which Page Level to move to - either 1,2 or 3. 1 is the root of the menu. If choosing 2 or 3 then choose the Level 1 or Level 2 page where the page will now sit within.
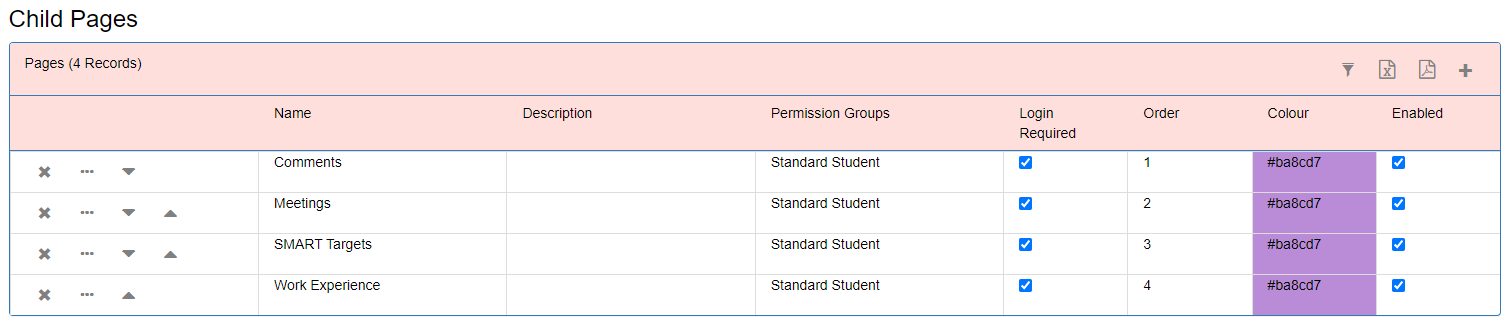
Child Pages
This section allows the users to see any pages which live within the higher level page.
From here new child pages can be added and existing ones altered.
Here we can see an example 2 level menu structure.
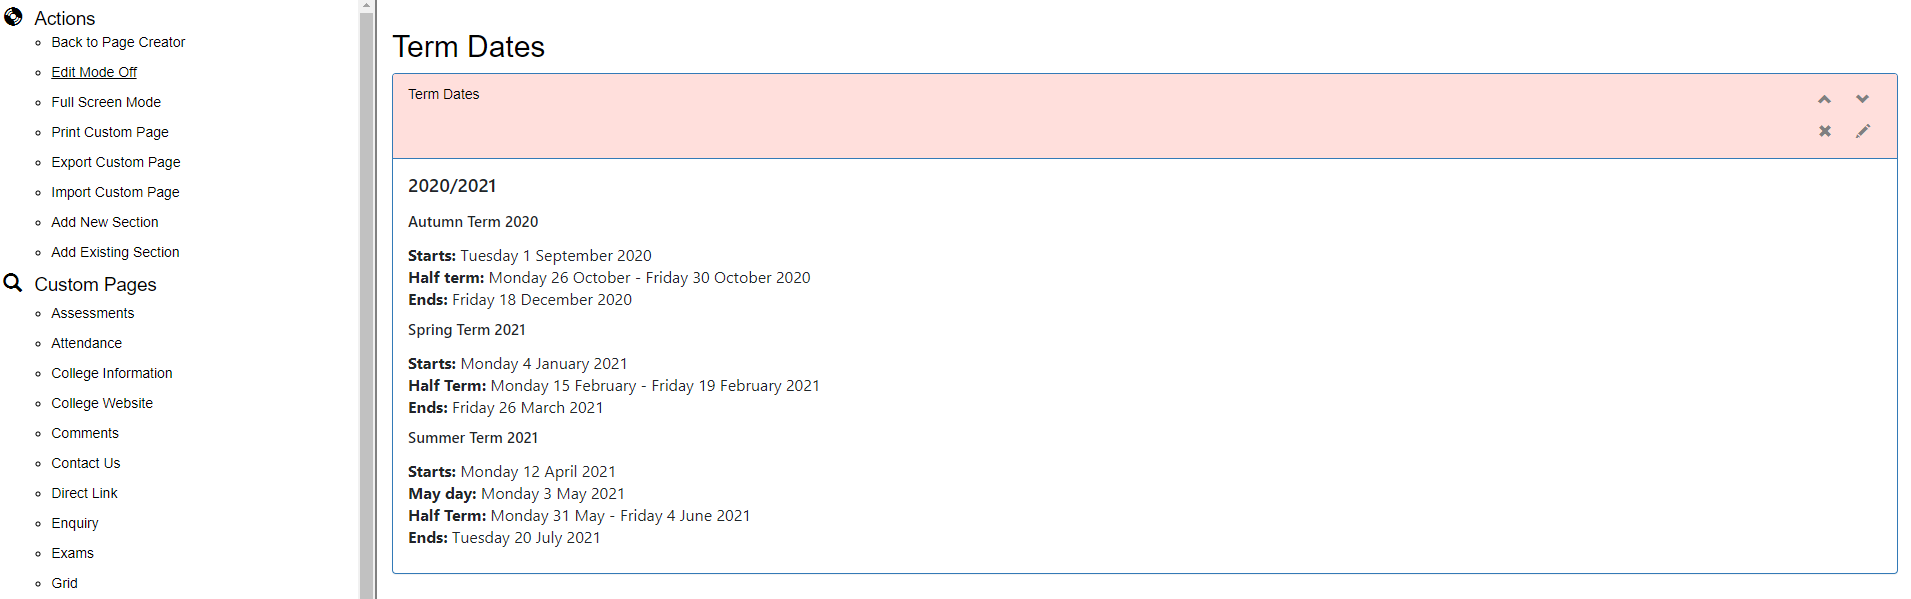
Page Section
This part shows the sections which live within the page and allows the page sections to be edited.
This part of the system is very flexible. Different types of sections can be added here.
Clicking to edit page sections will take the user to another page.
This will show all the editable sections on the page.
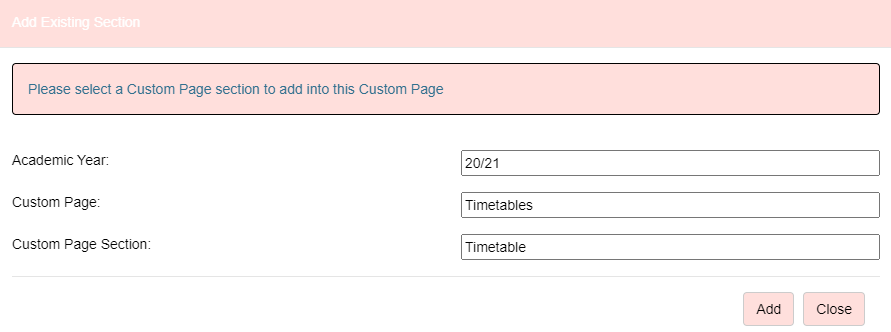
From here new sections can be added by clicking ‘Add New Section’ in the Action Panel.
There are many things you can do here.
Web Page
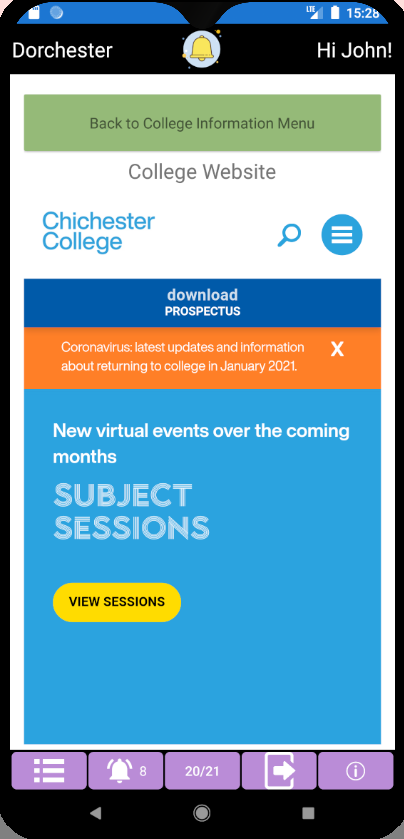
In the App this will allow the website to be browsed as in a normal browser but embedded within the App itself.
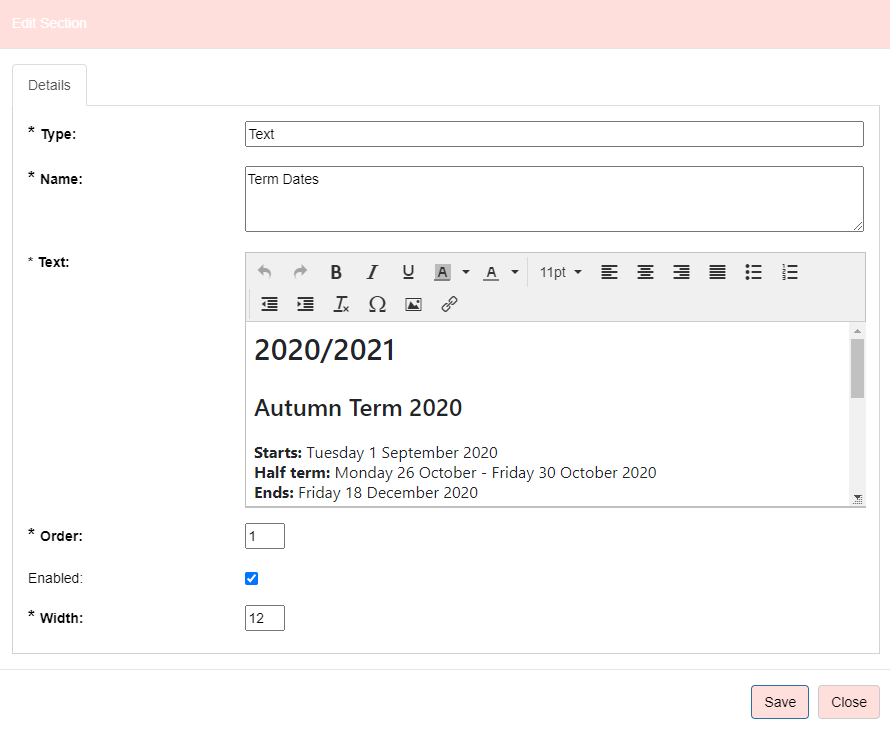
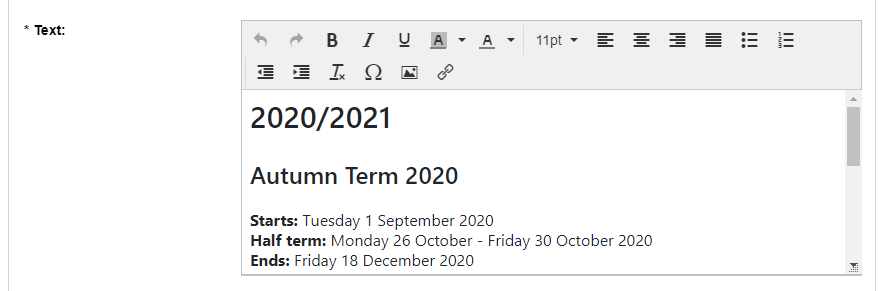
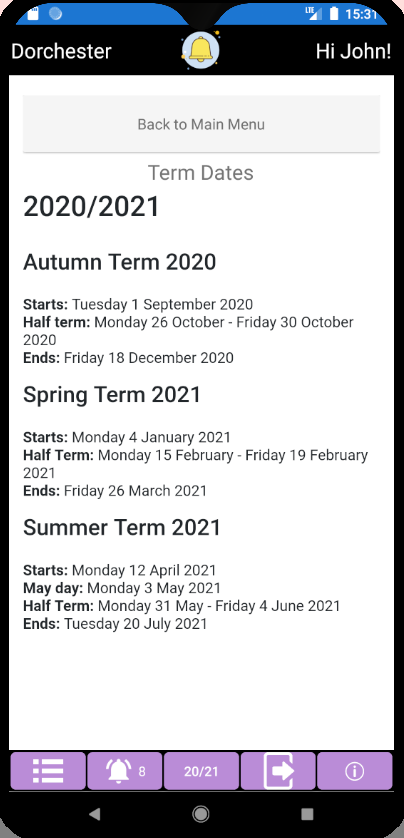
Text
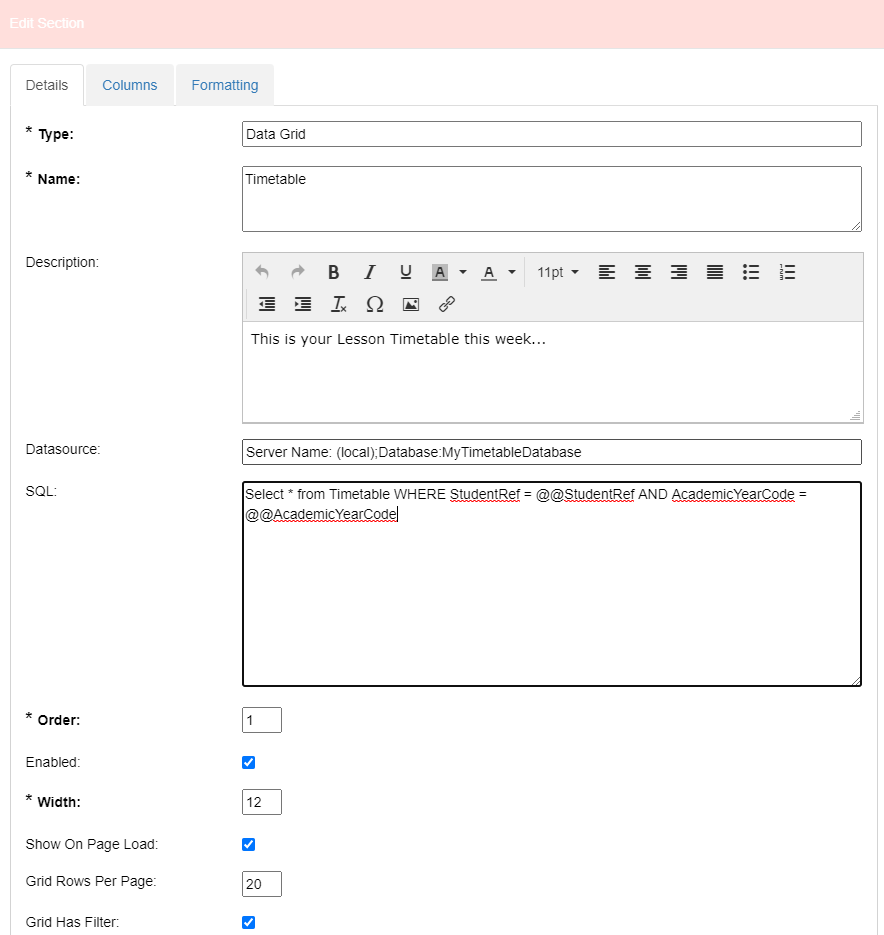
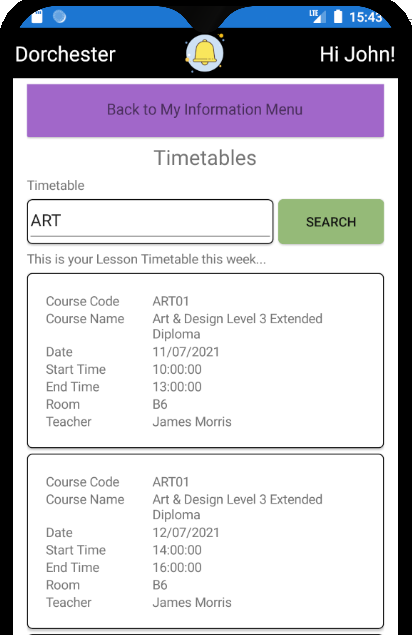
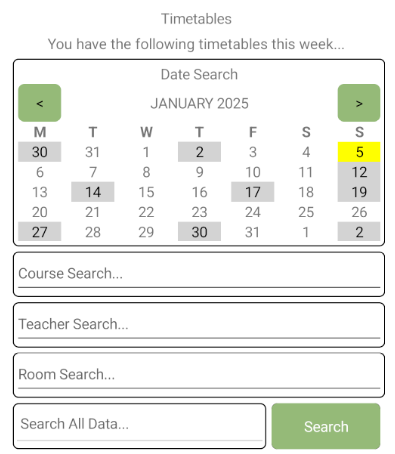
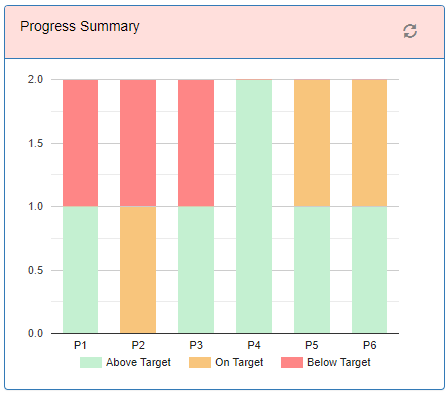
Data Grid
They can then choose from a list of their students.
Going back to the grid will show just the selected student. This setting will be remembered for other grids.
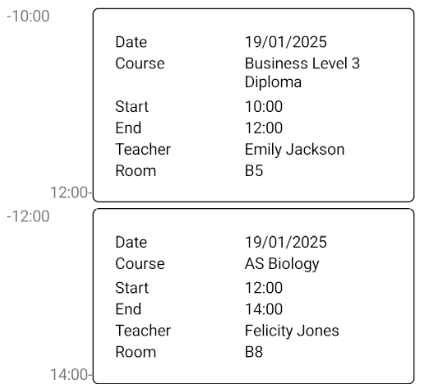
If the Data Grid returns any Time SQL columns then the time will be displayed on the left of the grid.
If two Time columns are returned then these will appear with the earlier and latest times.This is very useful for showing any time based data e.g. timetables, exams,etc.
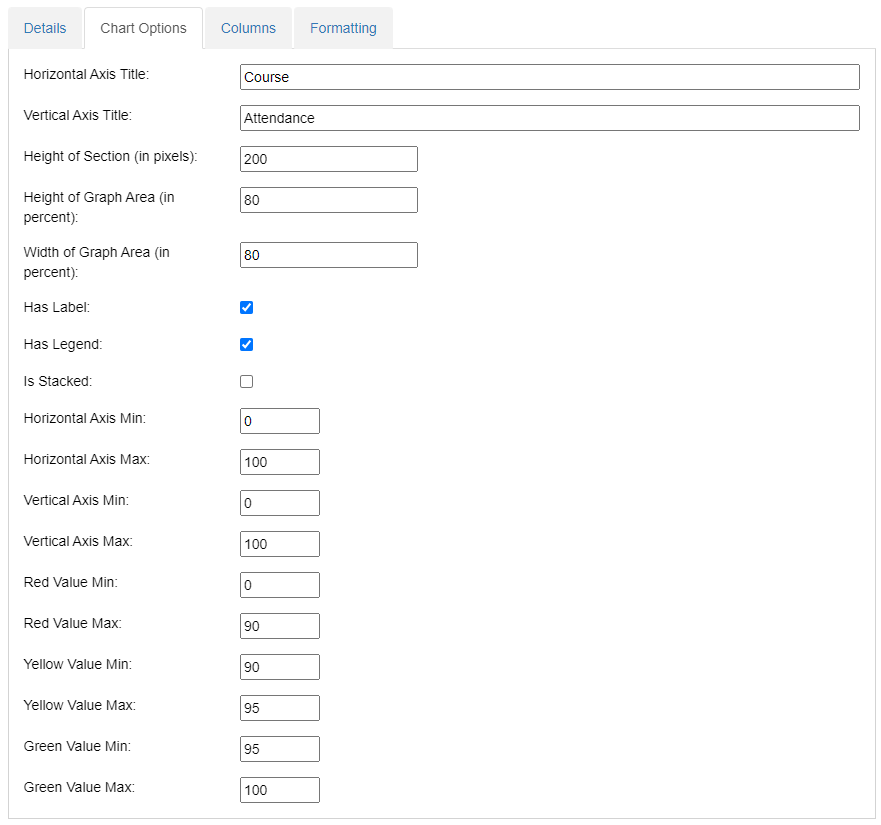
Chart
Details Tab
Chart Options Tab
Not all options are relevant to all the different chart types
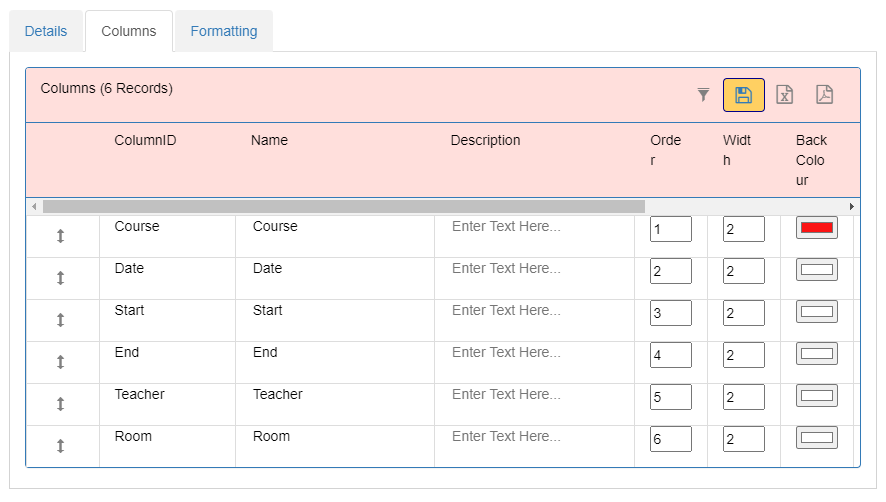
Columns
Not all options are relevant for charts
Formatting
The formatting tab allows the Colour of the chart segments to be dynamically determined by another column. For example you may return an html colour in the sql and use this to automatically change column colours. For Headline Types the Text Colour also works.
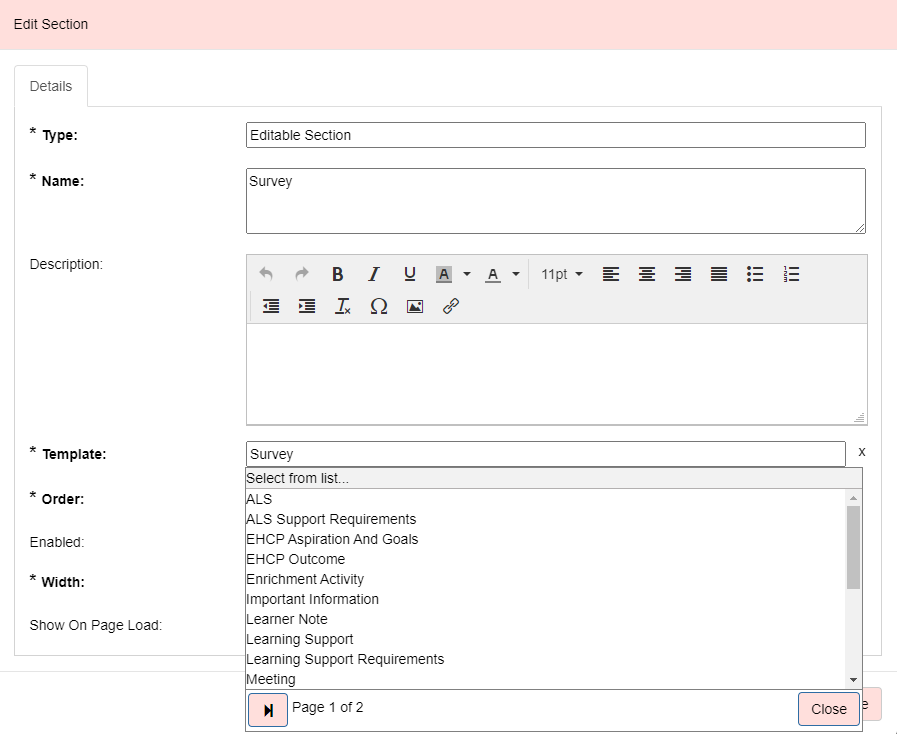
Editable Section
Editable Sections are Data Capture forms to store data against a student. Editable Section Templates can be added under Maintenance > Templates > Editable Sections Tab.
Each Template allows up to 60 input fields. For each input you can decide the label text, input type, whether it is required or not, permissions of who can view or edit. Input types include text, rich text, configurable dropdown list, check box, date, time or number.
There are two types of editable sections. The first one is where there can only be one entry for each student. The second one is where there can be multiple entries for each student.
Once the Editable Section is created this can be added onto the page by choosing the type Editable Section then under Template choose the Editable Section itself.
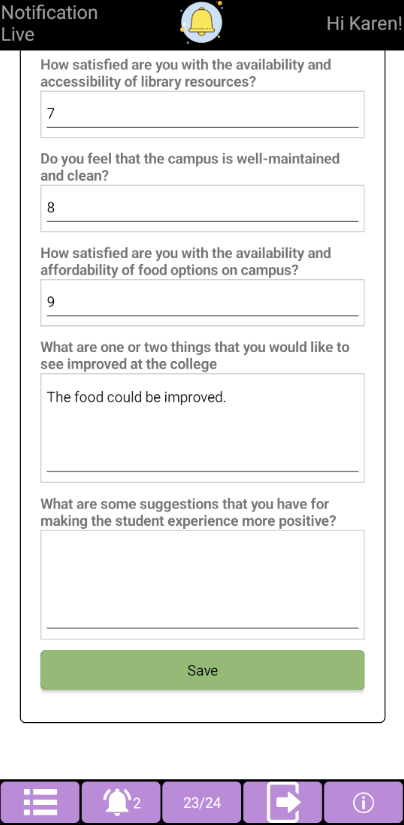
This will then appear in the App. Depending on permissions the user will be able to view the data, edit the data, add a new record or delete an existing record.
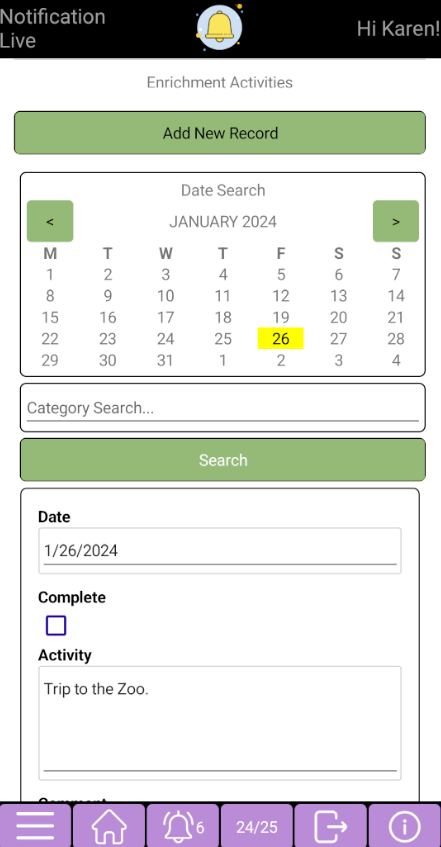
For sections which allow multiple records the section will be filterable by selecting a filter and clicking the Search button:
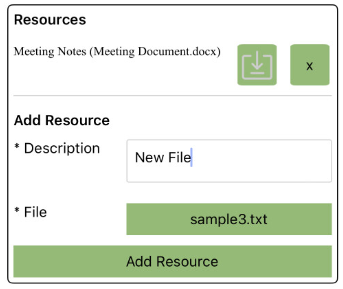
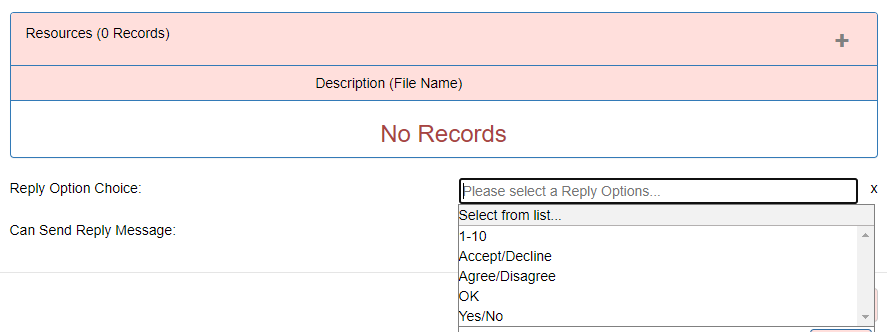
Resources can also be added to the record if the template has the ‘Allow Resource’ option checked. This allows existing resources to be downloaded or deleted. Or New resources to be added from the mobile device by giving the resource a description and searching for the file. Note that the default maximum upload size is 15Mb. This can be changed within the web.config file maxRequestLength <httpRuntime targetFramework="4.6.1" maxRequestLength="15360" />
For building ‘Editable Section’ Templates please see the General Documentation.
Actions
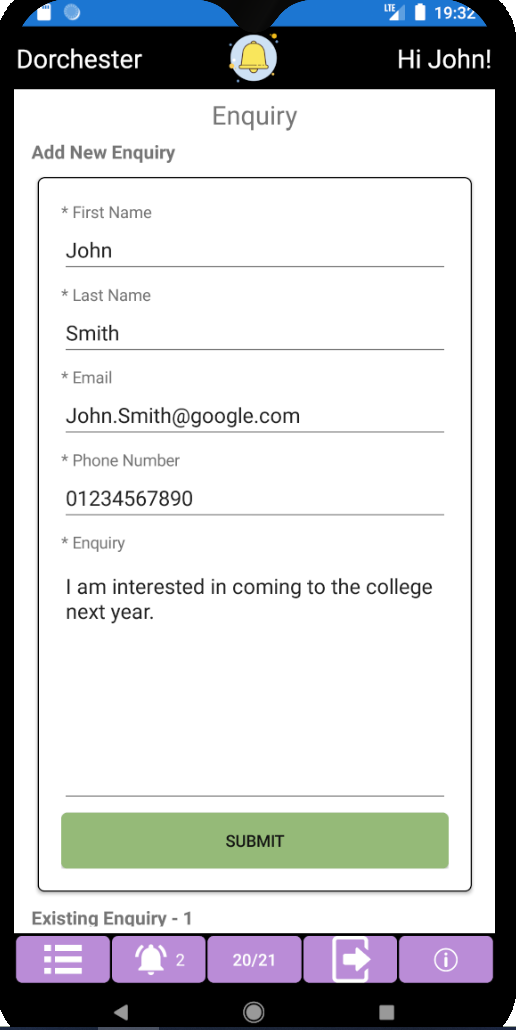
Actions allows for input forms to be created which come back into the system as actions for a member of staff to complete. Examples could include enquiry, absence forms, work experience forms.
Building Action Type - Please see the General Documentation for more details about creating action types.
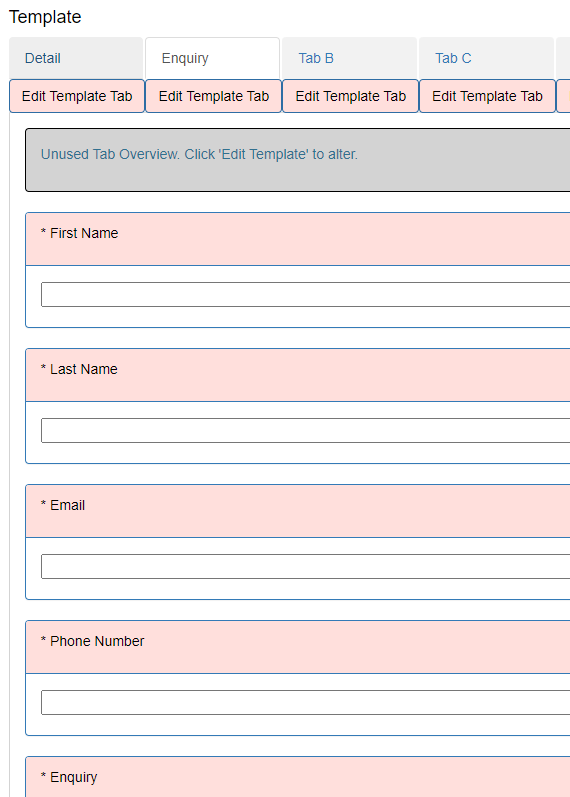
The Action Type contains 3 customisable tabs A - C where the college can define input types.
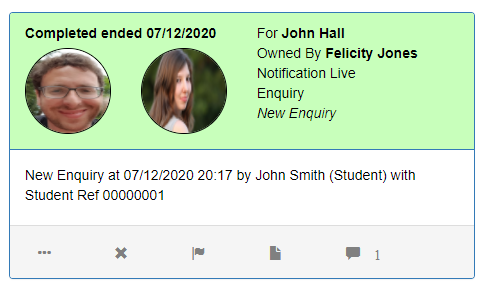
When actions are submitted from the App they come through as Actions…
These can be reviewed by members of staff and actioned as appropriate. Please see the General Documentation for more details about Actions. Action Types can also be configured to have a default ‘For’ and ‘Owner’ so that if a member of staff is incharge of ‘Enquiries’ these can be automatically set against them. Also the Action type can be set to automatically send a message to the staff member so they know a new enquiry has come through.
Other Page Section Features
The Side Panel
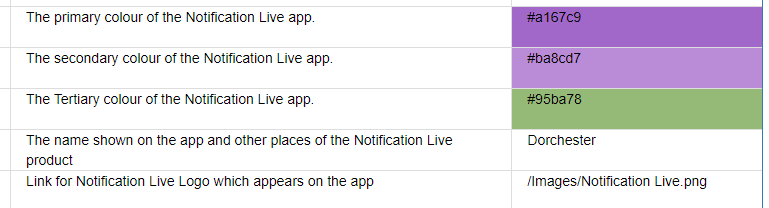
The College can change how the App appears within System > Themes. This includes:
The following are affected by themes:
Banners can be added to the top of the App.
New banners can be added within the website under Maintenance > Banners. Ideally banner images should have an aspect ratio of 8:1.
The App will show any enabled banners. If more than one banner is enabled the App will rotate through the banners on each page load. In order to conserve server resources banners are only updated by the App every 10 minutes.
Optionally each banner can be associated with a url. When clicking the banner the link will open on the device's default browser. URLs should start with the prefix https.
Allows users to be added, details changed and associated to permission groups.
It is recommended that users are imported from a datasource and synced every night. For example all the students within the college.
The Manage Users page can be used to bulk set passwords. It is recommended for Students and Staff that LDAP is used (See System Settings) so these users can login with their college username and password. However for users without a college account for example parents or applicants this facility can be used to generate random passwords for these accounts.
The page can also be used to bulk send out an email or sms to all users (or a subset) giving them details about how to download and login to the app. This gives the user their username and password details to login to the app with. Once logged in the user should not have to log in again on that device.
Please see the Manage Users section in the General Documentation for more information.
Allows Permission Groups to be created or altered.
Permission Groups are useful within the App so that different types of users see different pages in the App. See the Page Builder section for more details. The system ships with default permission groups - Staff, Students, Parents, Applicants etc. However your college may wish to have other groups of users. For example perhaps splitting out students into FE and HE students and so giving them different sets of pages in the App.
Permission Groups also define what staff can do in the website. For example you may not wish Standard Staff to create notifications and only allow administrators to do this.
Please see the Permissions section in the General Documentation for more information.
Sets up connections to SQL Server Databases used for Imports, Message Creator and Dashboards.
Import data into the system.
Course/Group
Allows notifications to be sent for all users on a course or group.
Enrolment
Imports each student enrolment. This is used by the system to work out which groups the students lives in so that teachers can send notifications to students in their group.
Organisation Structure
Imports Organisation Structure and their Managers. Up to 4 levels can be imported e.g. Campus > School > Department > Team. Each Notification can be associated with an area. This is useful for reporting and for the managers to keep track of their area. It is also used to be able to send notifications to all students/staff in the area.
Organisation Structure Course
Imports the courses assigned to each Organisation Structure. Allows managers to be able to send notifications to students in their area.
Organisation Structure Staff
Imports the Staff members assigned to each Organisation Structure. Allows Notification Live to work out which area the notification might live in and to be able to send a notification to all staff within their area.
Staff
Required by the system. The staff import creates staff user accounts including passwords. Staff Users can be associated with a teaching staff member. There is a distinction between users and staff in the system. Users do not need to be staff and staff do not need to be users. A user can log into the system and in most cases will be a teaching staff. However there may be users who are not teaching staff for example the IT Administrator or Head of Quality. On the flip side a college may have a member of teaching staff who is not a user of the system. This will mean that the member of staff can be used within the system but they will not be able to login.
Students
Required by the system. Sets up students and their accounts including passwords and permission groups.
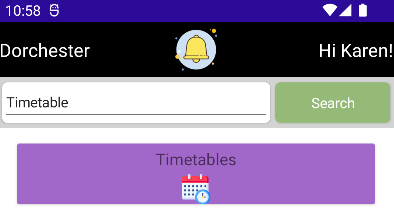
Timetables
Allows the system to work out which groups the teacher teaches, the enrolments within the group so that teachers can send notifications to students within their groups.
Other Users
Allows other types of users to be imported into the system e.g. parents, applicants, alumni, etc, etc
Recommended Order Import
The order in which the imports are imported is important as imports rely on other data being present and should be as follows.
View pending emails and emails sent. Allows the system to be setup to send emails.
Emails are useful for sending links for the user to download and login to the App. Emails can also be used when sending bulk notifications to help ensure the user views the notification or for users who do not have the App.
Please see the General Documentation for more details.
View pending SMS and SMSs sent. Allows the system to be setup to send SMSs.
SMSs are useful for sending links for the user to download and login to the App. SMSs can also be used when sending bulk notifications to help ensure the user views the notification or for users who do not have the App.
Please see the General Documentation for more details.
View the status of the Process Agent. The Process Agent performs various background jobs including imports and sending messages.
View and edit system settings which change the overall functionality of the system.
System settings used in Notification Live include:
View resources attached to all notifications.
View detailed error log and system status.
Managers can see their particular areas and can send notifications to staff or students in their particular area. Please see the General documentation for more information about how to use the Organisation Structure page.
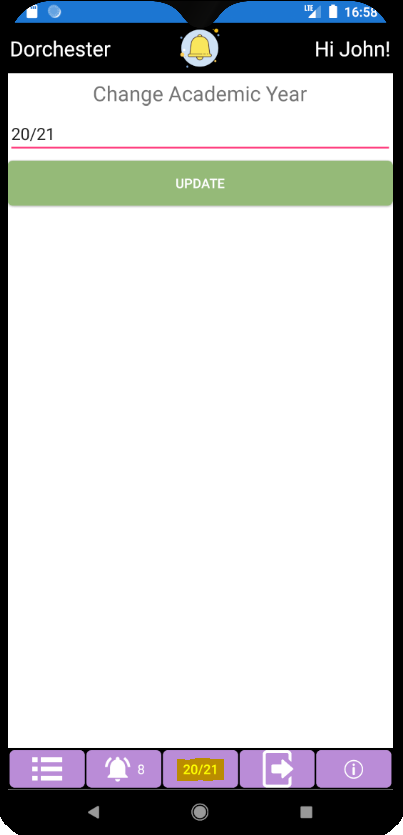
This screen allows academic years to be turned on or off and information copied between academic years such as the Page Creator.
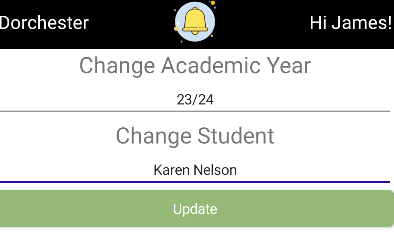
In the Mobile App users can change the Academic Year on the main menu.
Please see the General documentation for more information about how to use the Academic Years page.
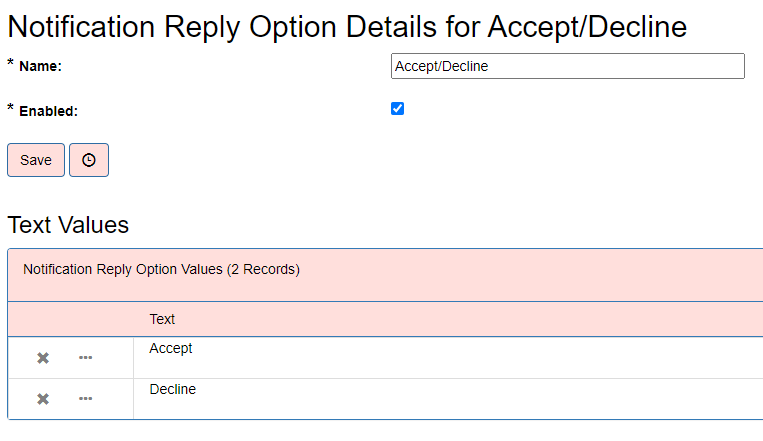
Notification Reply Options
Configures the list of Options under the Notification Reply Option Choice.
Each Reply Option contains multiple choices associated with it which the user can choose within the App.
The Search Menu allows users to search for information by Course, Group, Staff or Student. This can be used to send notifications to an individual student or member of staff, or all students within a group or course.
Depending who you are in the system you may see information targeted to you for example a list of your students, course or groups for quick access. You may also be able to see ‘All Student’ or ‘All Groups’
Please see the General documentation for more details.
Template Reporting is available under the Reporting menu. This allows a college to easily report on any Editable Section template that has been created. Under Template Type select Editable Section. Then choose the Template.
This shows several sections:
Notification Live ships with sophisticated reporting which allows the college to slice and dice the Notification data within the system. Please see the General documentation guide for more information.
The reporting can be accessed from the menu. The will open up the Reporting Homepage. The user should see the Notification Live section with up to two dashboards:
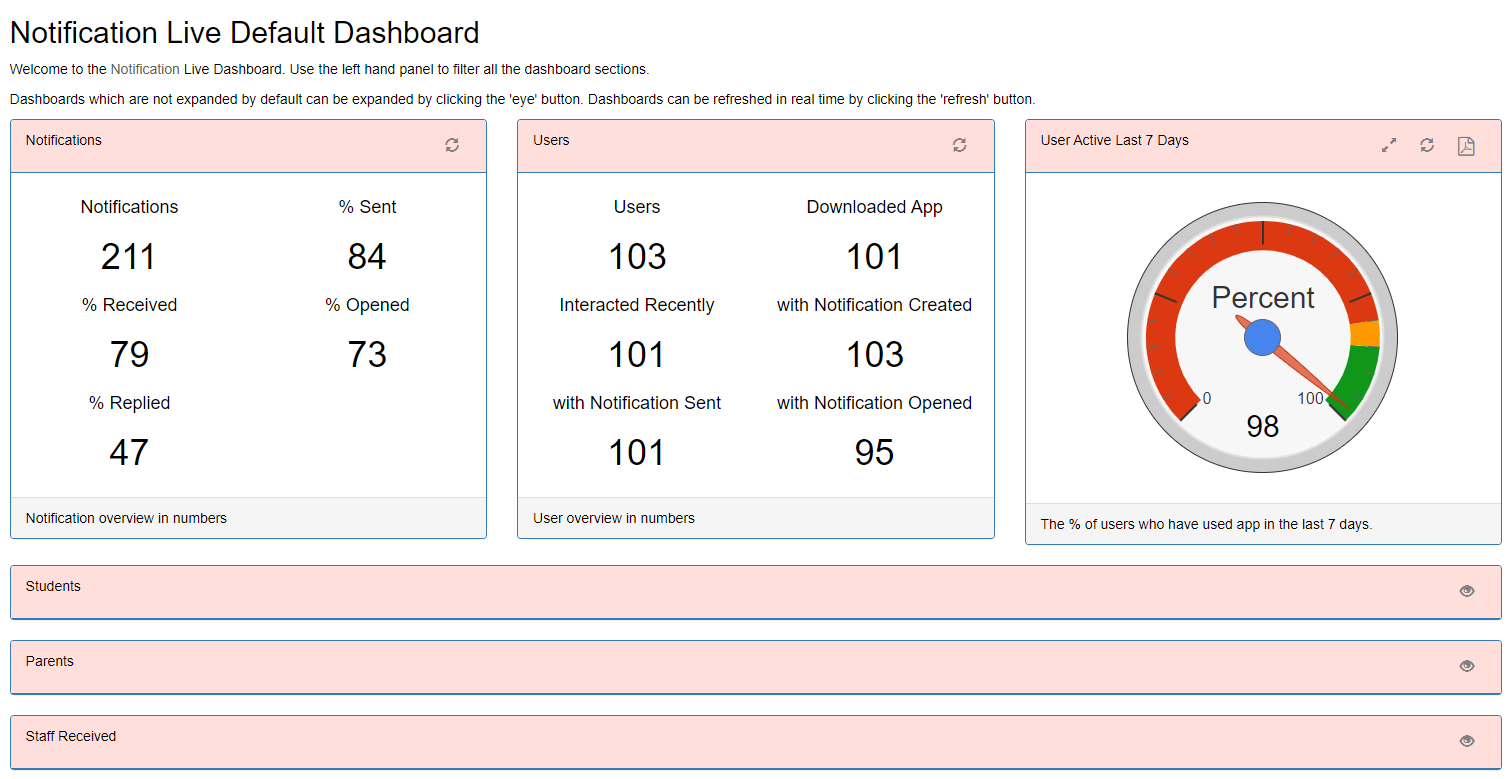
Default Dashboard
The default dashboard contains the following sections which are all filterable in the side panel:
Notifications
Overview of all notifications
Users
Are people using the App
User Action Last 7 Days
The percentage of users who have Interacted with the App in the last 7 days
Student, Parents, Staff Received, Staff Sent, Org Structure 1-4,
Comparison
Notification List
A summary of each notification
Notification Campaigns
A summary of each notification campaign. I.e. group of notifications sent at once.
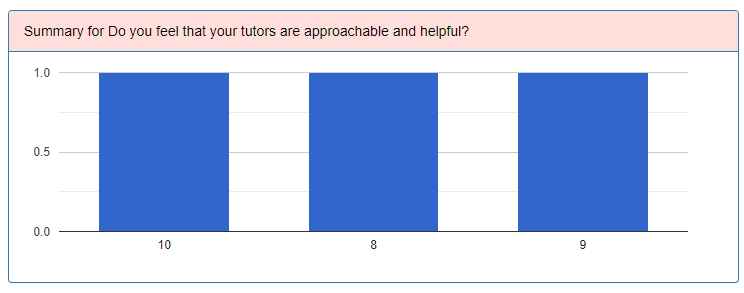
Notification Reply Option Choice Summary
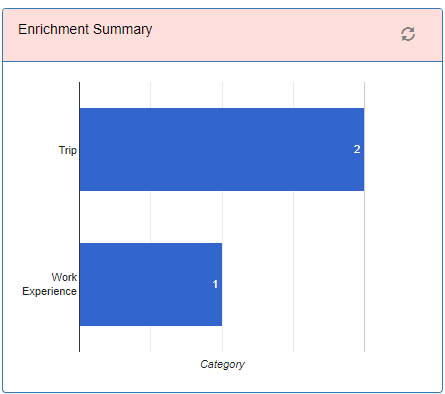
Numbers of each multiple choice reply option sent back in a reply. For example if a college sent out a survey in a notification with 1-10 options this would show the distribution of replies if filtered for a particular notification campaign.
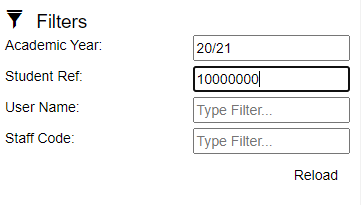
Filters
The following filters can be applied to each section:
This section is for developers who wish to integrate their current applications with Notification Live in order to send out Notifications.
There are many use cases for this where a college may wish to automate a Notification when an event happens in one of their systems. For example a student is marked as absent for a lesson. This is updated in the college’s student record system. As soon as this happens the college wants to send out a Notification to the student telling them that they did not turn up and asking for a reason.
This can easily be done by running the stored procedure called spNotification_AddMessage on the Notification Live database (normally called CollegeLive).
It can be run as follows passing in parameters some of which are optional
EXEC spNotification_CreateNotification
@CreatedByUserName = 'administrator',
@SendAs = 'College',
@ForUserName = 'Karen.Nelson',
@Title = 'Absence',
@NotificationText = 'You did not turn up to your lesson today at 9am. What was the reason for this?',
@CanSendReplyText = 0,
@ReplyOptionChoice = 'Absence Reason',
@NotificationGroupIdentifier = '12da53d1-5a36-46d9-b12e-17f50fbb59ee',
@UpdateKey1 = 'A',
@UpdateKey2 = 'B',
@UpdateKey3 = 'C',
@OrgStructure1Code = 'Hill',
@OrgStructure2Code = 'Science',
@OrgStructure3Code = 'Maths',
@OrgStructure4Code = 'TeamA',
@LinkToPageMenuName = 'Attendance'
Parameter | Required | Description |
CreatedByUserName | Yes | The UserName of the member of staff who created the notification. This UserName must exist in the system. |
SendAs | No | College means that the notification comes through with the App Logo and the name of the App as the creator. User means that the notification comes through with the photo and name of the member of staff who creates the notification. If left blank then defaults to College. |
ForUserName | Yes | The UserName of the user which will receive the notification. This UserName must exist in the system. |
Title | Yes | The title of the notification. |
NotificationText | Yes | The main body of the notification. |
CanSendReplyText | No | Whether the user can send a text based reply. If left blank default to false. |
ReplyOptionChoice | No | The list of reply options available for the user to select. These can be configured under Maintenance > Notification Reply Options. Examples could include 1-10, Agree/Disagree, Yes/No. If left blank then no reply options will be available. |
NotificationGroupIdentifier | No | A way to group notifications together. If you wish to group all absence notifications together then use a specific GUID for example. |
UpdateKey1/2/3 | No | This is the field in the SQL Datasource which identifies the record. It is useful if you wish to update another system when a notification is replied to. For example this could be the unique enrolment id field within your student record system. |
OrgStructure1Code/OrgStructure2Code/OrgStructure3Code/OrgStructure4Code | No | The Organisation Structure to assign to the notification. The Organisation Structure must exist in the academic year. |
LinkToPageMenuName | No | The Link to Page option allows the notification to be linked to any page within the menu. A button will appear within the notification which when clicked will go directly to the page. The Page Name must exist within the academic year. |
ScheduleDate | No | The Date/Time that the notification should be sent at. If left blank will be sent immediately |