Observation Live Documentation
For Lesson Observations
Observation Live has the following key features:
Observation Live is a stand alone product but can be used in conjunction with Planning Live - System Live’s platform for Schemes of Work and Lesson Planning. Using both products together will enhance both products.
Observation Live uses the System Live framework which has the following key standard features:
Observation Evidence Option 18
Observation Live compromises of the following main components: a Website, a SQL Server database and a Windows Service.
Website
The website provides the front end of the system where all users will login to access. This website can be hosted locally on the college’s intranet and/or made available externally. Typically the website can be accessed from a url which appears as follows http://ServerName/CollegeLive or www.college.ac.uk/CollegeLive. Colleges will often embed this link on their intranet page for a seamless experience.
Prerequisites
Windows Server 2012 or above
IIS7 or above
10 GB Hard Drive
3Ghz Quad Core Processor
8GB RAM
.NET 4.6.2 Installed
Please note that hardware requirements are estimates and maybe higher or lower depending upon the volume of concurrent users. Additionally if the server has other systems installed that are taking up resources then the resources available to the system may be considerably lower. Please contact support if unsure.
Database
The data behind the system is stored within a SQL Server Database.
Prerequisites
SQL Server 2014 or above
100 GB Hard Drive
3Ghz Quad Core Processor
8GB RAM
.NET 4.6.2 Installed
Please note that the Website and Database can be hosted on the same server. However the resources required will be higher to accommodate this.
Windows Service
The Windows Service known as the Process Agent will perform background processes required by the system. This includes scheduling data to be imported into the system and sending emails.
Installation
The Installation Wizard should guide the users in how to install the Website, SQL Server Database and Process Agent.
Configuration
Once installed there are various steps required before staff can enter Observations. This outlines the minimum steps required but other steps might be needed.
User Authentication
The college will need to decide how they want users on the website to be authenticated. There are 4 methods:
In order to use windows authentication the following settings are required in IIS. Under the website navigate to authentication. Make sure that ASP.NET Impersonation and Windows Authentication are turned on, and that Anonymous Authentication and Forms Authentication are turned off.
In order to use any of the other authentication methods the following settings are required in IIS. Under the website navigate to authentication. Make sure that Anonymous Authentication and Forms Authentication are turned on, and that ASP.NET Impersonation and Windows Authentication are turned off.
The system ships with a default administrator account with username: administrator and password: Password. This should be altered as soon as possible to have a password of your choice.
Observers
The College needs to decide which staff are Observers. Staff which are observers should be added to the Observer permission group.
Imports
The system requires data from other systems to be used. At a very minimum staff/users and courses/groups need to be imported. Other useful imports include Organisation Structure, Organisation Structure Course, Organisation Structure Staff, Room, Students, Enrolments, Timetables, Tutorial. The imports need to be SQL Server views or stored procedures. Each import has a specification associated with it showing the columns and data required. Imports can be scheduled using the Process Agent at a specified time in the day. Colleges who use ProMonitor or ProSolution can use preconfigured imports. Colleges who do not wish to use ProMonitor or ProSolution will need to set up SQL Server views from their relevant sources.
Templates
Templates govern how the Observation will look. This includes labels, guide text, visibility of text boxes etc. Crucially it also determines which grading schemes are used for the observation if indeed any. The system ships with an example template for a Graded Observation and a Learning Walk. The College will probably wish to alter these to fit their processes and/or create additional templates for different types of courses.
Once this setup is completed Observers should be able to login and start creating Observations
Online Demo
There is an online demo for Observation Live which can be found here http://www.demo.system-live.com
This can be useful to see an example of how the system can be configured. This can show you sample Observations. The system can be logged in with different types of users.
To access the demo site the following credentials should be used.
Type of User: Administrator
Username: Administrator
Password: Password
Type of User: Head of Campus
Username: Kady.McPhee
Password: Password
Type of User: Head of School
Username: Linzi.Stephenson
Password: Password
Type of User: Head of Department
Username: James.Morris
Password: Password
Type of User: Teacher
Username: Felicity.Jones
Password: Password
Type of User: Observer
Username: John.Hall
Password: Password
Please feel free to try out the demo site and edit information. Please note that the demo site may be regularly reset so any changes will be lost.
Observation Live has many General Features used throughout. Please see the General Documentation for more details.
Please see the General Documentation for more details.
The first page after logging into the system is the homepage. This displays your user with appropriate timely information. The type and scope of the information being shown depends upon the type of user.
The type of user can be split as follows
In order to view the homepage information for Observation Live the user will need to have the permission ‘Show Observation Live Homepage’. The homepage for each user can appear different as each section is governed by a permission.
Standard users are shown information which pertains to the Observations they are associated with (either as an Observer or Teacher)
Managers are shown an information overview for their entire area. See the Organisation Structure section to see how users can be made managers.
Global Users are shown an information overview for the entire college. To be a Global User then a user requires the Homepage permission ‘View all data’.
The homepage consists of the following sections.
Notice Board Top Message
The top of the homepage may contain a message or message(s) set by an administrator informing the user how to use the system. This may provide useful links to useful documentation regarding how your college expects you to fill out Observations.
My Upcoming Observations
Shows the user the next 10 upcoming Observations. Displays the Course or Tutorial the observation is for as well as the date and start time of the observation. Observers will see their next 10 upcoming observations where they are the observer. Teachers will see their next upcoming observations where they are the teacher as long as the observation has been made visible to them. The ‘...’ button will take the user to the Observation in question. If Managers of Organisation Structure or users who can see all observations log in they will see the Teacher being observed rather than the Course/Tutorial.
My Previous Observations
Shows the user their previous 10 Observations. Displays the Course or Tutorial the observation is for as well as the date and start time of the observation. Observers will see their previous 10 observations where they are the observer. Teachers will see their previous observations where they are the teacher as long as the observation has been made visible to them. The ‘...’ button will take the user to the Observation in question. If Managers of Organisation Structure or users who can see all observations log in they will see the Teacher being observed rather than the Course/Tutorial.
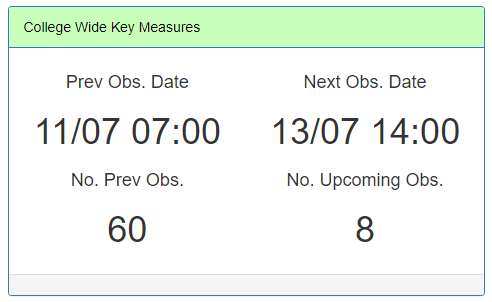
My Key Measures
Shows an overview of your observations. The key measures include:
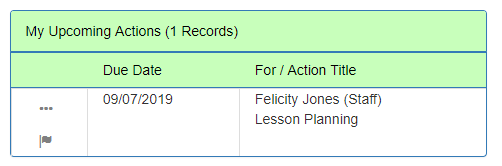
My Upcoming Actions
Actions can be created on the back of an observation. This shows the next 10 upcoming actions based on the due date which have a completion status of ongoing. Actions will be shown where the action is for the member of staff, the member of staff created the action or the member of staff is the owner of the action.
The data shows when the action is due, who the action is for and the action title. Clicking the details button at the beginning of the row will show the user more information about the action.
My Overdue Actions
The same as the ‘My Upcoming Actions’ but this shows the 10 most overdue actions based on the due date
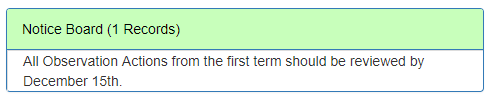
Notice Board
Administrators can set messages for everybody to appear on the Notice Board. This can provide standard users instructions regarding the Observation process.
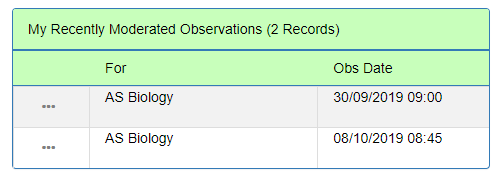
Recently Moderated Observation
Shows the last 10 observations which have been moderated in the past 14 days.
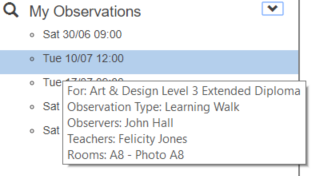
My Observations
The side panel will show all the user’s observations. The list is ordered with the next upcoming observation on top. Hovering over the observation will show the user useful information about the observation including:
Clicking the observation will take the user to the Observation detail screen to be able to further view/edit the observation.
The system menu contains the following sub menus. Please see the General Documentation for more detail.
Allows users to be added, details changed and associated to permission groups. Allows users to be made into observers.
Allows Permission Groups to be altered.
Sets up connects to SQL Server Databases used for Imports, Message Creator and Dashboards.
Import data into the system.
Course
Required to use the system. Populates the system with courses and teaching groups which sit within the course. This allows observers to add observation against the course and group.
Enrolment
Recommended if the college wants to see a group profile of learners present within the observation. When adding an observation for a group the system can automatically pull in the learners in the group.
GradeBook Element
This import attaches Grade Elements e.g. Units to the Groups. This can be useful if the college stores unit information for example in ProMonitor. Observations can be associated with a specific unit.
Organisation Structure
Imports Organisation Structure and their Managers. Up to 4 levels can be imported e.g. Campus > School > Department > Team. Each Observation can be associated with an area. This is useful for reporting and for the managers to keep track of their area.
Organisation Structure Course
Imports the Courses assigned to each Organisation Structure. Allows Observation Live to work out which area the observation might live in.
Organisation Structure Staff
Imports the Staff members assigned to each Organisation Structure. Allows Observation Live to work out which area the observation might live in.
Observation
Colleges new to Observation Live might have Observation information in another system. This import can be used to populate the system with historical observations. It is also useful if the college wants to programmatically import observation schedules.
Qualification Aim
Imports information about each Qualification Aim e.g. Sector Subject Area, NVQ Level. Useful for high level reporting.
Register
Imports detailed register attendance data for each student. Contains data about the date, start time and end time of the session as well as the mark e.g. Present. Useful if observers wish to see which students attended during an observation.
Room
Imports a list of Rooms into the system. Useful if the college wants to associate the Observation with a Room.
Staff
Required by the system. The staff import creates staff user accounts including passwords. Staff Users can be associated with a teaching staff member. There is a distinction between users and staff in the system. Users do not need to be staff and staff do not need to be users. A user can log into the system and in most cases will be a teaching staff. However there may be users who are not teaching staff for example the IT Administrator or Head of Quality. On the flip side a college may have a member of teaching staff who is not a user of the system. This will mean that the member of staff can be used within the system but they will not be able to login.
Statistic Course
Imports custom statistical information against each course. Up to 8 numerical fields, 8 text based fields and 2 date fields can be imported. Useful for Observation Planning and reporting.
Statistic Group
Imports custom statistical information against each group. Up to 8 numerical fields, 8 text based fields and 2 date fields can be imported. Useful for Observation Planning and reporting.
Statistic Staff
Imports custom statistical information against each group. Up to 8 numerical fields, 8 text based fields and 2 date fields can be imported. Useful for Observation Planning and reporting.
Student
Recommended if the college wishes see Group Profile information for the learners present in the observation.
Timetable
The timetable import will import each Lesson Date, Start Time, End Time, Room and Teacher for each Group. This allows lesson dates to be looked up when creating new Observations.
Tutorial
Imports a list of tutorials into the system. Required if the College wants to create Tutorial based observations.
Recommended Order Import
The order in which the imports are imported is important as imports rely on other data being present and should be as follows.
View pending emails and emails sent. Allows the system to be setup to send emails.
View pending SMS and SMSs sent. Allows the system to be setup to send SMSs.
Allows Message Creators to be generated which allows you to create your own custom emails/sms or app notifications to be sent out on an adhoc basis or scheduled periodically. The system ships with some default creators:
View the status of the Process Agent. The Process Agent performs various background jobs including imports.
View and edit system settings which change the overall functionality of the system.
Observation Visibility Email
A flag to automatically email staff when the Observation is made visible to the teacher or manager.
Observation Grade Definition
This allows the college to change the word overall Observation ‘Grade’ to a term of their choice for example Outcome. This will display the alternative term to ‘Grade’ in the following places:
Microsoft 365 Integration
A flag to say whether the system should integrate with Microsoft 365 to pull in calendar and other information.
Microsoft 365 Application ID
The ApplicationID found within Microsoft Azure to be able to connect to Microsoft 365.
Microsoft 365 Secret Code
The Secret ID found within Microsoft Azure to be able to connect to Microsoft 365.
A college can change the theme of the website including colours, the name of the Action Live and images.
View detailed changes to all observation records.
View resources attached to all observations.
View details error log and system status. Allows troubleshooting for Microsoft 365 integration.
This screen allows organisation structure areas to be set up.
This screen is useful in Observation Live for the following reasons:
Please see the General documentation for more information about how to use the Organisation Structure page.
The Homepage Noticeboard page allows Observation based notifications to be placed on the Observation Live homepage. This could give users an overview of the system or key dates or milestones.
Please see the General documentation for more information about how to use the Noticeboard page.
When adding posts to the Wall each post requires a category. For example an Observation Category could be set up for just Observers to view and post, and a Teaching and Learning Category could be set up for all users to view and post, etc.
Please see the General documentation for more information about how to use the Wall Post Category page.
This screen allows college rooms to be set up. Rooms are useful in Observation Live as the observation can be placed in a room. This obviously allows users to see where the observation has or will take place.
Please see the General documentation for more information about how to use the Room page.
Templates govern how the different observation, moderation and action types will look and work. This includes:
The system ships with a standard observation template for Graded and Learning Walks and a standard moderation template.The College will probably wish to alter these to fit their processes and/or create additional templates for different types of observations.
The Template page is also used to determine how each action type will look. Each action needs to be given an action type. This is used for the following reasons:
Please see the General Documentation for more information about the Template page.
This screen allows academic years to be turned on or off and information copied between academic years such as templates and observation evidence.
Please see the General documentation for more information about how to use the Academic Years page.
There are various pages within Observation Live which shows statistical information against courses, groups and staff. This page allows these columns to be turned on/off and renamed. The pages which show these columns include:
It is up to the college to decide which statistical information might be appropriate for courses, groups and staff. Statistical information is important for observers planning which future observations to create and once in an observation to see how well the course, group or staff is performing overall. Each statistic can be associated with the observation input field in the template which for example could allow the observer to comment against the Group’s attendance for example. It can also be useful for reporting purposes e.g. plotting achievement rate against average observation score for each course.
Please see the General Documentation for more detail about this page.
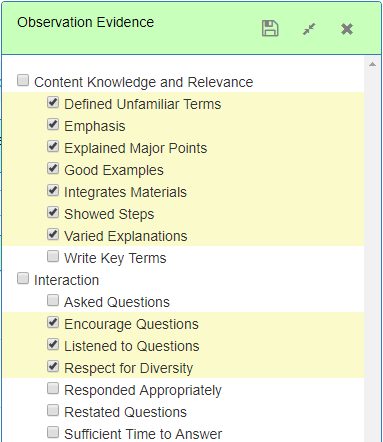
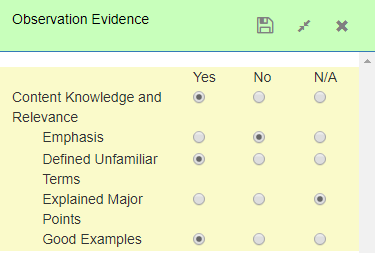
This page allows the user to add or modify the list of observation evidence. The Observation Evidence is a quick way for the observer to record evidence of teaching within the observation. The evidence list can be a series of checkboxes or radio buttons depending how it has been configured.
Multiple Observation lists can be configured for different types of Observations. The Observation List can be associated with the Observation Template.
The first page shows a list of all the different Observation Evidence Types in the system. New lists can be added and edited.
Clicking the ‘...’ against the Observation Evidence allows the user to configure the list. The following information can be altered:
This page displays all the first level items. New first level items can be added or deleted or modified.
Each item comprises of the following:
Clicking the ‘Down Chevron’ against the row will show the second level items which sit under the first level. New second level items can be added or deleted or modified.
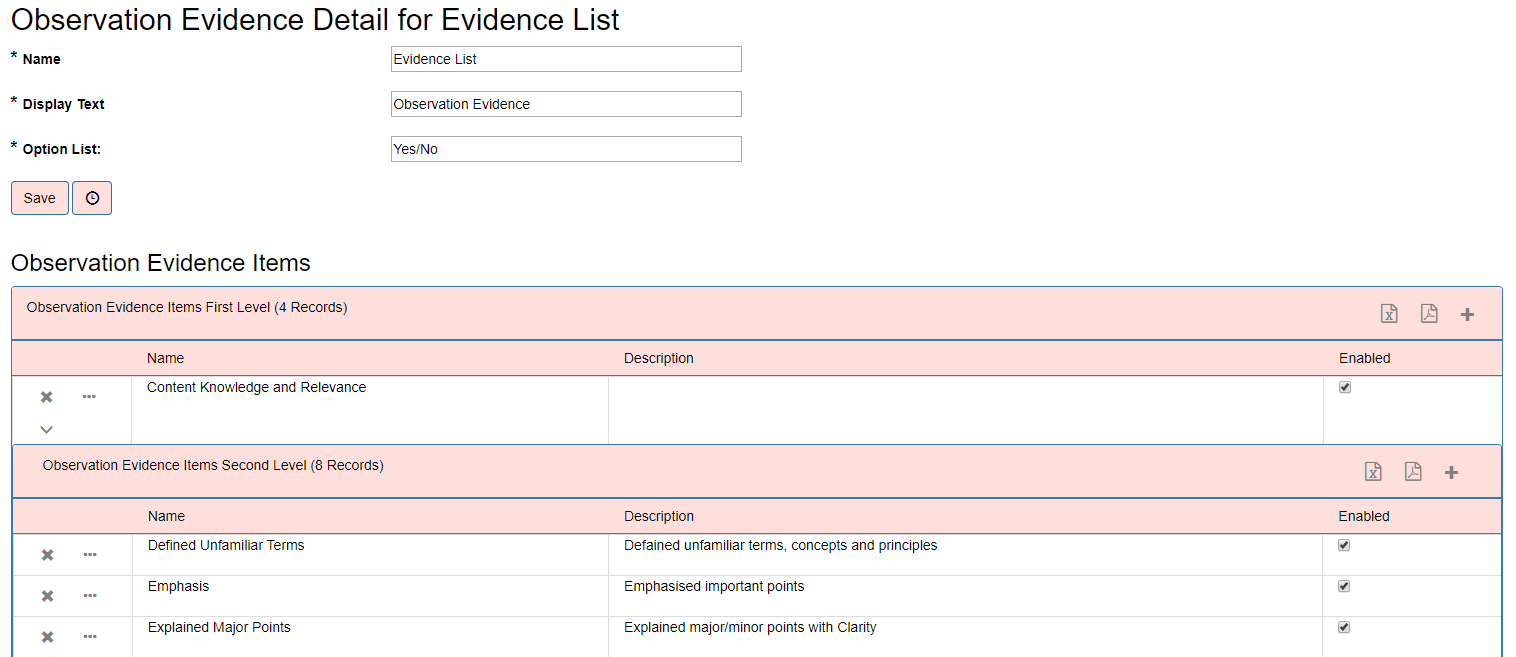
This page allows the list of radio buttons against each observation evidence item to be configured. The Option list can be associated with an Observation Evidence list.
The detail page will allow multiple option values to be created. A maximum of 5 option values can be created for each option list The value columns available are:
For example the following option values…
When they are associated with the observation evidence list against the observation template will create the following 3 radio buttons against the observation.
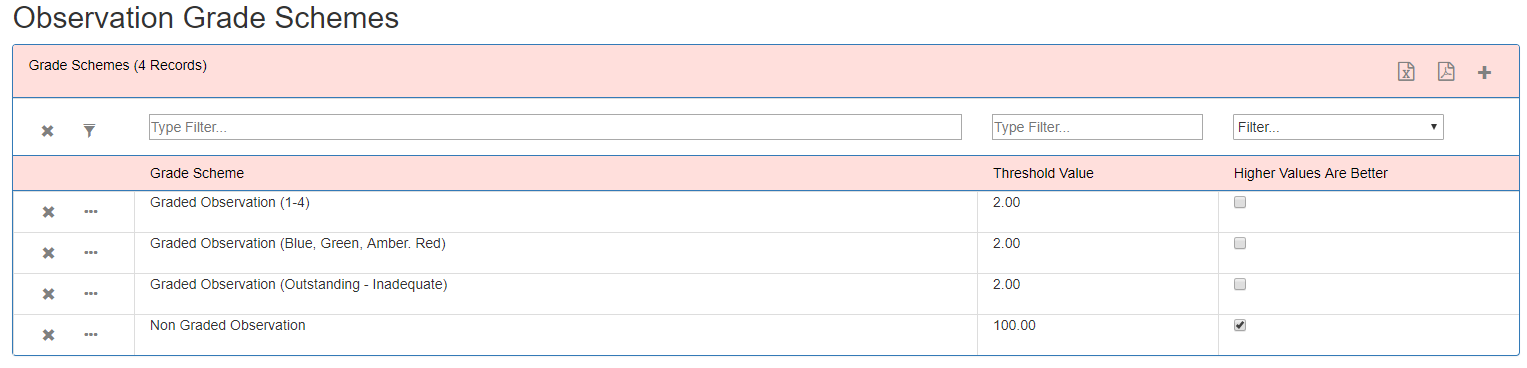
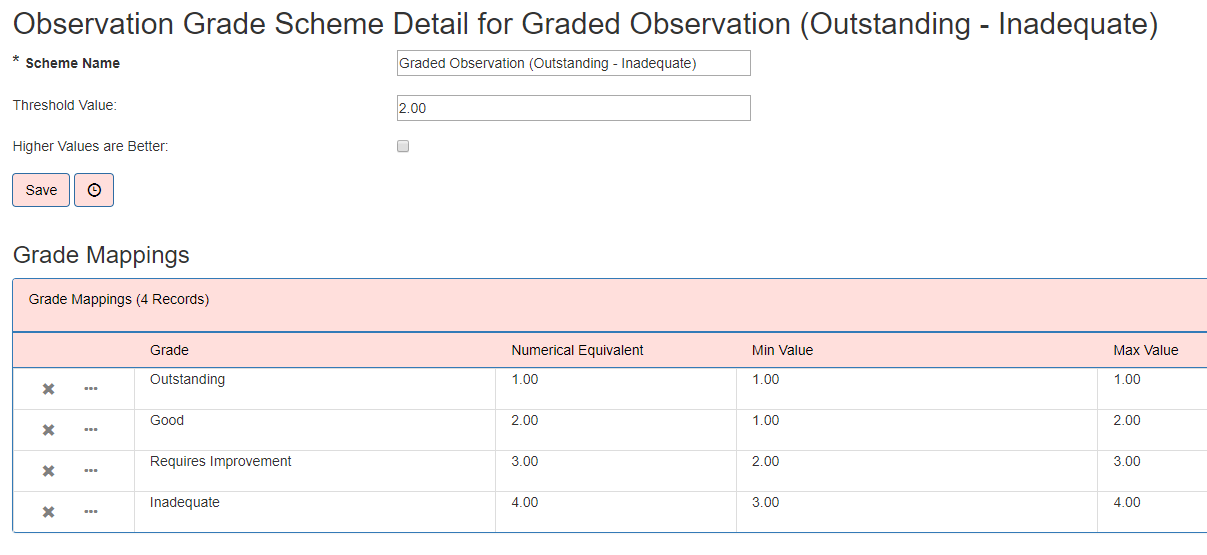
The observation Grade Scheme pages allows users to edit, add and delete Observation Grade Schemes. An Observation Grade Scheme determines how an observation will be graded and where the grade given is above or below threshold.. The college can associate the Observation Template with an Observation Grade Scheme. The system ships with the following grade schemes to cater for different observation processes.
Clicking the details button against a Grade Scheme allows the user to:
The Grade Mapping grid displays the following
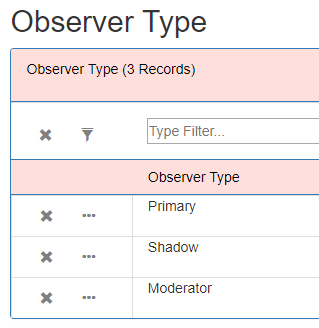
The Observer Type page allows user to edit, add and delete Observer Types. Observer Types are used in the Observation Detail page when adding new Observers. Example types include Primary, Shadow, Moderator etc. An Observer Typer can be made default. This means that when adding a new observer this type will be selected by default.
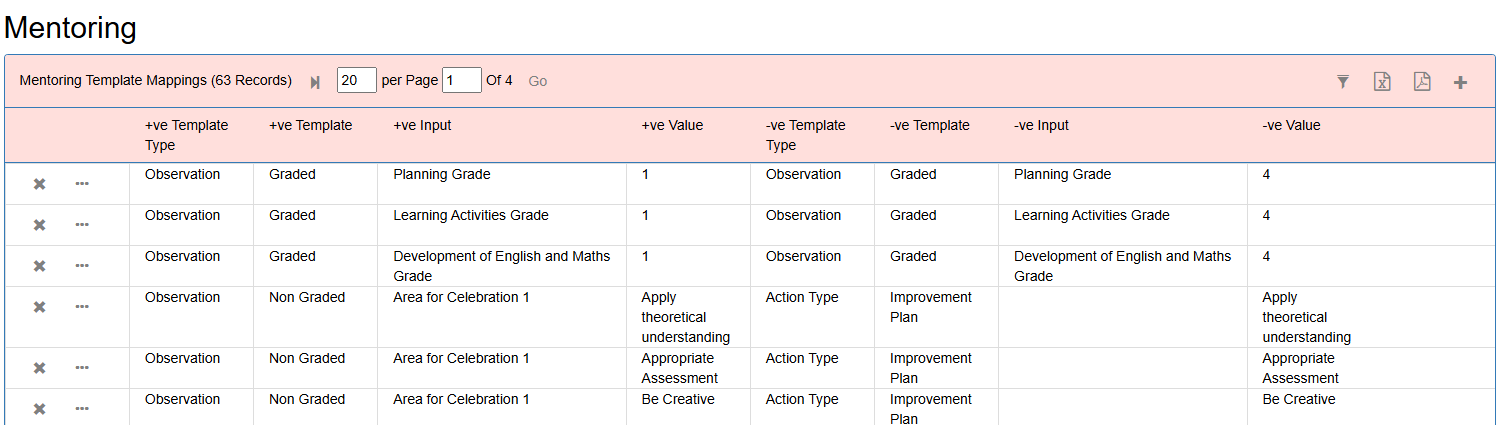
Members of staff can be paired up together. Each pairing consists of a mentor and a mentee. The system can help match mentors and mentees by finding staff who are good at a particular attribute and matching them with staff who are poor at a particular attribute for example Lesson Planning or Promoting Technology. Observers can create these pairing within the observation page or this could be done by heads of department or admin staff. Once matched, progress between the mentor and mentee can be monitored in the form of actions.
Staff can be matched together based on attributes recorded in Observation Live. This can be either information entered into an observation or an action. In order to create these matches the system needs to know how these positive attributes map to the equivalent negative attribute. For example:
Existing mappings can be viewed and new mappings can be created per academic year from here. Firstly there are the positive attributes:
Then there are the equivalent negative attributes to map to.
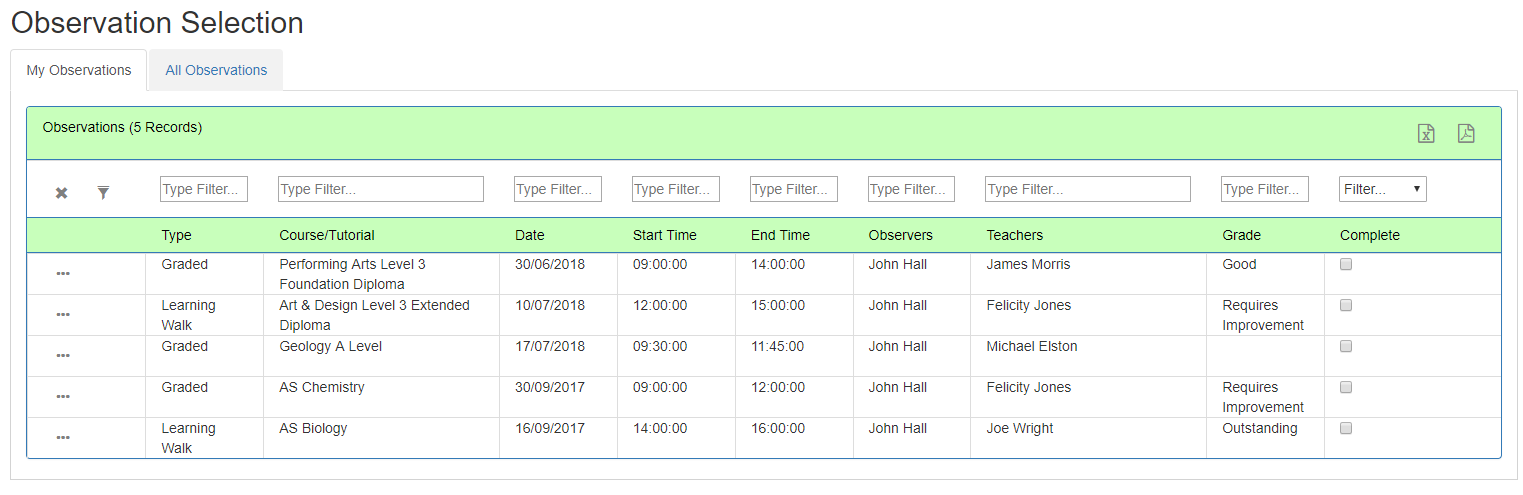
The Observation Selection page allows the user to search for Observations.
This screen can have up to 3 tabs:
The columns displayed in the tabs are:
Other features of the tab include:
Actions
Add New Observation
The user can add a new observation. In order to be able to add an Observation the user needs the Permission ‘Can Add Observations’ or ‘Can Add Observations for Other Observers’. See the ‘Add New Observation’ section for more details. There is no context to this page so this is a good place to add an ad-hoc observation. To add an observation more specifically for a course, staff or observer then go to the Observation Planner screen.
Export Offline Template
The user can export a pdf document for an Observation Template which can be filled in when the user has no online connectivity. At a later date these pdf documents can be imported back into the system. In order to be see this action the user needs the Permission ‘Can Add Observations’ or ‘Can Add Observations for Other Observers’. Please see the ‘Offline Template’ Section for more detail.
Import Offline Template
The user can import a pdf document generated within the previous action. In order to be see this action the user needs the Permission ‘Can Add Observations’ or ‘Can Add Observations for Other Observers’. Please see the ‘Offline Template’ Section for more detail.
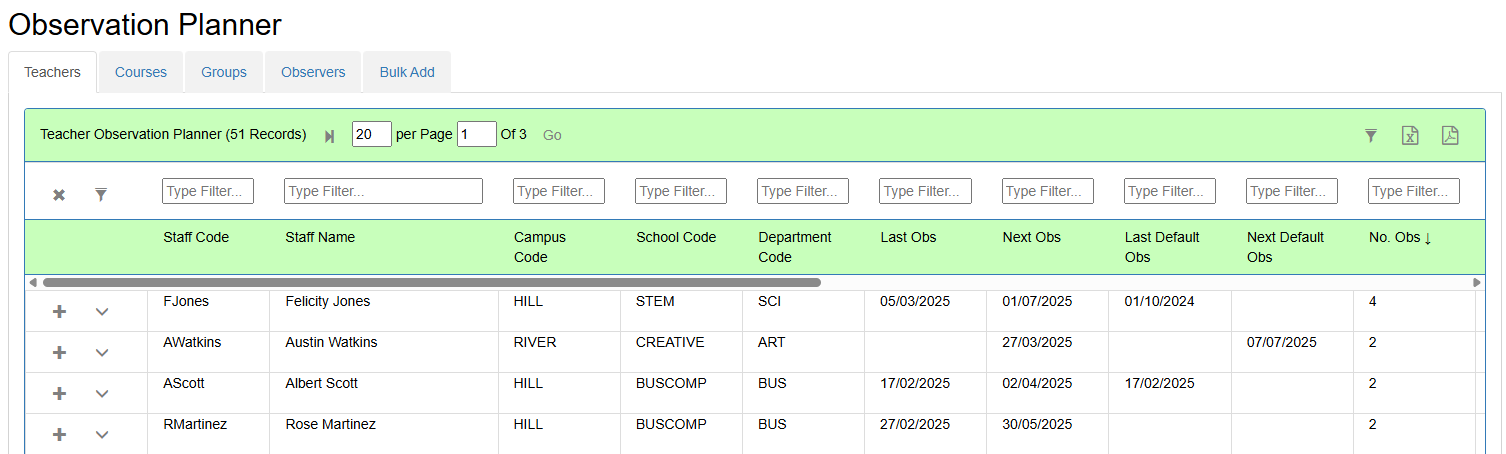
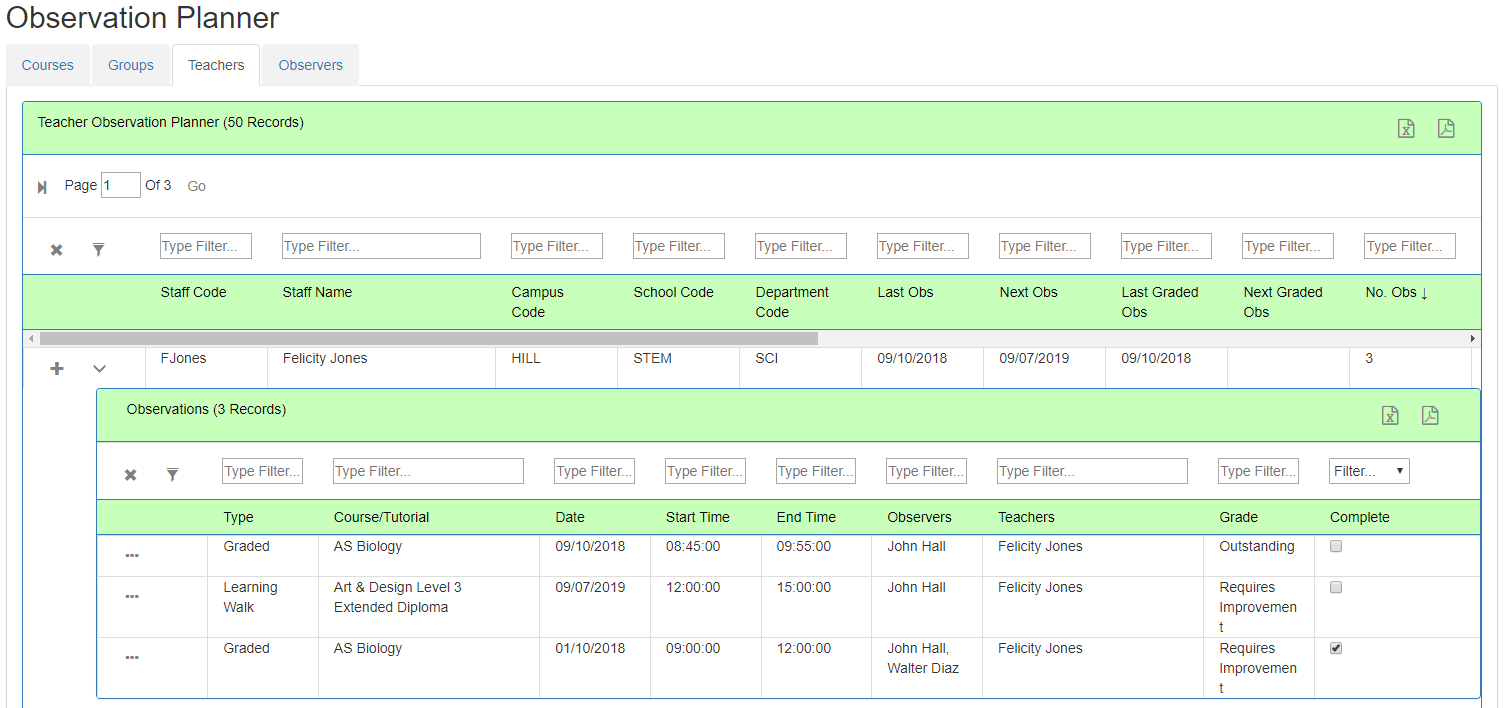
The Observation Planner screen allows the user to add new observations. The page is split into 5 tabs:
This allows the user to create an observation specifically Teachers, Courses, Groups or Observers. Each tab shows statistical and other information about the course, group, teacher or observer. The idea is to give the user an informed choice as to which areas to target an observation. The grids on each tab can be filtered and sorted as appropriate. There are endless possibilities but for example the user could:
The columns available for the first 4 tabs are as follows:
The College can also define their own bespoke statistical column against each course, group and teacher. There could be an extra 8 numerical based columns, 8 text based columns and 2 date based columns against each course, group and teacher. The administrator can decide which columns are visible and what they are called within Maintenance > Observation Statistics. See this section for more details. The administrator can import this information using the Imports:
The College can decide what statistical information might be useful for planning observations. Some interesting ideas might include:
The user can create an observation against a specific course, group, teacher or observer by clicking the ‘+’ button at the beginning of the row. This will open up the ‘Add New Observation’ wizard in the content of the row clicked. For example adding against a specific course will show only timetabled information for that course. In order to add a new observation for courses/groups or teachers the user will need the permission ‘Can Add Observations’. In order to add a new observation for observers the user will need the permission ‘Can Add Observations for Other Observers’. Please see the ‘Add New Observation’ section for more details.
The user can also see each individual observation by clicking the down chevron button against each row. For example for a member of staff with 10 observations this will show a row for each observation with information about the observation. This might allow observers to see if a new observation for the staff member is appropriate. Clicking the button at the beginning of each row will take the user to the Observation Detail screen within a new tab.
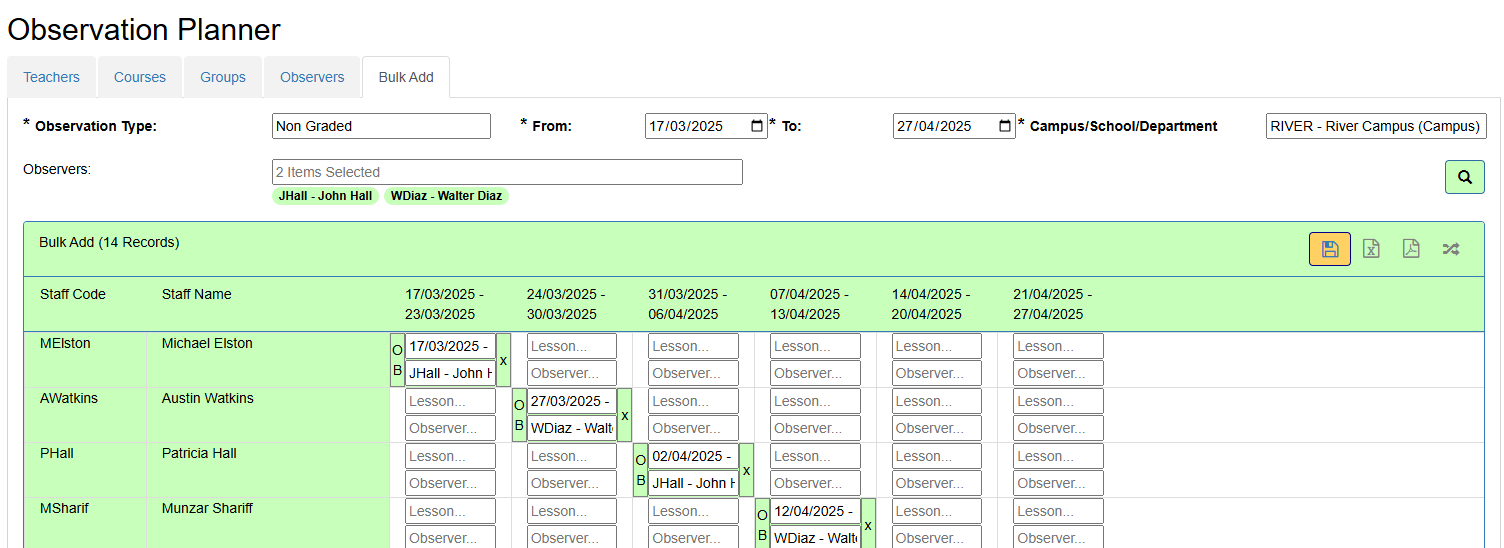
Bulk Add Tab
This tab allows you to bulk add multiple observations at once. These can be created manually or automatically. This can be used as a quick way to add observations to all members of staff within a department within a date range. For example add a developmental observation for all staff in Department A in Term 1.
In order to view this tab you will need the permission ‘Can Bulk Add Observations’.
Firstly choose various parameters for the Bulk Add:
Once these options are chosen click the search button.
This will display a row for each member of staff within the organisation structure. A column will be created for each week within the date range. Staff with at least one observation of the selected type within the date range will appear green.
For each cell the user can manually choose:
Only future weeks can be edited.
Clicking Save against the grid will create any new observations.
Clicking the ‘OB’ button will take the user to the observation form. Clicking the x button will flag the observation to be deleted. Clicking save will remove the observation.
If the user changes the lesson or observer within the cell then this will update the information against the observation.
Observations can be automatically created by clicking the ‘Automatically Create Observations’ button against the grid. This will flood fill the grid with observations
only for staff with no observations of the selected type in the date range. This will loop through each member of staff and attempt to spread the observations out across the weeks and across the available observers. If there are lessons available within the week then a random lesson will be chosen. If not the following week will be used, etc until a match is found.
At this point no observations are created. The user can manually move observations around as appropriate before pressing the save button to create the observations.
Actions
Add New Observation
The user can add a new observation. In order to be able to add an Observation the user needs the Permission ‘Can Add Observations’ or ‘Can Add Observations for Other Observers’. See the ‘Add New Observation’ section for more details. There is no context (i.e. specific to course, group, teacher, observer etc) to this so this is a good place to add an ad-hoc observation.
Export Offline Template
The user can export a pdf document for an Observation Template which can be filled in when the user has no online connectivity. At a later date these pdf documents can be imported back into the system. In order to be seen this action the user needs the Permission ‘Can Add Observations’ or ‘Can Add Observations for Other Observers’. Please see the ‘Offline Template’ Section for more detail.
Import Offline Template
The user can import a pdf document generated within the previous action. In order to be seen this action the user needs the Permission ‘Can Add Observations’ or ‘Can Add Observations for Other Observers’. Please see the ‘Offline Template’ Section for more detail.
New Observations can be added from the following pages:
In order to be able to add an Observation the user needs the Permission ‘Can Add Observations’ or ‘Can Add Observations for Other Observers’. Clicking Add New Observation opens up a wizard to guide the user in how to add a new Observation. The behaviour of the wizard can be slightly different depending where the screen was accessed from.
The Wizard has the following steps:
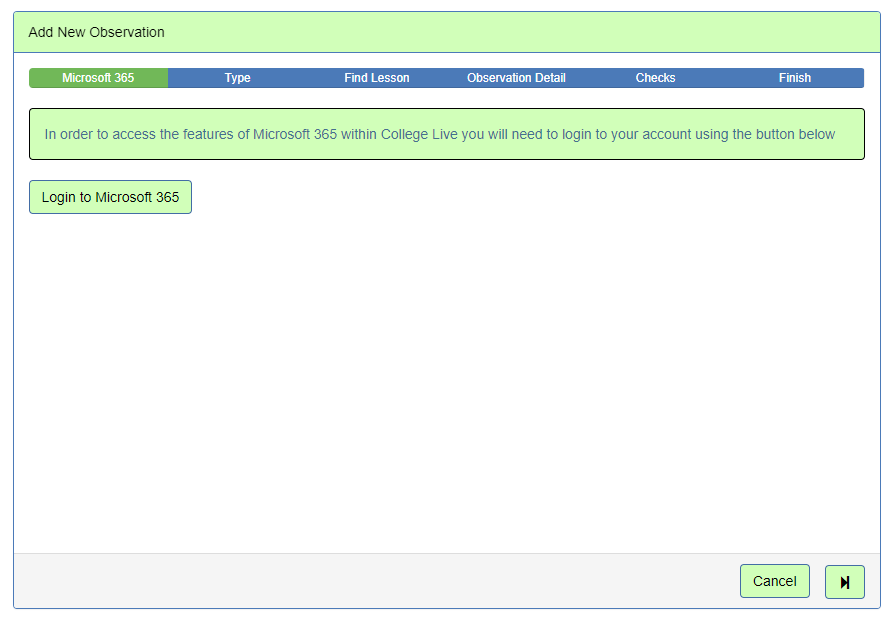
Microsoft 365
The Microsoft 365 step allows the user to connect to their Microsoft 365 account. It only displays if the system setting Microsoft 365 Integration’ is set to true and the user has not already authenticated with Microsoft 365.
Connecting to Microsoft 365 allows the user to check the Outlook Calendar to see if they are busy at the Observation Time or if another Observer is busy to help to user schedule Observations at appropriate times. It also allows a calendar event to be added to the Microsoft 365 calendar. The user if they so wish can ignore this step and just click ‘Next’
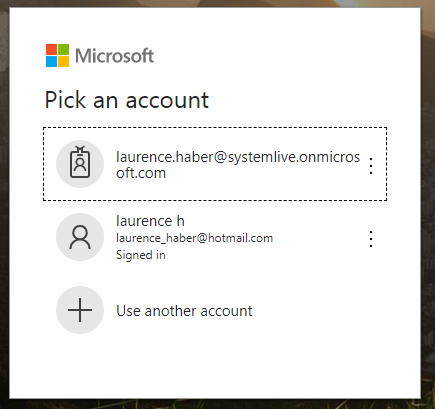
Clicking the ‘Login to Microsoft 365’ button will open up a new tab at ‘https://login.microsoftonline.com’ where the user can put in their college email address and password to connect to their Microsoft 365 account. Once authenticated the tab will disappear and the login button will say ‘Successfully Logged into Microsoft 365’. During their current session the user should not have to login again to Microsoft 365 and using the wizard again will not display this step. The user will need to have successfully logged into Microsoft 365 to use the Microsoft 365 features later on in the wizard.
Clicking Next will go to the Subject/Tutorial Tab.
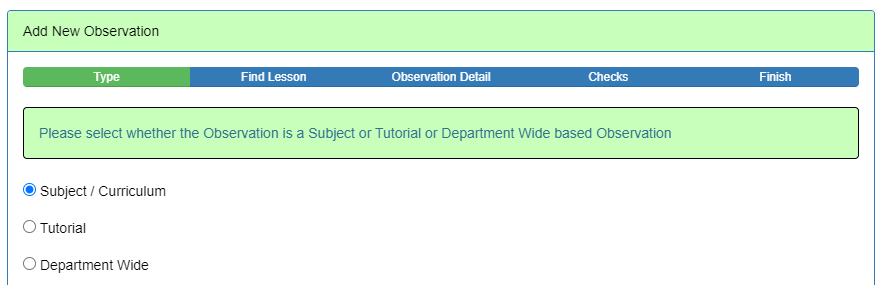
Subject/Tutorial
The user can decide whether the Observation is Subject based or Tutorial based or Department Wide. This will change the steps in the wizard. For Subject based Observations the user will later be asked which Course and Group the Observation is for. For Tutorial based Observations the user will be asked which Tutorial the Observation is for. For Department Wide the user will be asked which Organisation Structure the observation is for. The ‘Find Lesson’ step will also be removed as is inappropriate for Tutorials/Department Wide.
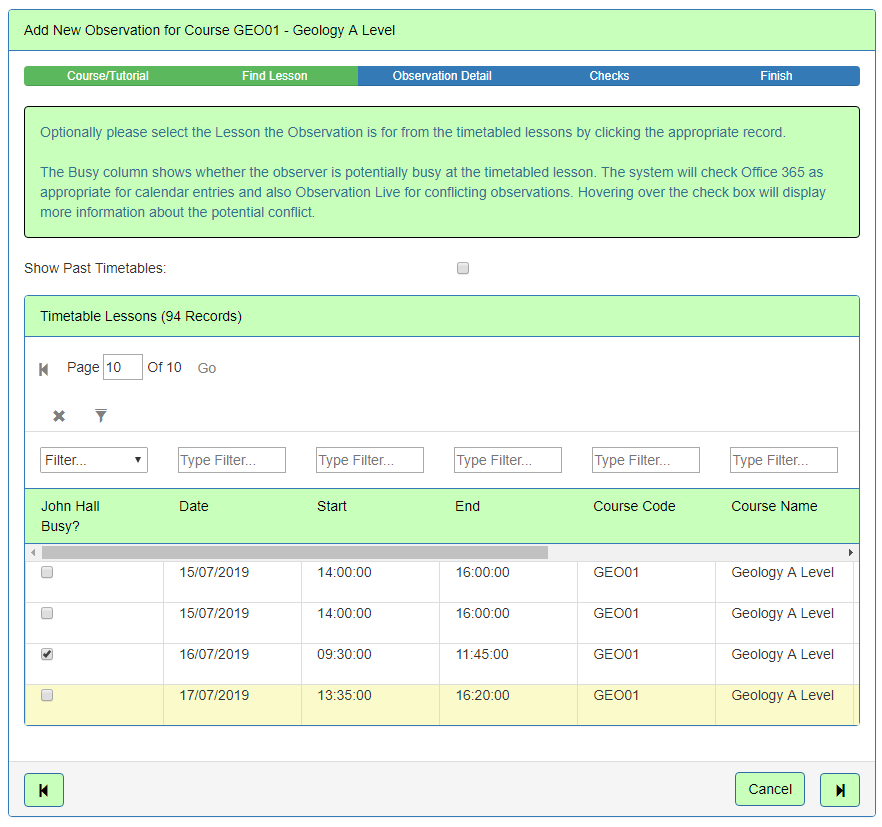
Find Lesson
The user will be able to choose a timetable slot the Observation will be for. Timetables can be imported into the system and will be displayed here. By default only timetables in the future are displayed here. To see timetables in the past click the ‘Show Past Timetables’ check box. Information shown includes:
The Busy column displays whether the Observer (yourself or another Observer if accessed from the Observation Planner - Observer tab) is busy at the particular date and time of the lesson. The system will check other Observations which conflict and also Microsoft 365 calendar events which might conflict. The system will also check any timetables where the observer is teaching which might conflict. If the Observer might be busy the column will be ticked. Hovering over the grid cell will show the user more information about the potential conflict. The user can ignore any conflicts and this is meant as a guide only for the user to make a judgement about whether the observer is busy.
Depending where the page was accessed from the lesson grid will be prefiltered:
The user can apply additional filters to the grid e.g. for a particular date or teacher etc.
To select the Lesson they wish to observe the row can be clicked. It will turn yellow to indicate it has been selected. It is worth noting that this step is optional. If the user cannot see the appropriate lesson then they can click next anyway to go to Observation Detail step.
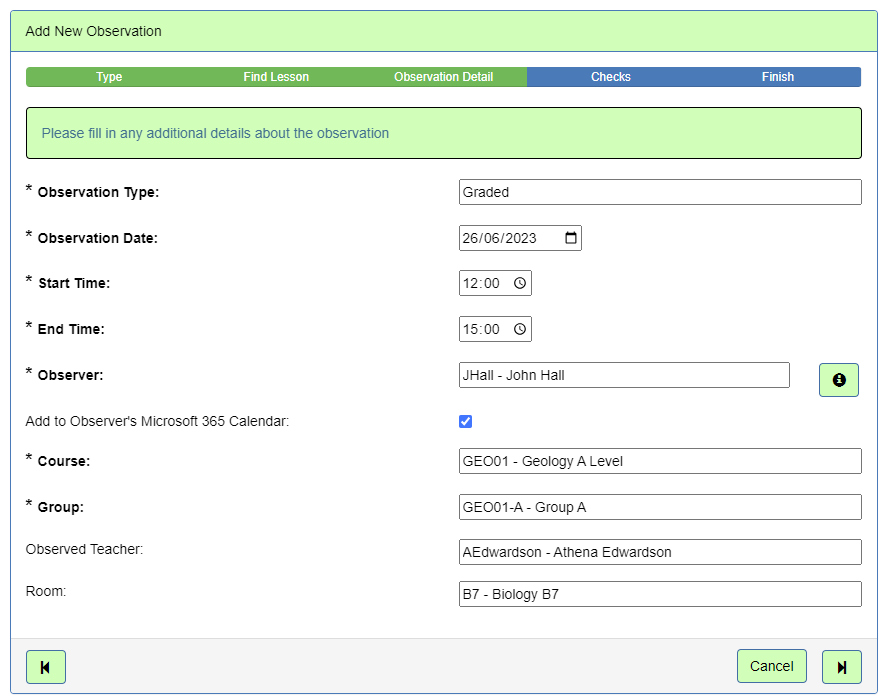
Observation Detail
The Observation Detail step allows the user to fill out key information about the Observation. Labels in bold are required to be able to add new observations.
The wizard will try to fill out the information based on where it was accessed from and the ‘Find Lesson’ tab. For example if a lesson is selected the system will fill out the Observation Date, Start Time, End Time, Course, Group, Teacher and Room. If the wizard was accessed from the Observation Planner - Teacher tab then the teacher will be populated. Any populated information can be overridden.
The form details on this step include:
It is also worth noting that once the observation is created all this information can be later altered from the Observation Details screen.
Checks
Final checks are made to see if the Observation Date, Start Time and End Time for the Observer might conflict with other Observations in the system and the Observer’s Microsoft 365 Calendar event. The system will also check any timetables where the observer is teaching which might conflict. Details about each conflict will be shown. Conflicts do not prevent the user from adding the observation but allow the user to make an informed decision about whether to continue to add the observation or go back in the wizard to modify information.
Once happy the user can click next to be taken to the Finish step.
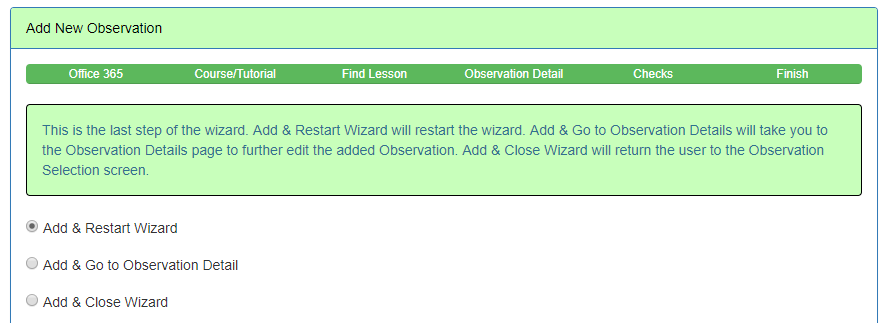
Finish
On the Finish Step the user can click ‘Finish’ to create the Observation or ‘Cancel’ to close the wizard without adding the observation. The user can pick between:
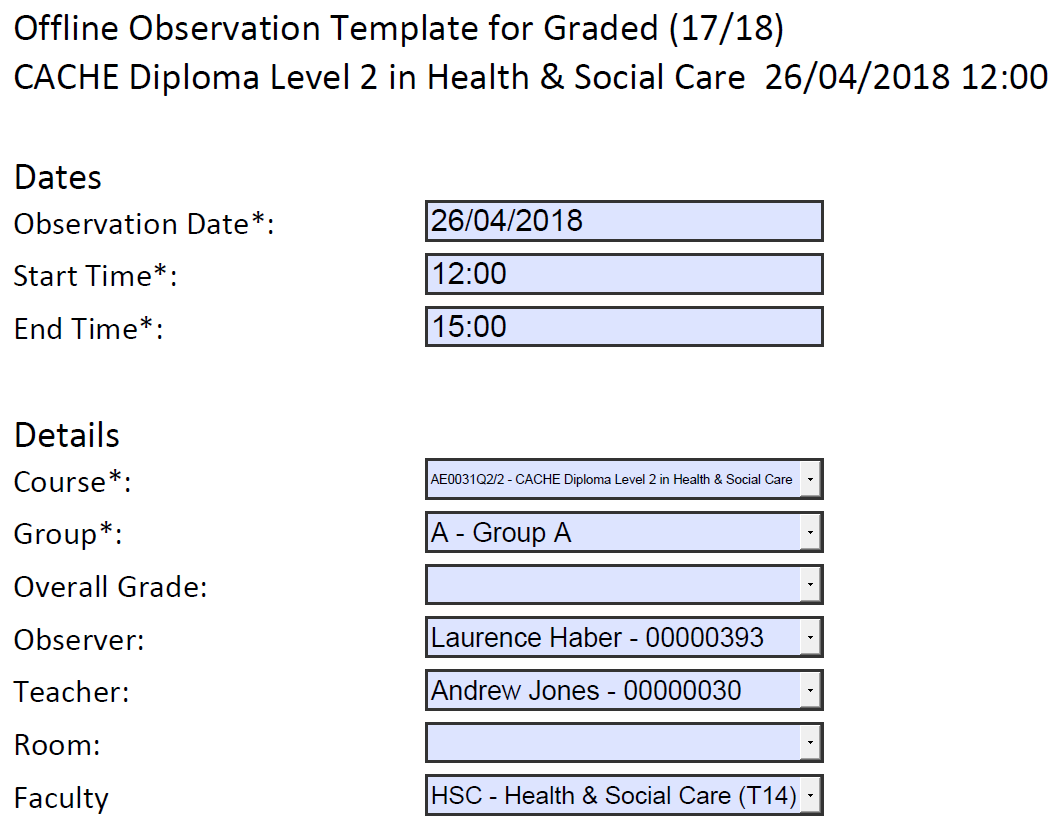
Observers are not always connected to the internet to be able to access Observation Live. Often Observations are done within the field where there may be no internet connection e.g. for work based learning or community based courses. Additionally observations are often done on tablets in classrooms where the observer might not have wifi access or have a poor wifi connection.
Observation Live allows observers to export different Observation Types in an interactive pdf document which can be filled in on all different devices. The templates mimics the information in the Observation Detail form. At a later date these documents can be imported back into Observation Live. New observations will be created and existing observations will be updated. This can be done in bulk. For example the observer creates 10 offline observations in the field. At a later date these can all be imported back into the system at once.
Export Offline Template
This facility creates the interactive pdf document.
A popup will appear where the user can choose the type of observation and click export. This will create a pdf document which has all the characteristics of the Observation Type and will shows the appropriate labels, text, dropdowns etc. Each Observation Type will appear different. Only those types which are available to the user will be available.
Note that if this is accessed from the observation detail screen then the user will not get a popup. Instead a pdf will be created for the observation type of the current observation. Additionally if accessed from the observation detail key information about the observation will be included e.g. Date, Start Time, End Time, Course, Group, Tutorial etc. Otherwise this information will be blank.
Filling in Offline Observations
The user should fill in the appropriate document for the observation they are observing. Each offline observation should be saved as a separate document. Interactive pdf documents can be filled in on all devices. The user may need to download and install a suitable pdf reader for their device. These are often free for example Adobe Acrobat Reader DC.
Fields marked in bold are required by the observer to be filled in. For dropdowns e.g. Course, Observer, Teacher etc the observer will be presented with a list of values from the system.
Import Offline Template
Once the Observer has saved the Offline Template pdf they can be imported back into Observation Live. Clicking Import Offline Template will open a wizard. The behaviour of the wizard can be slightly different depending where the screen was accessed from. The wizard has the following steps:
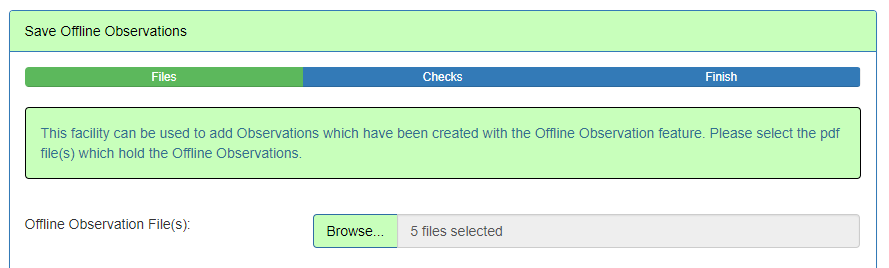
Files
This step allows the observer to select the pdf files to import. Up to 20 files can be imported at one time. Note that if accessed from the observation detail screen then only 1 file can be imported for the particular observation.
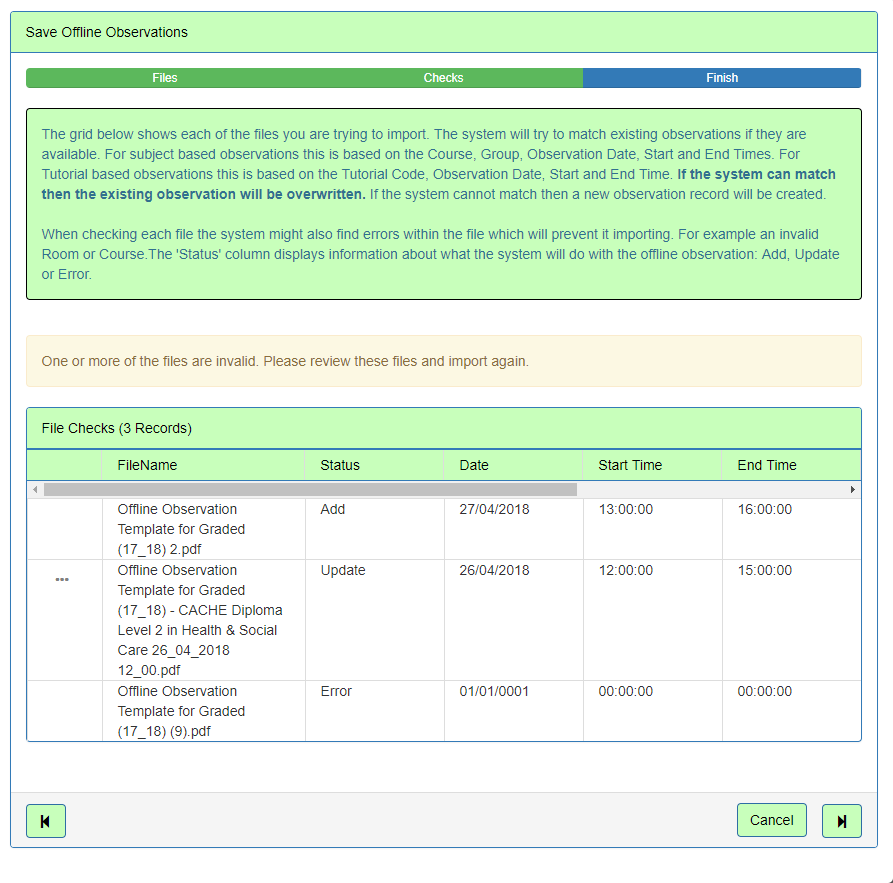
Checks
This step checks each file to make sure it does not have any errors and to tell the user what the system will do with the file (either update existing observation or add a new Observation). The grid shows the following information:
The Status column will tell the user whether there is an error with the record. Hovering over the Error will tell the user more information about it. Errors might be that no observation date is filled in the file, or an invalid observer is selected etc, etc.
If the record is valid the status column will show update or add. Update means that the system has found an existing observation which matches. Add means that no match is found and a new observation will be created. For subject based observations a match is made on Observation Date, Start Time, End Time, Course and Group. For tutorial based observations a match is made on Observation Date, Start Time, End Time and Tutorial. Please note that if a record will be updated then existing information in the observation may be wiped. The observation which will be updated can be opened in a new tab by clicking the ‘...’ button in order to be further checked by the user if necessary.
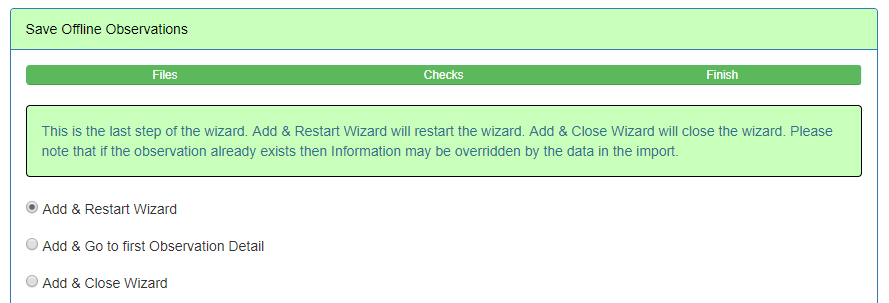
Finish
On the Finish Step the user can click ‘Finish’ to create the Observations or ‘Cancel’ to close the wizard without adding the observation. The user can pick between:
Note that when on the observation detail screen this option will only show ‘Add & Go to first Observation Detail’
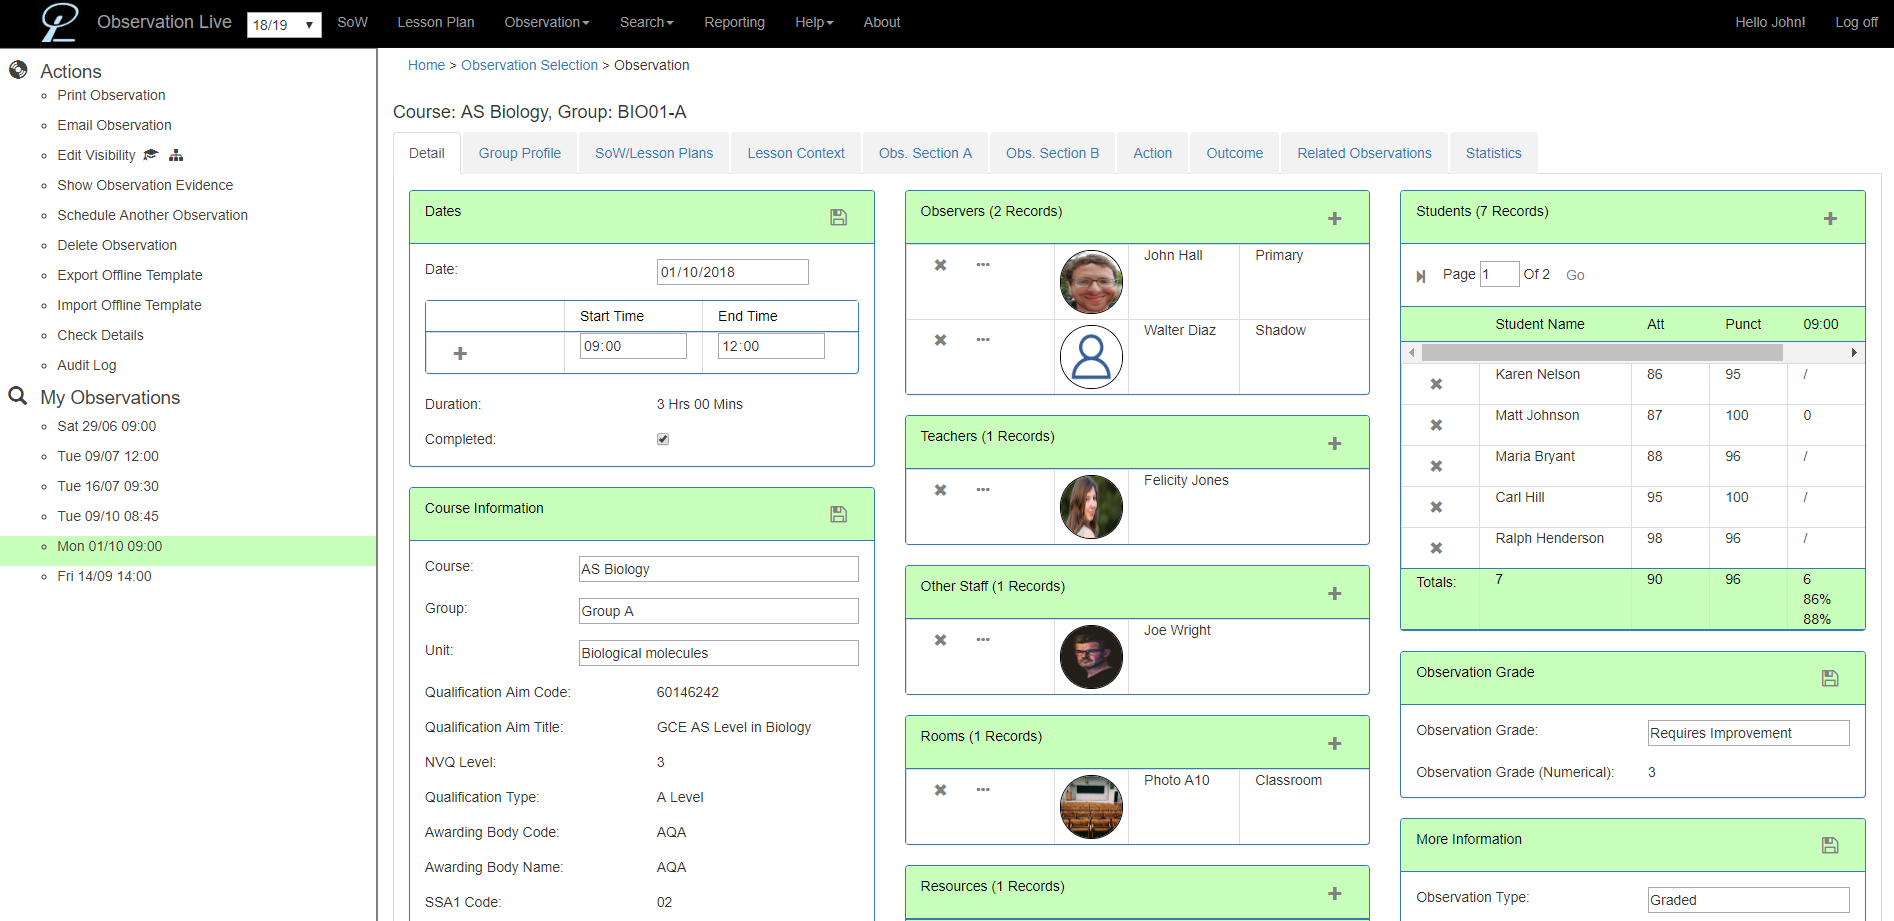
The Observation Detail screen can be accessed from different places in the system. The screen shows all the information about the Observation and allows the observation to be edited provided that the user has suitable permissions to do so. Please bear in mind that Observations can be given different Templates so may look different from the descriptions below and may look different between different observations at your college.
The Observation can contains the following tabs.
And the following actions.
Details
The details tab shows basic information about the Observation. The user will need to be an observer or have the permission ‘Can Edit All Observations’ to edit this tab. The tab will allow the following information to be viewed or edited
Data can be saved within each section by clicking the save button and new data added by clicking the add button.
Dates
Course/Tutorial Information
For subject based observation this will say Course Information. For tutorial based observation this will say Tutorial Information.
Observers
This grid shows the Observer(s) for the observation. New Observers can be added by clicking the ‘+’ button. The popup allows the user to select from a list of observers. Only observers which have access to the observation type will be available. An Observer Type must also be selected. Potential options might be Primary, Moderator, Shadow etc. The list of Observer Types is set by the Administrator. Please see the Observer Type section for more details. The administrator can also pick a default observer types which select a particular type by default.
If the system setting to use ‘Microsoft 365 Integration’ is set to true then the user can login to Microsoft 365. Once this is done when the Observer dropdown list is viewed the user will see (maybe busy) if there is a potential conflict within the user’s calendar. The user will need to be able to view the Microsoft 365 calendar of the user to be able to do this. The system will also check if the observer has another observation in Observation Live or is timetabled for a lesson at the same time. Hovering over the observer will show more information about the potential conflict.
Observers can later be deleted or edited.
Teachers
This grid shows the Teachers(s) being observed. New Teachers can be added by clicking the ‘+’ button. The popup allows the user to select from a list of all staff imported into the system.
Teachers can later be deleted or edited.
The AI button will allow the user to ask questions about the teacher’s observations and actions.e.g. ‘Suggest an action to improve the quality of this teacher's teaching and learning’. In order to use this functionality the user needs to have the permission 'Can Use AI Staff’ and the Gemini AI needs to be configured under System > Gemini AI.
Other Staff
This grid shows any other staff who are not teachers or observers present during the observation. This could be teaching assistants etc. New Other Staff can be added by clicking the ‘+’ button. The popup allows the user to select from a list of all staff imported into the system.
Other Staff can later be deleted or edited.
Rooms
The grid shows the room(s) and the room type where the observation has taken place. The popup allows the user to select from a list of rooms imported into the system.
Rooms can later be deleted or edited.
Resources
Resources can be added to the Observation for example a Scheme of Work or a piece of marked work by the teacher. Resources can either a file, url or a simple description
The grid displays a list of resources attached to the Observation The description and file name will be displayed. The resource can be downloaded by clicking on the download button at the start of the row.
Attachments can be added by clicking the add button at the top of the grid.
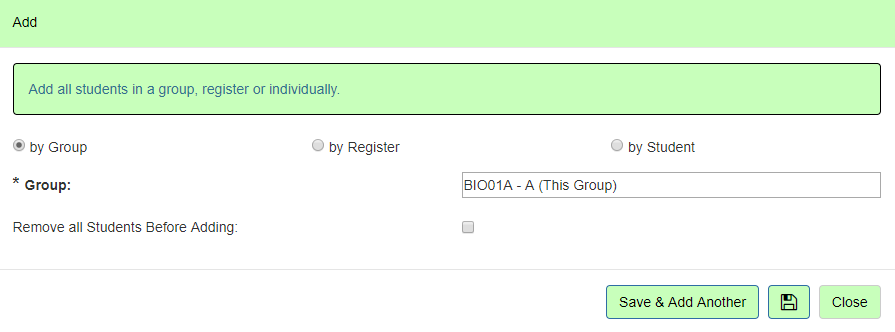
Students
The students present or meant to be present within the Observation. When creating a subject based observation the students will be automatically picked up based on the enrolment information imported into the system.
However students can be manually added or deleted. Clicking the ‘+’ button will add a new student.
The user can either choose to:
There is the option to also remove all the students from the observation before adding the new student(s).
Key information about each student is shown e.g. attendance and punctuality.
If the College has enabled the Register Import then the attendance data for the register(s) will display as individual columns for each register session. For example an observation takes place from 10-12 and within this time there is a register from 10-11 and 11-12 then two columns will be displayed for each register. The register mark will be displayed against each student e.g. / or O. Hovering over the cell will show more information about the mark e.g. the mark description and the register code.
The footer of the grid will show the total number of students present within each register session, the % of students present within each register session and the overall attendance for the register. Registers are normally imported nightly. However the system also provides a live link to the register information. If the observation takes place today then a refresh button will appear on the grid which will refresh the grid and allow the observer to see updated register data as the teacher does the register.
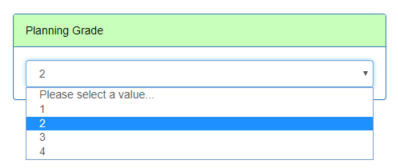
Observation Grade
This section allows the observer to fill in the overall grade for the observation. The user will be able to select from a dropdown list. The Observation Template determines the list values. The College is in complete control over the grades as each College will grade differently. Some example Observation Grade are:
Observation Grades are associated with Numerical Equivalents for reporting purposes e.g. for working out the average observation score. Again this is determined by the college but is likely to be 1-4. When the Observation Grade is selected the numerical equivalent will be automatically shown.
This section is only displayed if the Observation Template has an Observation Grade scheme. For some observation types it might not be appropriate to have an Overall Grade e.g. Learning Walks. Additionally some colleges might not want teachers to see the overall grade but still be able to report on it. Therefore in order to see this section user will require the permission ‘Can View Observation Overall Grade’.
The Observation Template can also automate this grade so the observer does not need to fill it out. Other fields saved against the observation on the Lesson Context, Observation Section A, Observation Section B, Outcome tabs can be used to populate this value. For example the Overall Grade could be the average of 6 different fields on the Observation section tabs or the maximum numerical value. Please see the Template section for more details.
The term ‘Grade’ can be altered within the System Setting ‘Observation Grade Definition’.
More Information
Group Profile
The information about the students against the observation. Please see the Group Profile section in the General documentation for more information.
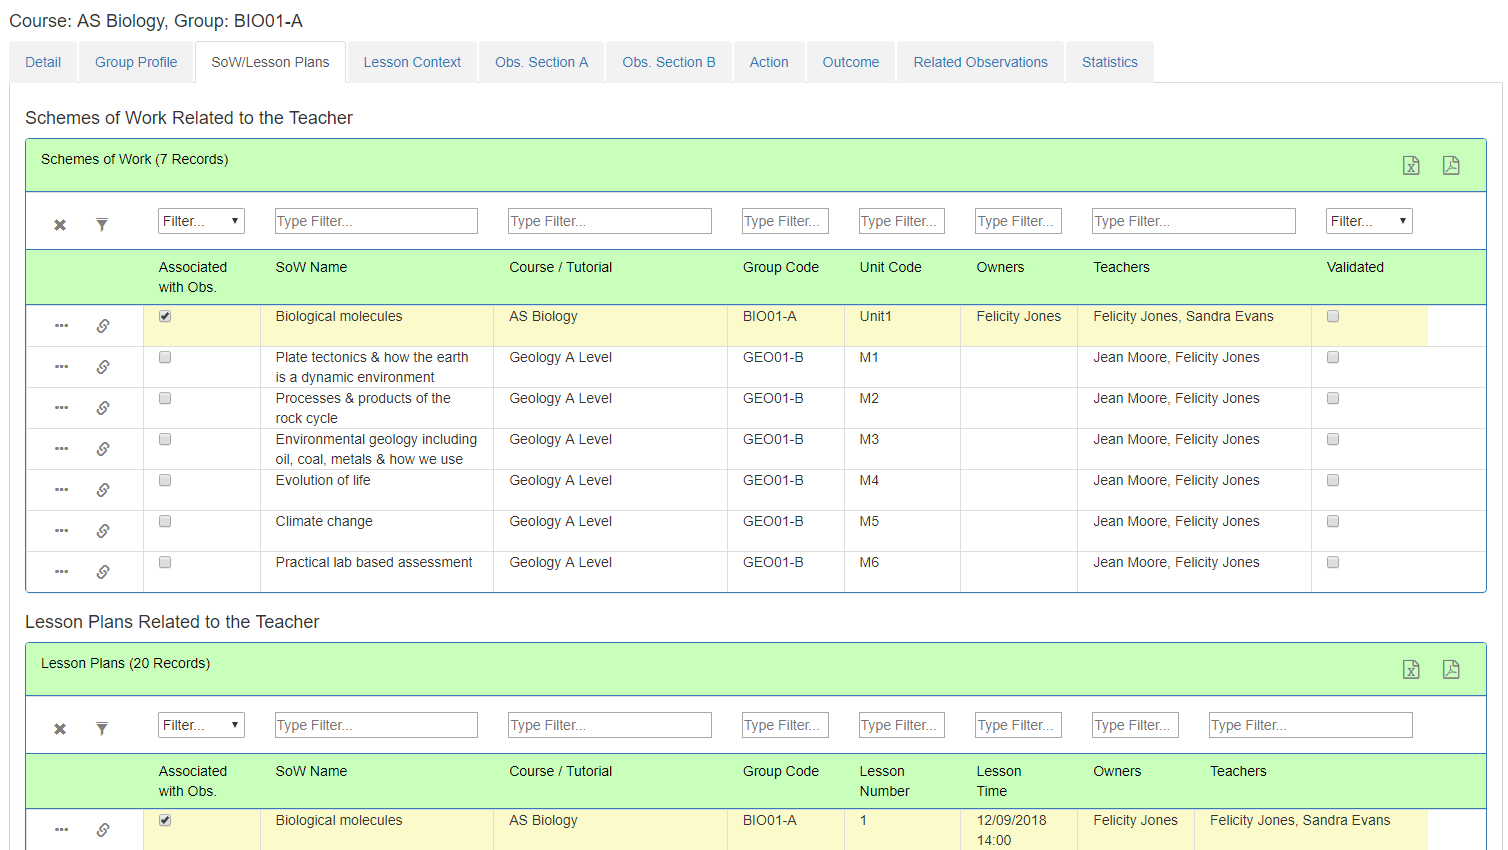
SoW/Lesson Plans
This tab shows Schemes of Work and Lesson Plans which might be related to the Observation. This tab is only available if the College owns a Planning Live licence. Observers often look at Schemes of Work and Lesson Plans to see evidence of planning.
All Schemes of Work where the Teacher against the Observation is either the Owner or Teacher of the Schemes of Work are shown. Information on the grid includes:
The user can open the Scheme of Work in a new tab by clicking the ‘...’ button. The Scheme of Work can be associated with the Observation by clicking the ‘link’ button at the beginning of the row. Schemes of Work associated with the observation will be highlighted in yellow.
All Lesson Plans where the Teacher against the Observation is either the Owner or Teacher of the Lesson Plan are shown. Information on the grid includes:
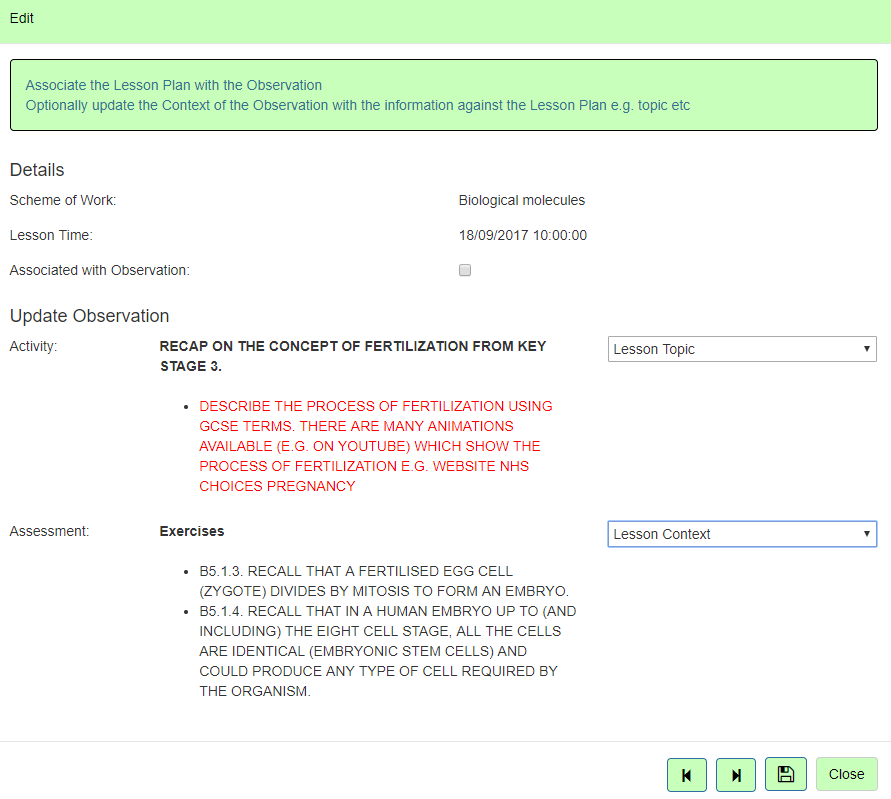
The user can open the Lesson Plan in a new tab by clicking the ‘...’ button. The Lesson Plan can be associated with the Observation by clicking the ‘link’ button at the beginning of the row. The Observation Lesson Context tab can be auto populated by information about the Scheme of Work Content for that lesson. The Scheme of Work content will be displayed with a dropdown for each of the fields in the Observation Lesson Context tab. The user can select the appropriate field to auto populate. For example the Scheme of Work for the Lesson might contain the Lesson Topic. The observer could populate the topic against the Observation Lesson Context. If the Scheme of Work content column exactly matches the name of the field in the Observation Lesson Context tab then this field will be automatically selected in the dropdown.
Lesson Plans associated with the observation will be highlighted in yellow.
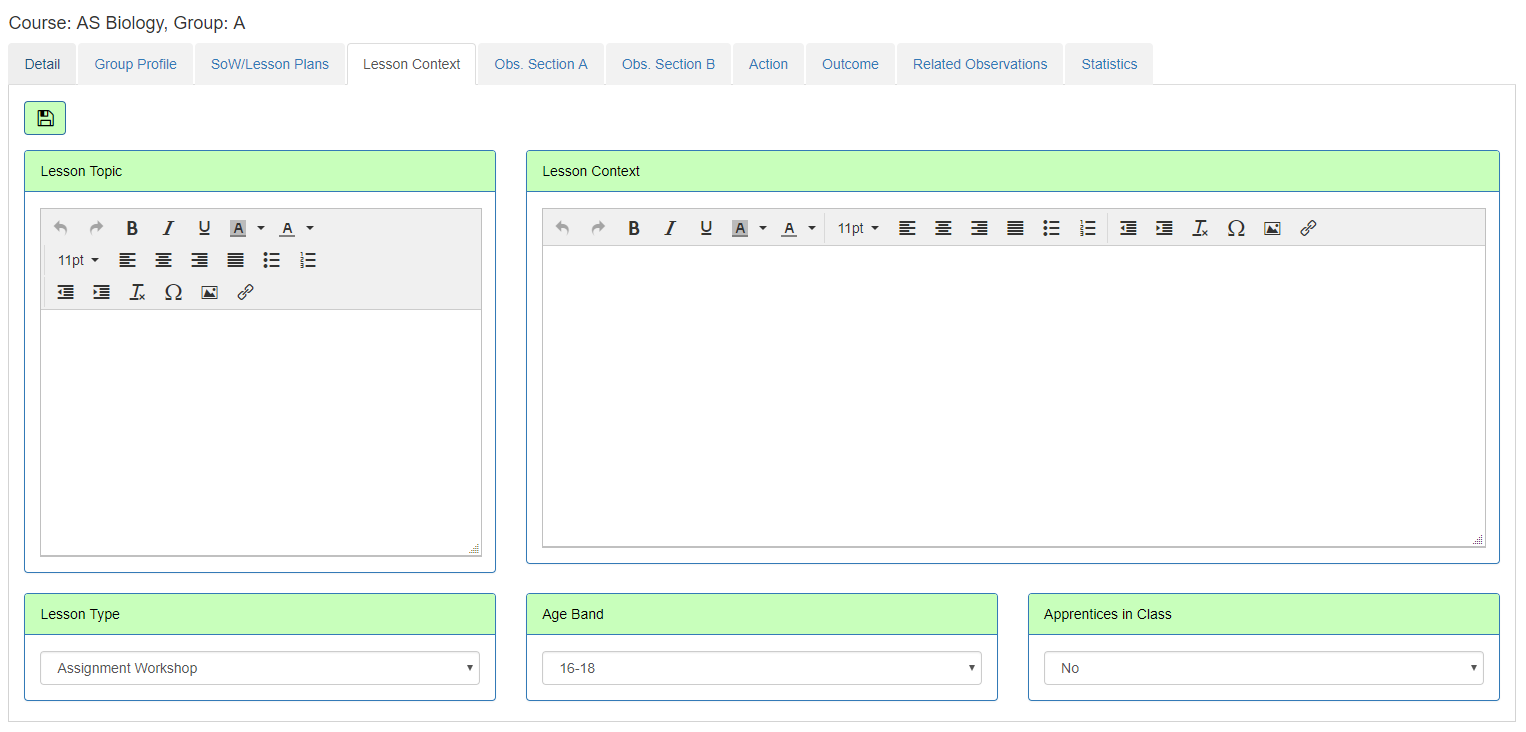
Lesson Context
The Lesson Context tab allows the observer to add information about the lesson itself.
It will comprise up to 12 input areas which:
Information on this tab might include:
When an Observation is associated with a Lesson Plan it could pull some of this information from the scheme of work content for the lesson. For example auto populating the topic of the lesson.
Observation Section A and B
There will be two observation tabs again configurable with up to 40 inputs.
These tabs will be for the observer to record the observation. Examples might include the strength of the learning activity, what could be improved about the learning activities or the learning activity grade.
The college might decide that some of these fields are associated with an Observation Grading Scheme. This is configured within the Observation Template and might include:
The Observation Template can be automatically configured so that the overall grade of the observation can come from one or more fields from these tabs. For example the overall grade could be from.
This value will populate the Overall Grade on the Observation Details tab.
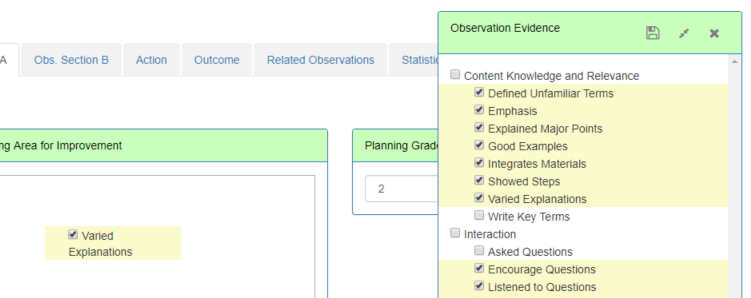
Observation Evidence can also be set up against the Observation Template. The user can click the ‘Show Observation Evidence’ Action to show a list of Observation Actions which can be directly dragged into a text box. This acts as a quick way of recording information as the Observation is progressing and time is limited.
Outcome
This tab allows the observer to record the Outcome of the Observation again configurable with up to 12 inputs.
This tab will be used to record the resulting outcomes from the observation. For example:
The observer will be able to schedule another observation directly from this tab which will open the ‘Add New Observation’ popup. The wizard will auto-populate for the teacher of the current observation. This will mean for example that the timetable will only show lessons for the teacher. The new action will also be the ‘child’ of the current observation. Please see the ‘Add New Observation’ section for more details.
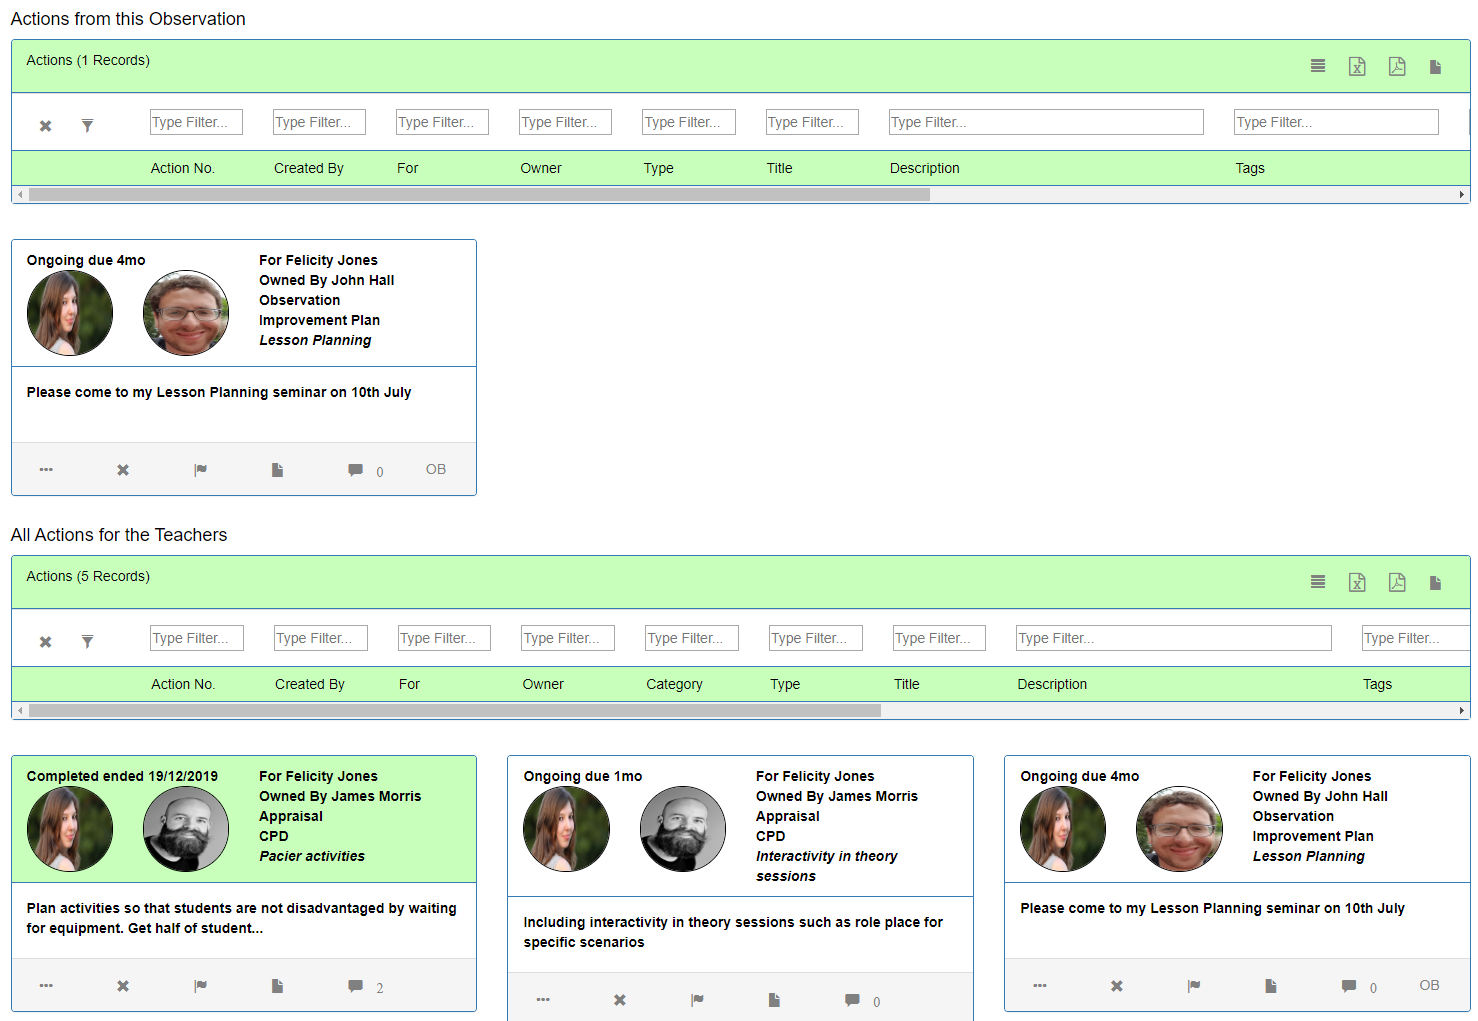
Actions
Actions can be created off the back of an observations. Actions are generally something which the Observer requires the Teacher to do based on the observation. Maybe they observed ‘Good Practice’ in the observation and they wish the teacher to share this with other teachers.
The top list shows all actions created from the current observation. Observers can add a new action by clicking the add button.
The lower list shows all actions for the teachers of the observation. This allows previous actions to be reviewed. An action can be edited and reviewed by clicking the ‘...’ button.
When Observers, Managers of Organisation Structures Areas or users with the permission ‘Can view all Observations’ are on this page, they can see all actions whereas teachers can only see actions for themselves.
A Teacher or Observer can see all the actions for themselves or that they have created on the Search > Action page and on their homepage.
Note that ‘Previous Actions’ can be displayed on the Lesson Context, Observation A, Observation B and Outcome tabs by selecting the input type against the template item to ‘Previous Actions’. This will show a grid which displays all the teacher’s actions previous to the current observation, within the observation year or the previous year. Each action can be edited and commented on by clicking on the action record.
More information about adding new actions and action functionality can be found in the General documentation.
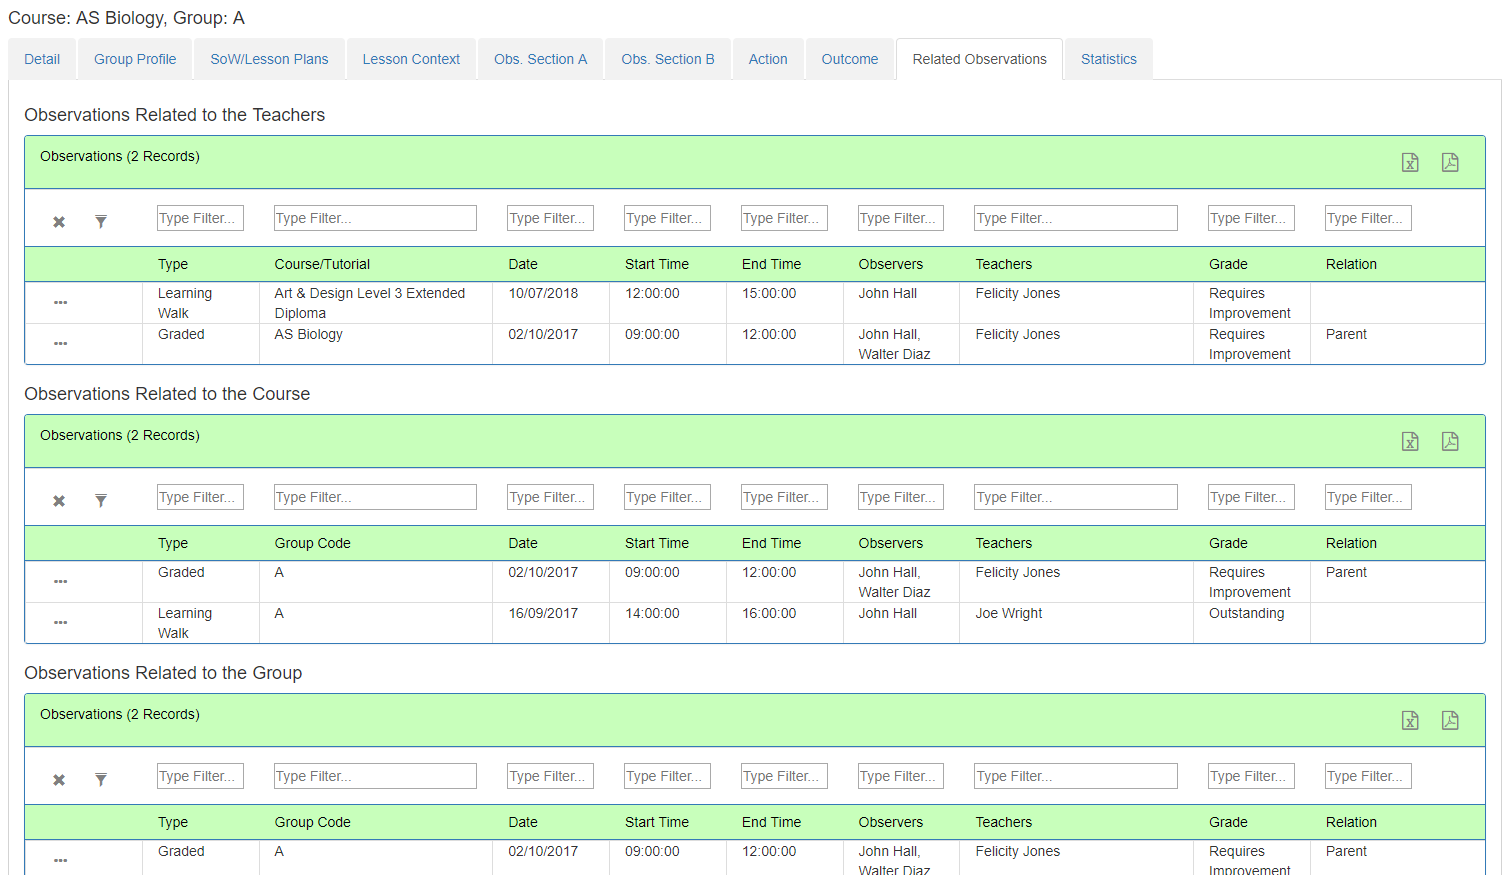
Related Observations
The Related Observations page shows other observations related to the current Observation. When filling out an observation it is often useful for the observer to see information about other observations which are related to the teachers, the Course and the Group (for subject based observations). The information displayed in the grid is as follows;
The columns displayed in the grids are:
Clicking the ‘...’ button against the row will take the user to the observation detail page.
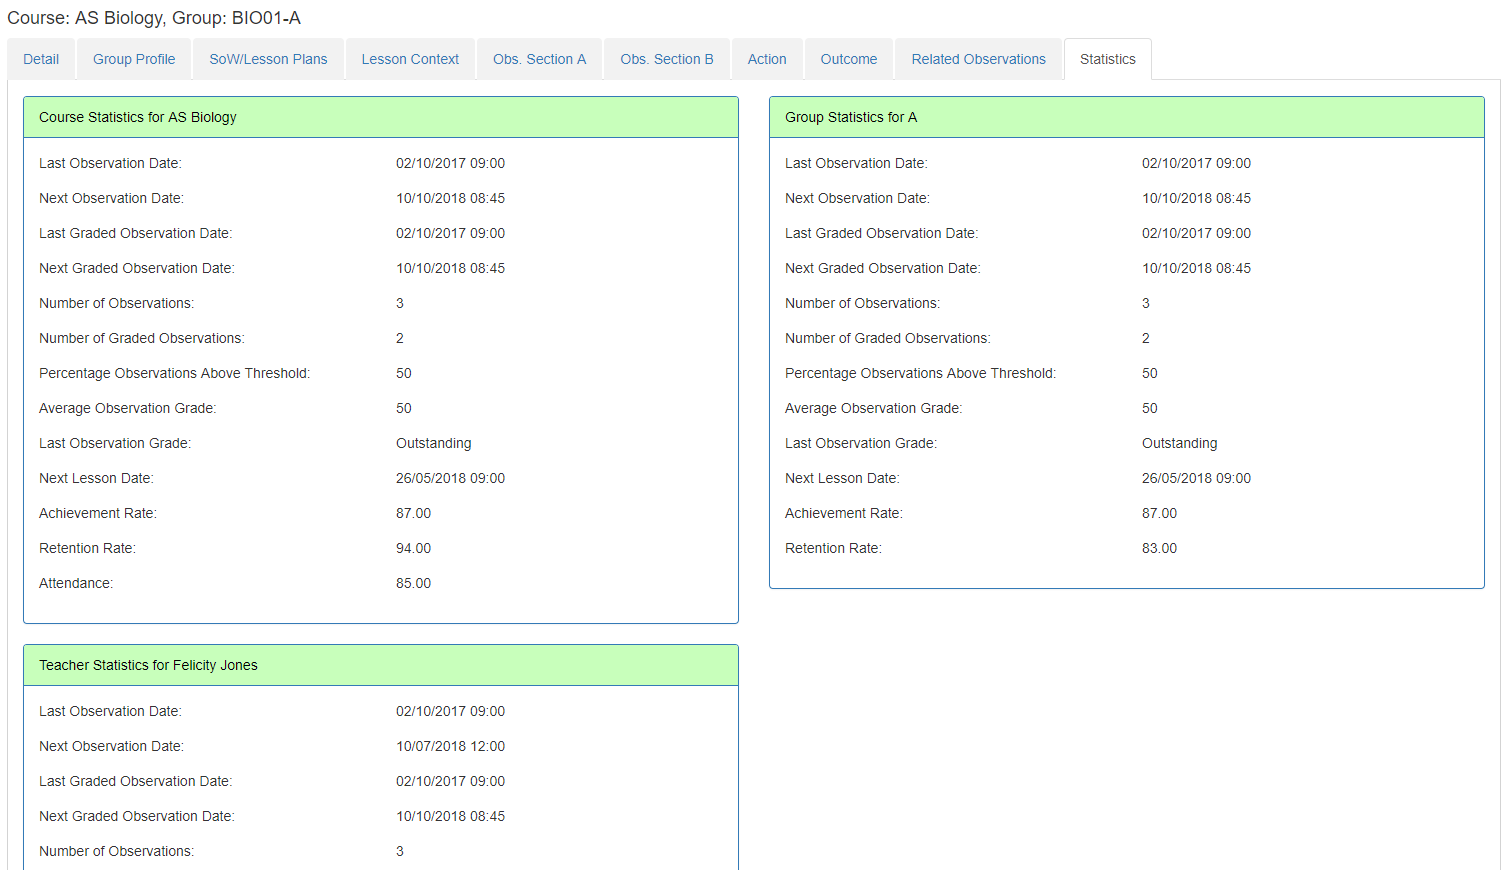
Statistics
This tab shows statistical information for each teacher of the observations and for subject based observations the Course and Group. This can be useful for an Observer to see the Observation in its broader context.
Statistically information includes:
The College can also configure their own statistical information against each staff, course and group to show in Observation Live. If these columns have been configured extra Statistical columns will be displayed for example Course Achievement Rate. Please see the Statistic Columns sections for more details about how to configure these statistics.
The following section refers to Actions in the Side Panel
Edit Template Action
Under Actions on the side panel a user may see the option to ‘Edit Template’. This option will only be available to either users who have access to the Template page. This provides a quick way for the template to be edited rather than the user having to go to the Template page to edit all of their templates. Please see the Template section for more details about editing templates.
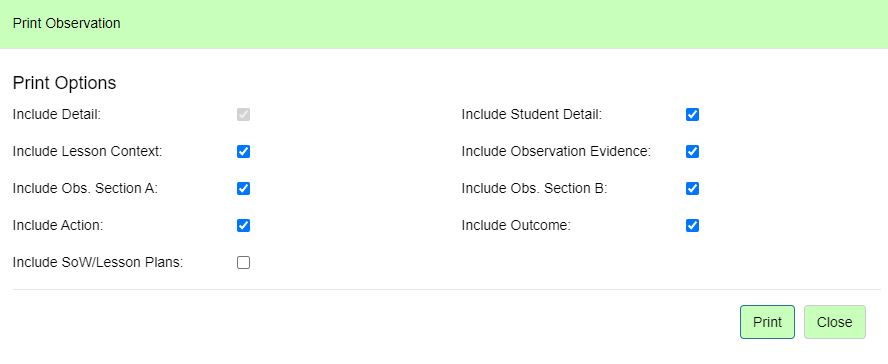
Print Observation Action
Users may print the Observation through the action on the side panel. This will open up a popup where the user can choose which sections of the observation to print/save as a pdf.
The sections which can be printed include:
Please note as each tab can be renamed within the observation template these could be named differently.
Note for administrators: Colleges who wish to alter the print format of the observation can go into the root folder of the website within UserArea > Reports and ensure a file named ‘ObservationDetail.rdl’ is present. If the folder is not present then it should be created. The file can be copied from the Reports folder in the root of the website. This file can be then be altered using Microsoft Report Builder 3.0. When printing the observation the system will use the report definition in the userarea folder. To return to the default option simply delete the file.
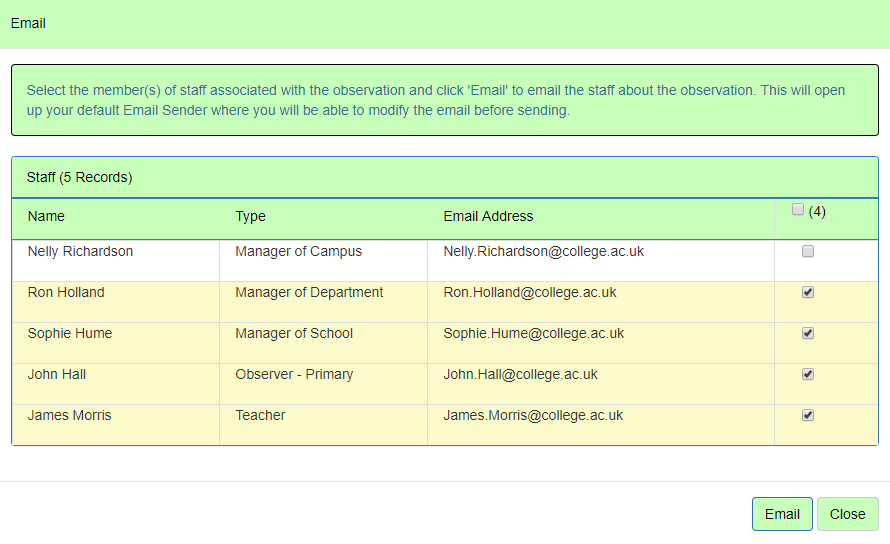
Email Observation Action
The Email Observation action allows the user to email information about the observation to any manager, observer, teacher or other user against the observation. This option is only available to users who can edit the observation.
A list of staff is shown including:
The user can select the row by clicking it and then pressing the ‘Email’ button. This will open up an email in the user’s default email sender with basic information about the observation including:
With a link directly to the observation itself.
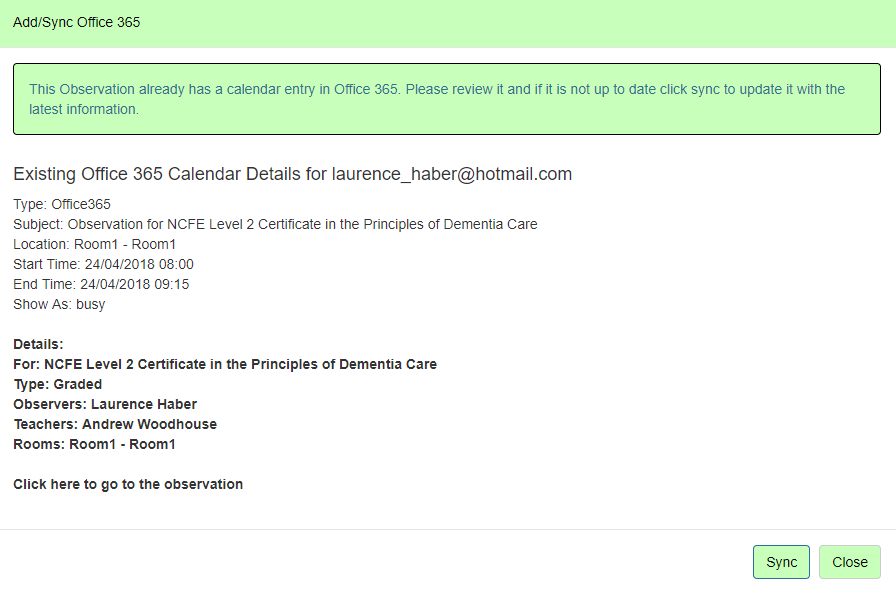
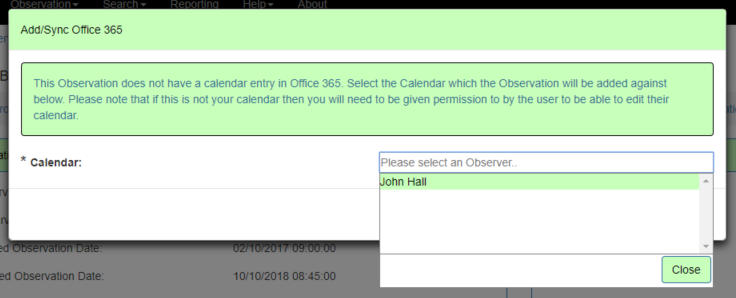
Add/Sync Microsoft365 Action
The Add/Sync Microsoft 365 Actions allows the user to either:
If the user has not already logged into Microsoft 365 they will be prompted to do so.
If a Microsoft 365 Calendar event already exists the Add/Sync Microsoft 365 link will have a green tick box next to it. If this is the case clicking the link will open up a popup which shows information about the calendar event in Microsoft 365 including the date and time, room, teachers, observers, course etc. The observation might have been altered in Observation Live for example the times changed. If this is the case the observer can click sync to update the calendar event.
If a Microsoft 365 Calendar event does not exist then the user will be able to Add a new event. The user will be able to select from a list of observers for the observation. This could be for themselves or another observer.
Please note that if trying to add or sync a calendar event on behalf of another user you will need edit permissions on the user’s calendar. This action is only available to observers or users with the permission ‘Can Edit All Observations’ to edit this tab.
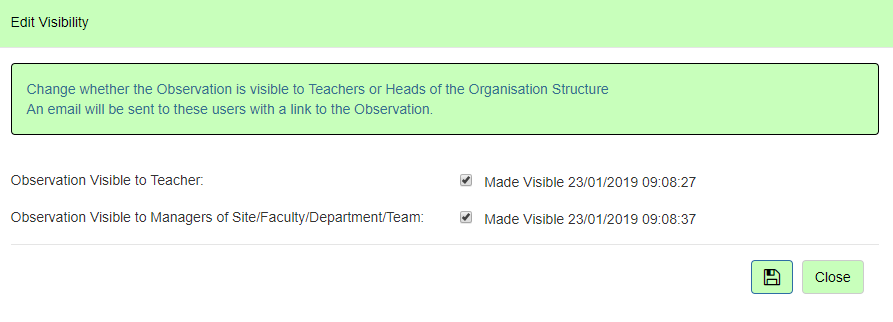
Edit Visibility Action
This action shows whether the observation is visible for the teacher and the manager(s) of the organisation structure the observation is against. Higher Level managers will also be able to see the observation. For example the observation is against a department so the manager of the school will also be able to see the observation. This action is only available for users who can edit the observation.
Two icons are displayed
If the observation is currently not visible then the icon will have a red circle around it.
This visibility can be edited by clicking the action which opens up a popup to be able to set or unset the visibility for the teacher or manager. The date when the observation was made visible will be displayed.
The system will check that any strictly required fields are filled out before being able to change the visibility. Additionally there will be checks that:
The observation template governs how the observation is made visible to the teacher and manager. Please see the template section for more details.
Some visibility options are automatic so the Observer cannot alter the visibility e.g.
The only option which allows manually editing is ‘Observers set visibility’.
If the visibility is changed from false to true and the system settings ‘Observation Visibility Email’ or ‘Observation Visibility Notification’ is turned on then the teacher and/or manager will receive an email/notification about the observation with a direct link to the observation. Note that only managers of organisation structure level definitions with the setting ‘Observation Manager Visibility Email’ will receive an email/notification. For example heads of departments could receive an email but not heads of campus.
Who can view an Observation?
An observation can only be viewed by:
An observation can be edited by:
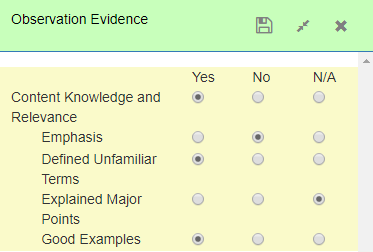
Show Observation Evidence Action
Checkbox Example | Radio Button Example |
Clicking this action will show a popup which contains a list of checkboxes or radio buttons. The idea behind this is that a college can define their own list and the observer can quickly tick the checkbox/radio button if they observe evidence during the observation.
Features of the Observation Evidence include:
The list of evidence shown can be set up differently for each observation template or removed altogether so the action does not appear. The evidence can be a simple checkbox or a configurable list of radio buttons. The display text of the word ‘Evidence’ can also be altered. Please see the Template and Observation Evidence sections for more details about how these options can be configured. Please note that this option is only available for users who can edit the observation.
Schedule Another Observation Action
The observer will be able to schedule another observation which will open the ‘Add New Observation’ popup. The wizard will auto-populate for the teacher of the current observation. This will mean for example that the timetable will only show lessons for the teacher. The new action will also be the ‘child’ of the current observation. This option will only be available for users with the permission ‘Can Add Observations’ or ‘Can Add Observations for Other Observers’. Please see the ‘Add New Observation’ section for more details.
Delete Observation Action
This action will completely remove the Observation from the system and all Actions created within the Observation. Once clicked the user will receive a warning to confirm that this is actually what they intend. This action is only available for users with the permission ‘Can Delete Observations’
Export Offline Template
The user can export a pdf document for an the Observation which can be filled in when the user has no online connectivity. At a later date these pdf documents can be imported back into the system. Please see the ‘Offline Template’ Section for more detail.
Import Offline Template
The user can import a pdf document generated within the previous action. Please see the ‘Offline Template’ Section for more detail.
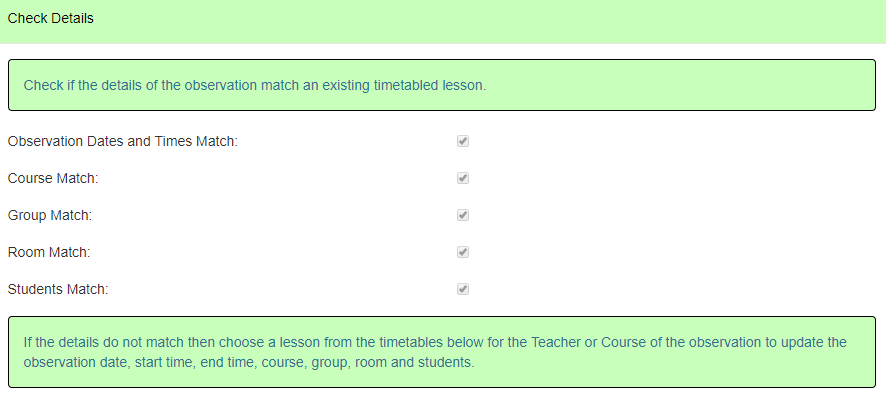
Check Details
This action will check that the information on the details tab matches a timetabled lesson for the teacher(s). It might be that since the observation has been scheduled the lesson information has changed. For instance maybe the lesson has been moved to a different date or time, maybe the room has changed or maybe the students in the group have altered since.
The popup will show whether there is a match with a lesson in the following ways:
Note that if there is no match on Date and Times there will be no check on Course or Group. If there is no match on Group there will be no check on Room or Students.
If the observation does not match a timetable then the user can choose a timetabled lesson for the course or teacher of the observation. A lesson can be selected from the grid and then by clicking update the Observation will be updated with the details.
Note that observation dates and times, teachers, rooms and students will all be replaced.
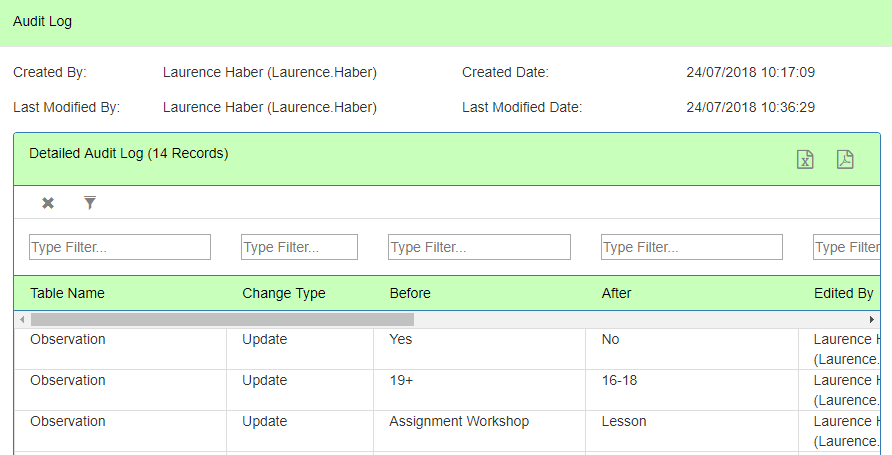
Audit Log
The Audit Log will show detailed information about each change within the observation. The popup will show when the observation was created, who created the observation, when the observation was last modified and who last modified the observation.
More information about each individual modification can be seen in the grid. This will display the change, who made the change and when it was changed. E.g. the observation grade changed from ‘Good’ to ‘Outstanding’.
This is only available to observers or users with the permission to view the Audit Log.
Mentoring
Only visible if the user can edit the observation and has the permission to view the Observation > Mentoring Selection page.
Allows the user to view the existing mentoring pairings for the teacher and add new pairings if they have the appropriate permissions. Please see the Mentoring section for more details.
Show Moderation
Displays the moderation for the observation in a popup. This will only be available:
Please see the Observation Moderation section for more details about the moderation process.
My Observation
The side panel will show all the user’s observations where the user is either the observer or the teacher. Teachers will only see observations which have been made visible to them. This is a quick mechanism to move between observations. The list is ordered with the next upcoming observation on top. Hovering over the observation will show the user useful information about the observation including:
Clicking the observation will take the user to the Observation detail screen to be able to further view/edit the observation.
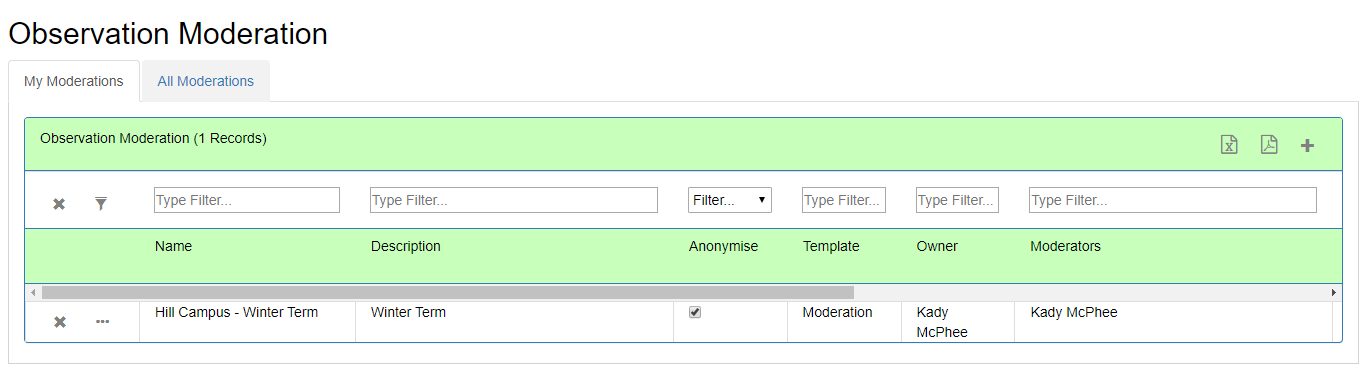
Observation Moderations
Observation Moderations can now be managed under Observation > Observation Moderation.
Key features include:
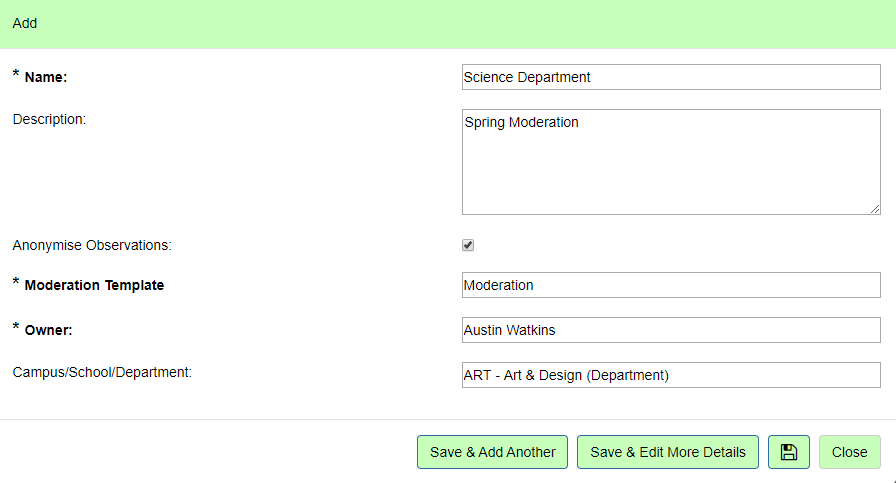
A new Moderation Group can be added from this screen. The Moderation Group is an umbrella for grouping together multiple observations to be moderated. The screen contains two tabs one for My Moderations and one for All Moderations. Only users with permission ‘Can Edit all Observation Moderations’ will be able to view this tab.
When adding a new Moderation Group there are various fields to fill out:
Selecting the Moderation Group will show more details about the Moderations.
From here the user can:
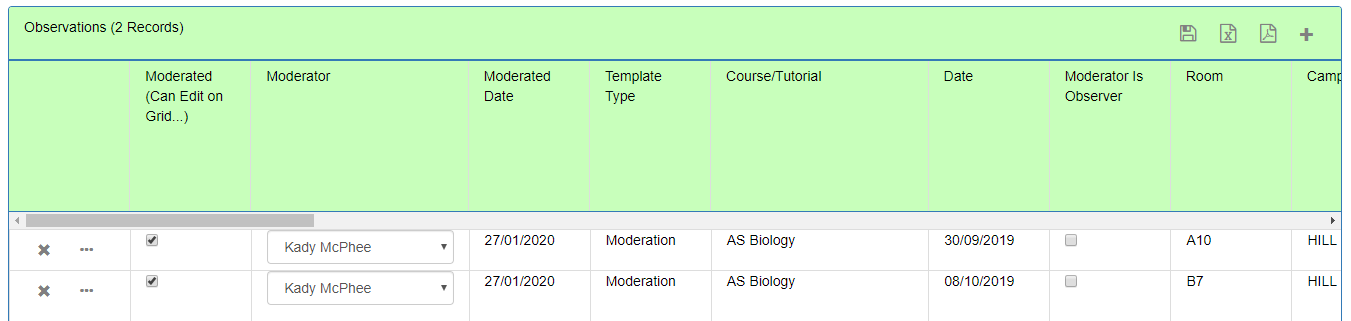
The user can view/add the observations to be moderated. The grid will show information about the associated observation as well as the moderation fields.
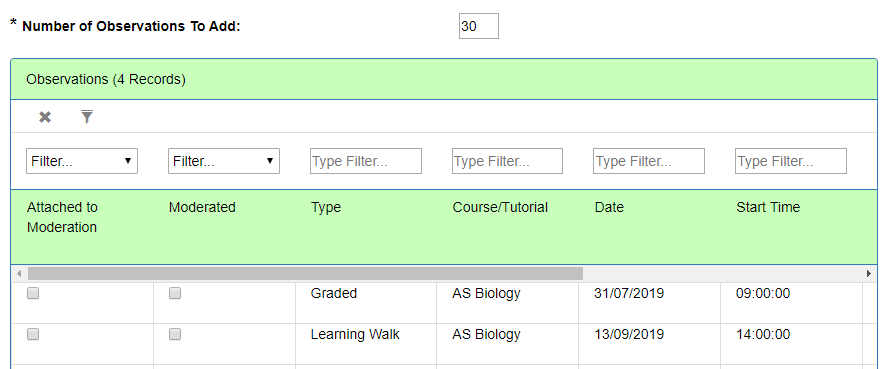
When adding observations to be moderated the user will be given a list of observations within the organisational structure area (if one has been selected). Note that only observations in the past will be displayed. The user can filter this list down as appropriate e.g. for a specific type of observation. The user can also see useful information such as:
The user can choose the number of observations to add. This defaults to 30. This will randomly add observations within the filtered list. When the observations are added the moderator will be set to the owner. However if the user has the permission ‘Can Add Observation Moderations for other Moderators’ then they can add other members of staff who have permission to the moderation screen. This can be done by selecting the moderator and then clicking save.
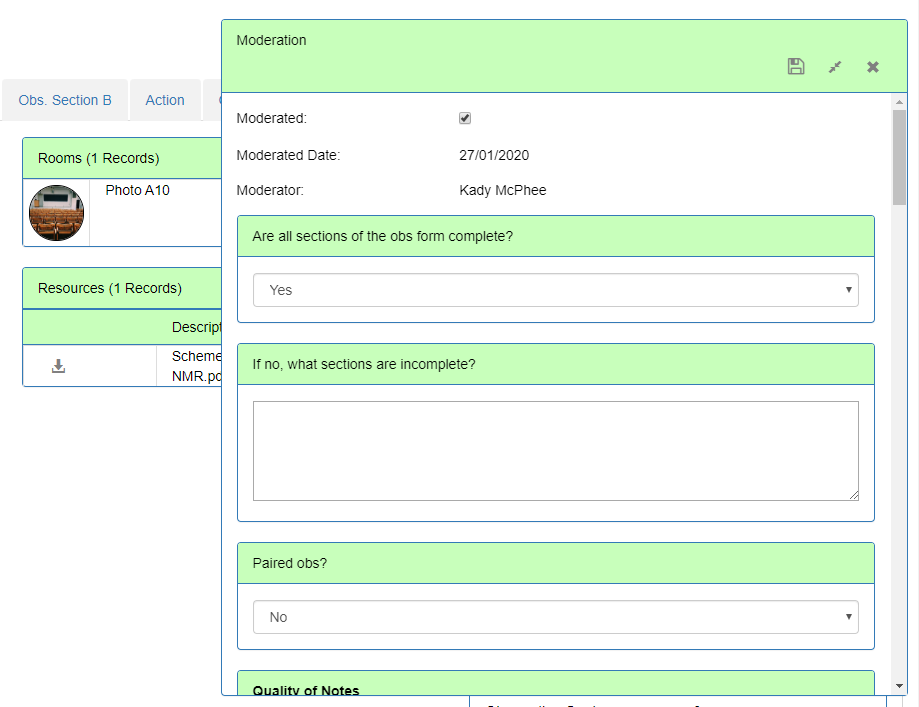
Once the moderations are added the moderator can click the … button on the grid to be taken to the observation. The observation will open with the moderation panel open. The moderator can contract the moderation panel, look in the observation and then expand and fill in the moderation and repeat etc. All moderations contain:
The other fields depend on the moderation template being used. The moderator can save the moderation by clicking the save button on the top.
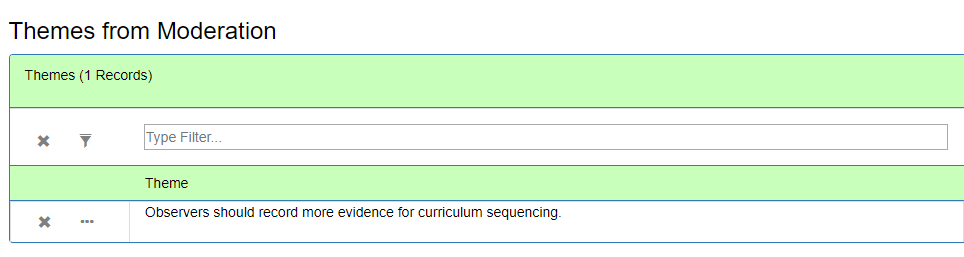
The Moderation Group page also contains a Themes sections which allows the moderators to record any key themes which have come out of the moderations.
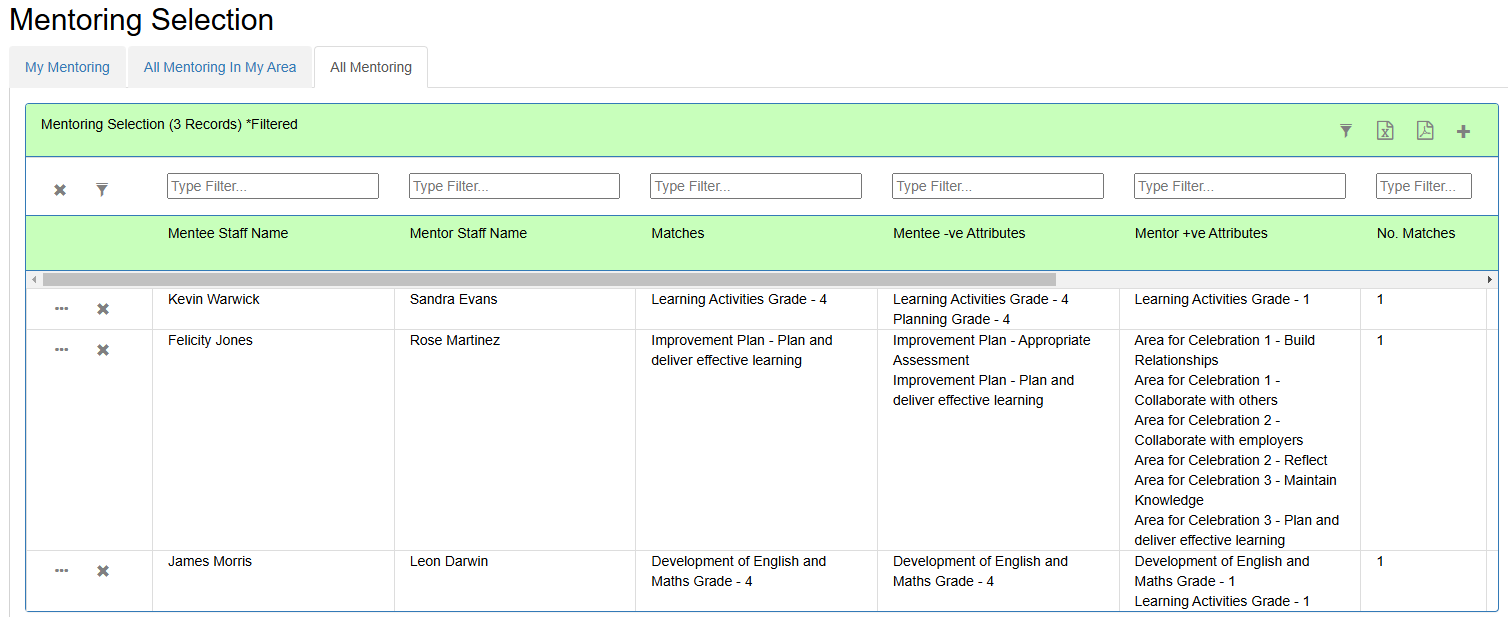
Mentoring Selection
Existing pairings between mentors and mentees can be viewed in several parts of the system:
These pairing grids will show:
Note that the attributes are taken for both this academic year and the previous academic year.
If the user has permission ‘Can Delete Mentoring’ then they will be able to delete pairings.
Clicking the … button will take the user to the details page for the pairing
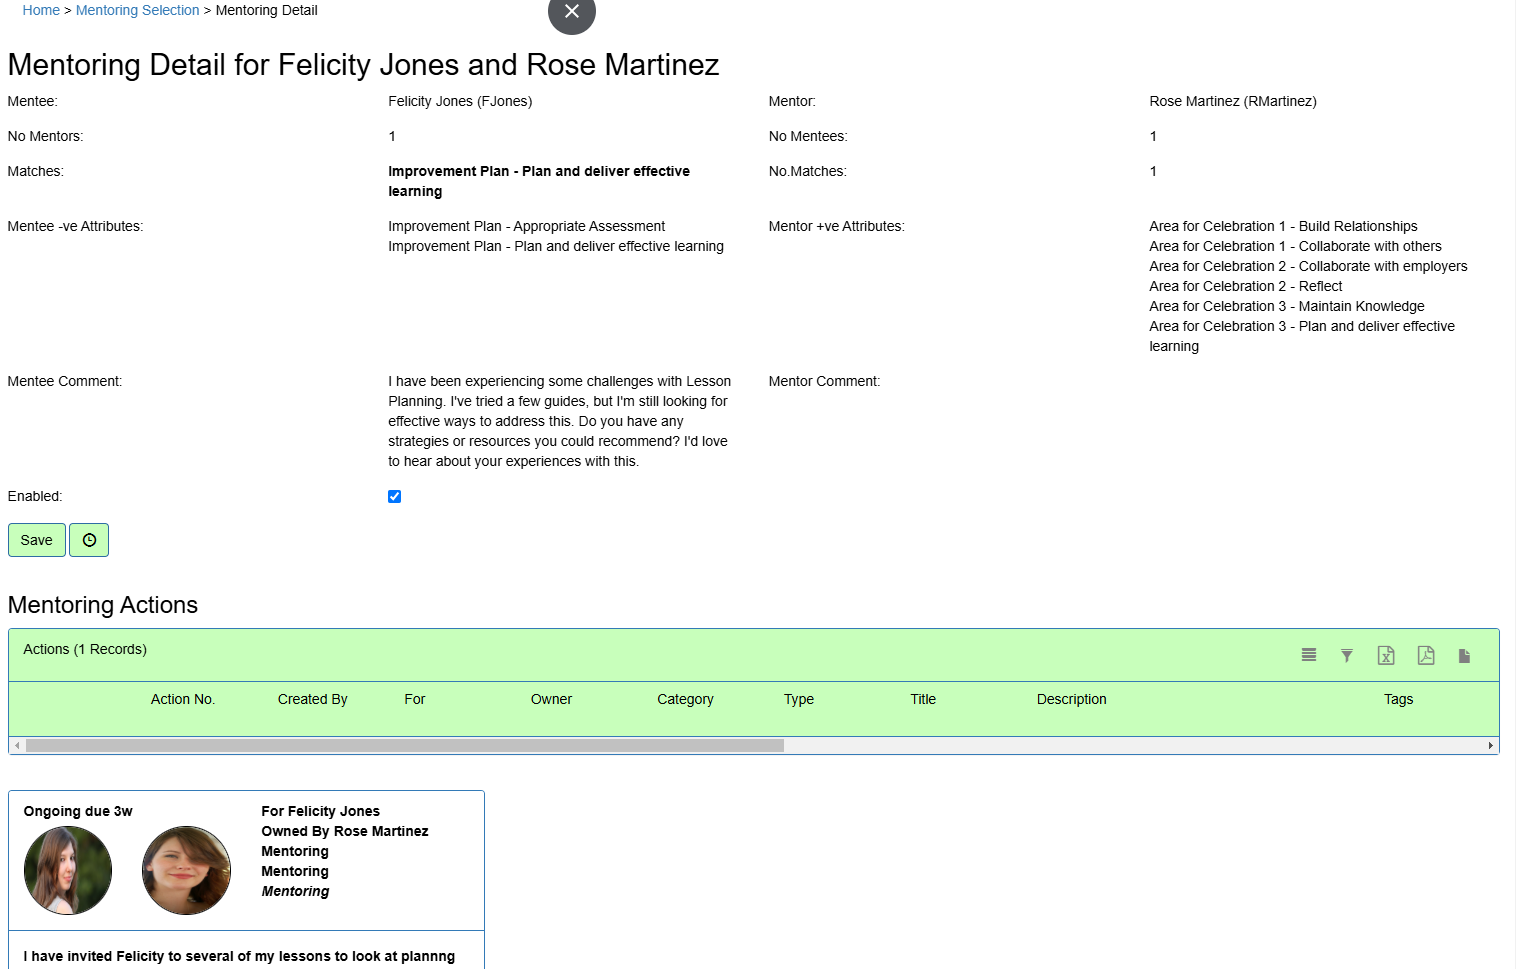
Mentoring Detail
This will show the same information as on the grid plus:
Adding New Mentoring Pairings
New Mentoring Pairings can be added if the user has the permission ‘Can Add Mentoring’.
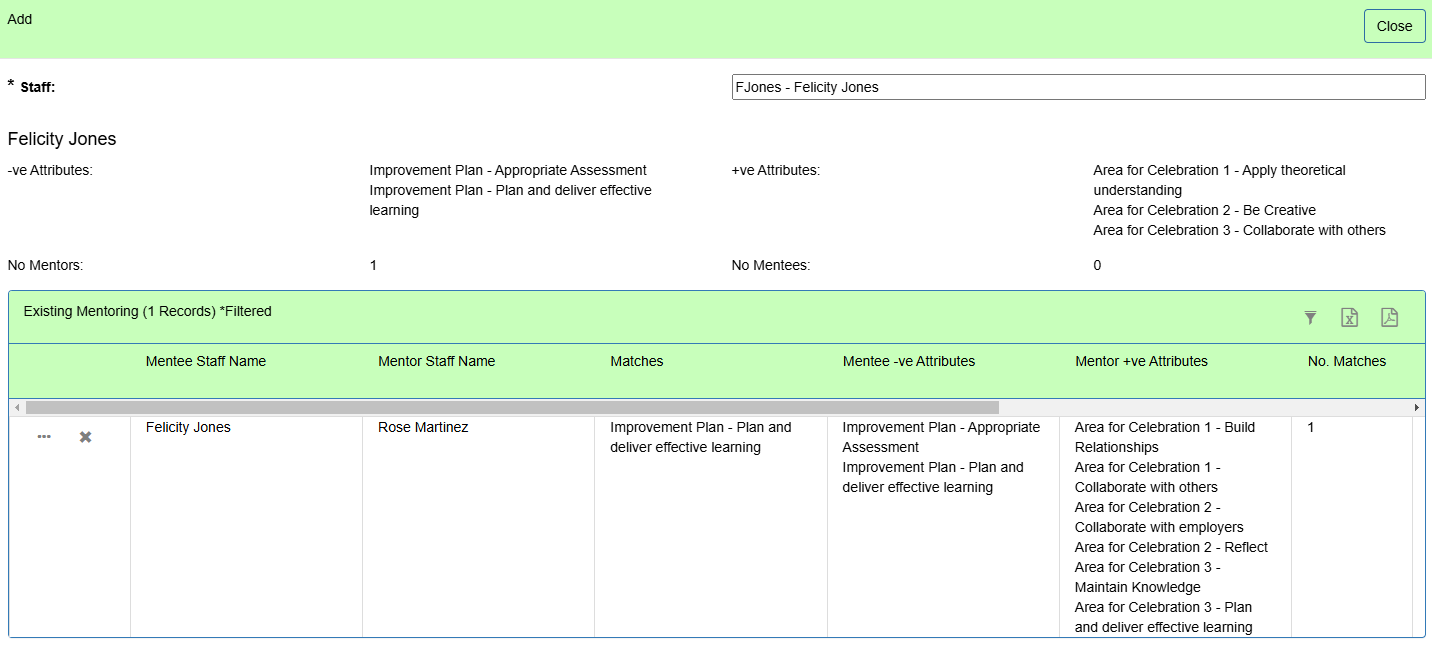
For the member of staff this will show:
New pairings can then be added:
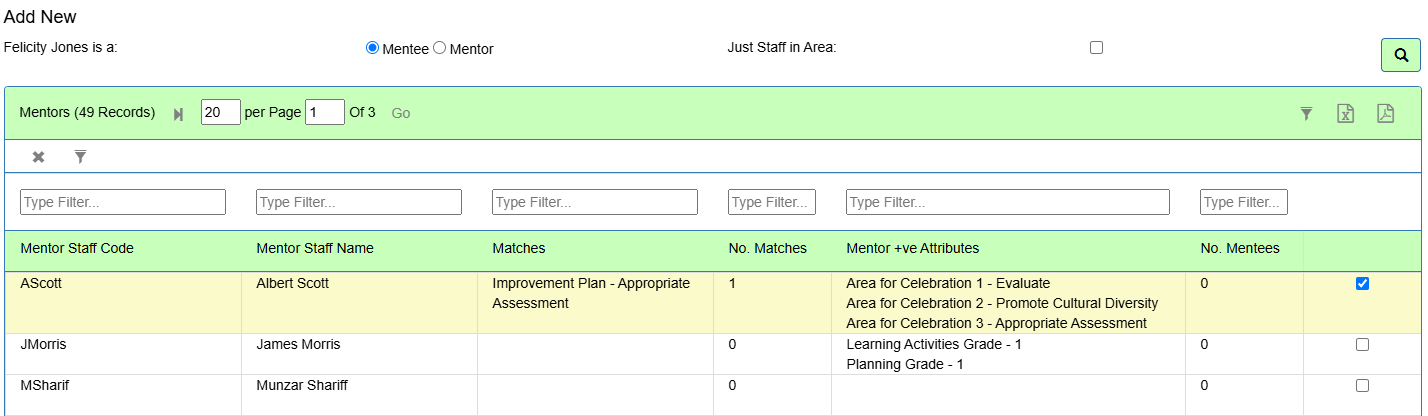
Choose if the member of staff is the mentee or mentor. Choose if to restrict on just members of staff within the member of staff’s area of the organisational structure. Then click the search button.
This will show a list of all staff which can be paired up. The staff with the highest amount of matches will be shown on the top. To add the pairing select the row and click save.
Observation Live ships with sophisticated reporting which allows the college to slice and dice the Observation data within the system. Please see the General documentation guide for more information.
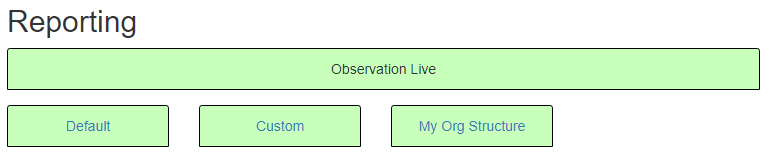
The reporting can be accessed from the menu. The will open up the Reporting Homepage. The user should see the Observation Live section with up to three dashboards:
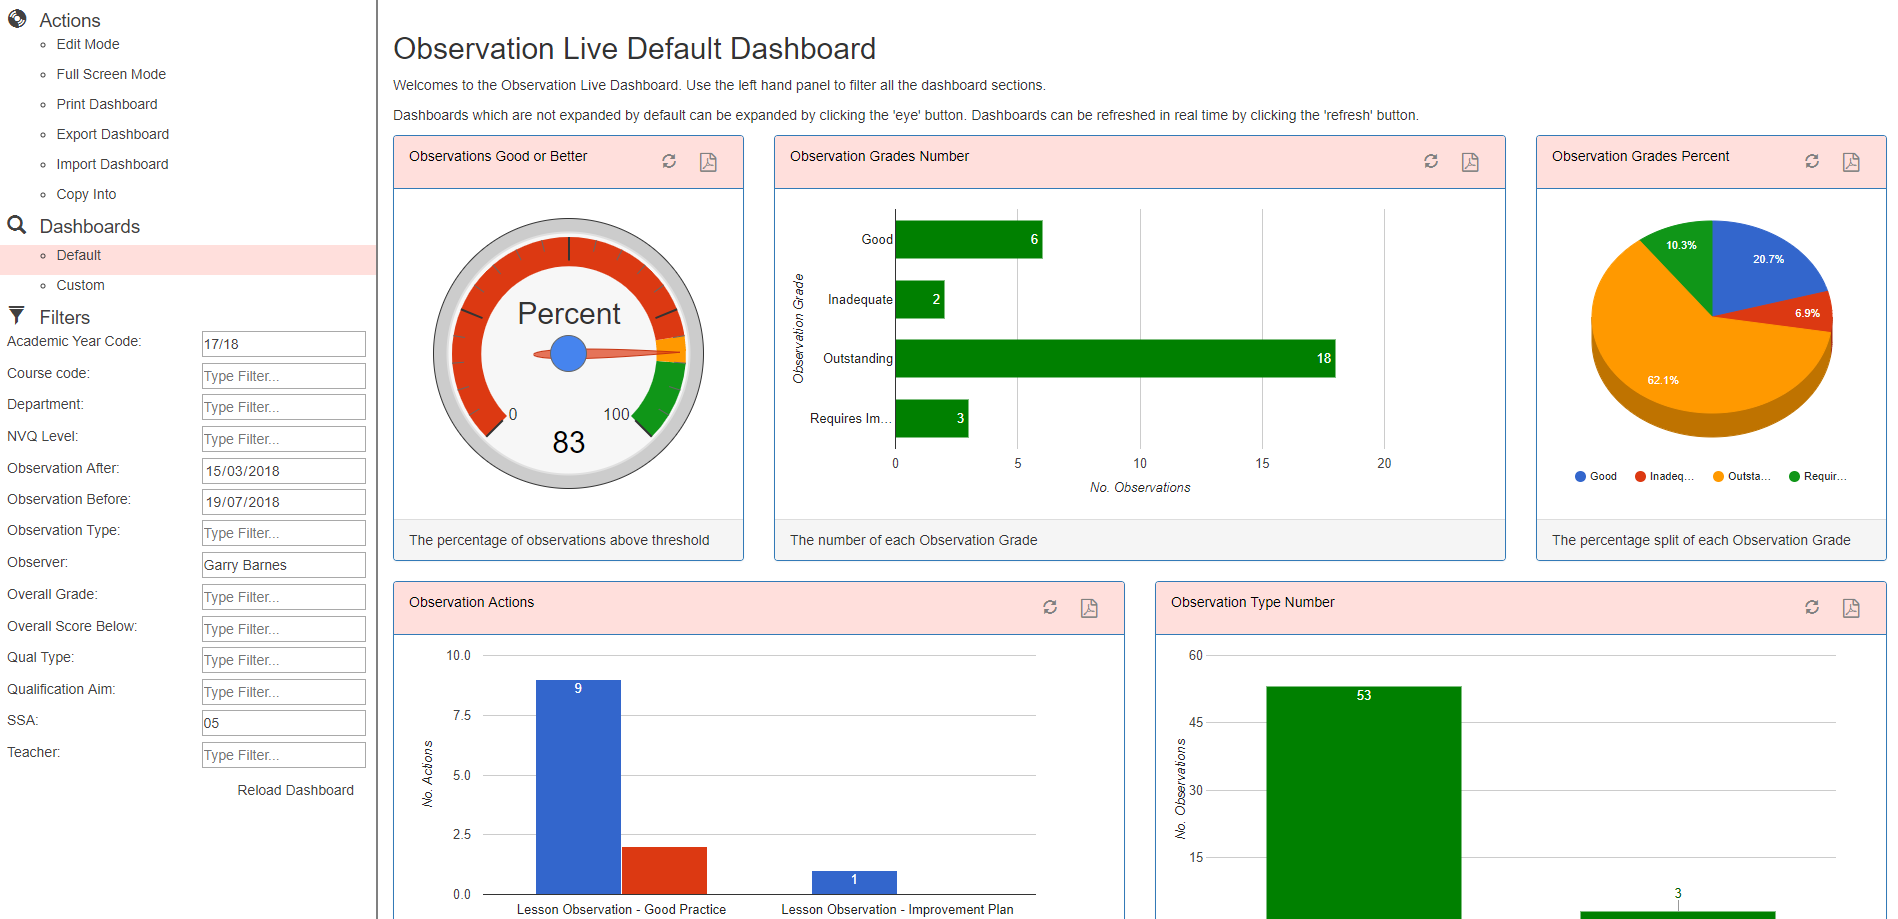
Default Dashboard
The default dashboard contains the following sections which are all filterable in the side panel:
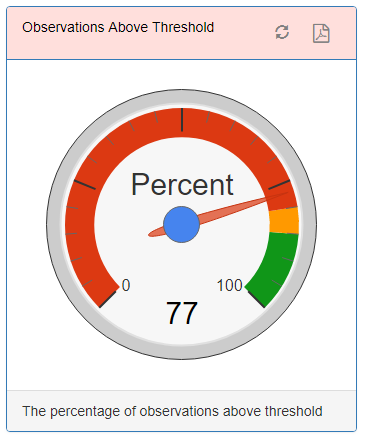
Observations Above Threshold
This section shows are gauge displaying a figure of the percentage of observations which are above a threshold value. The threshold values are set within the Observation Grade Schemes used by the Observation Template.
Observation Grade Numbers
Each Observation can be given an Overall Grade. This chart shows the number of observations at each grade.
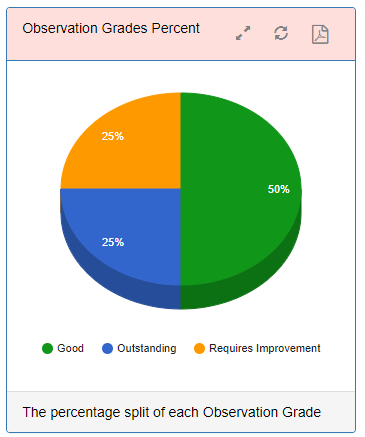
Observation Grade Percent
The same as the Observation Grade Numbers but displays percentage rather than numbers.
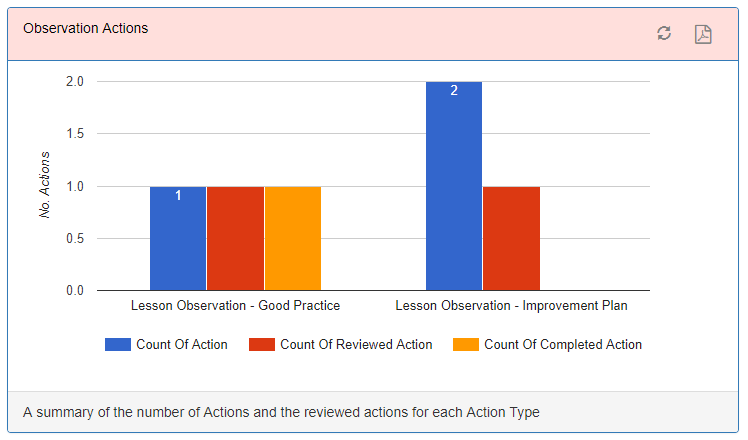
Observation Actions
Actions can be created off the back of an Observation. Each Action can be given a type, and each action can be set as reviewed or not, and an action can be set as completed. This chart splits out the action types by total number and the number reviewed and the number completed.
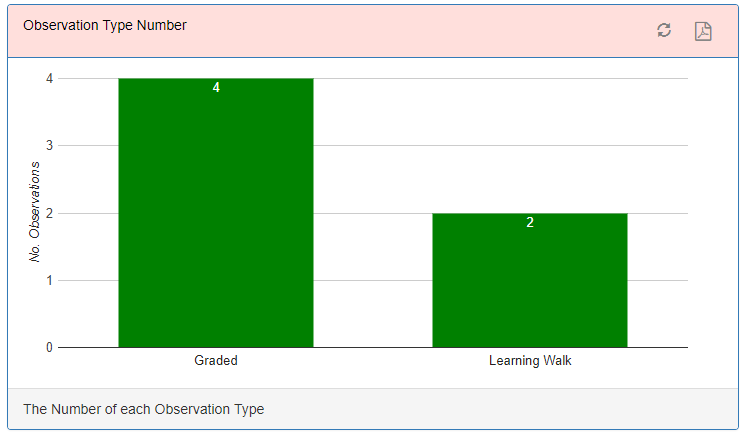
Observation Type Number
Observations can be given types e.g. Graded, Learning Walk. This chart shows the number of each type.
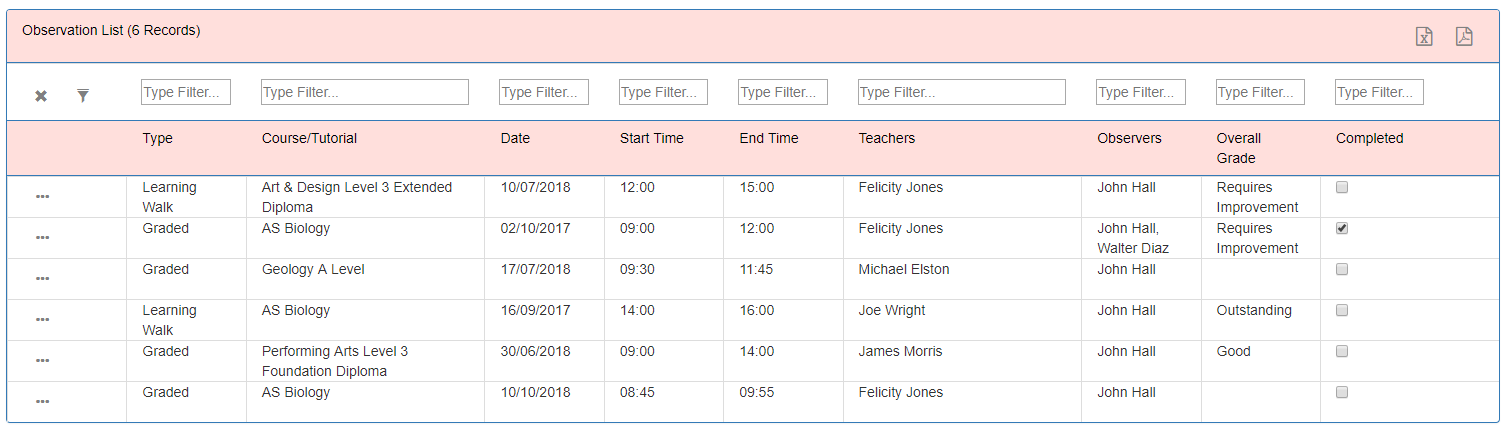
Observation List
A grid showing all the observations with details about each Observation. Clicking the ‘...’ button will take the user to the Observation Detail page.
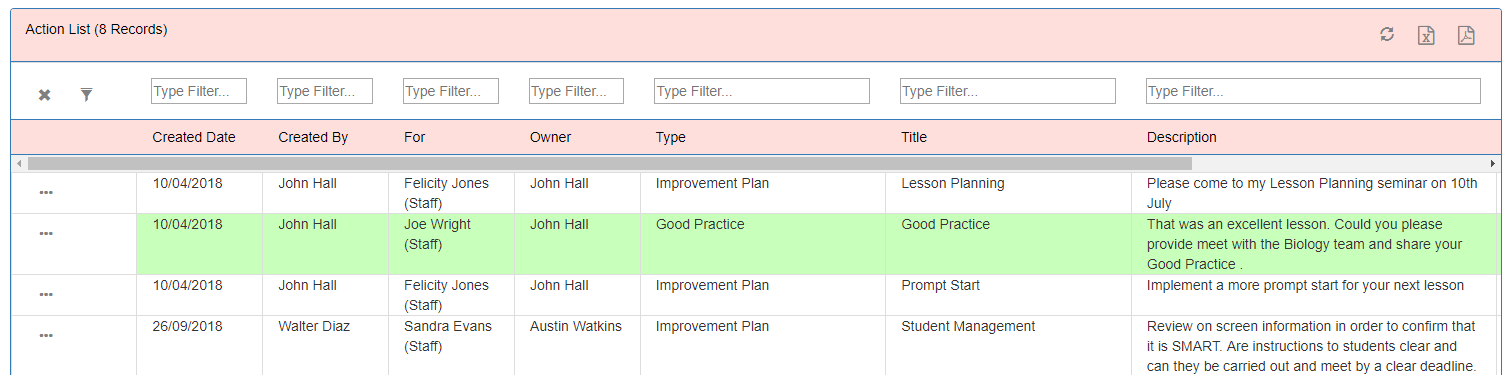
Action List
A grid showing all the actions with details about each action. Clicking the ‘...’ button will take the user to the Action itself.
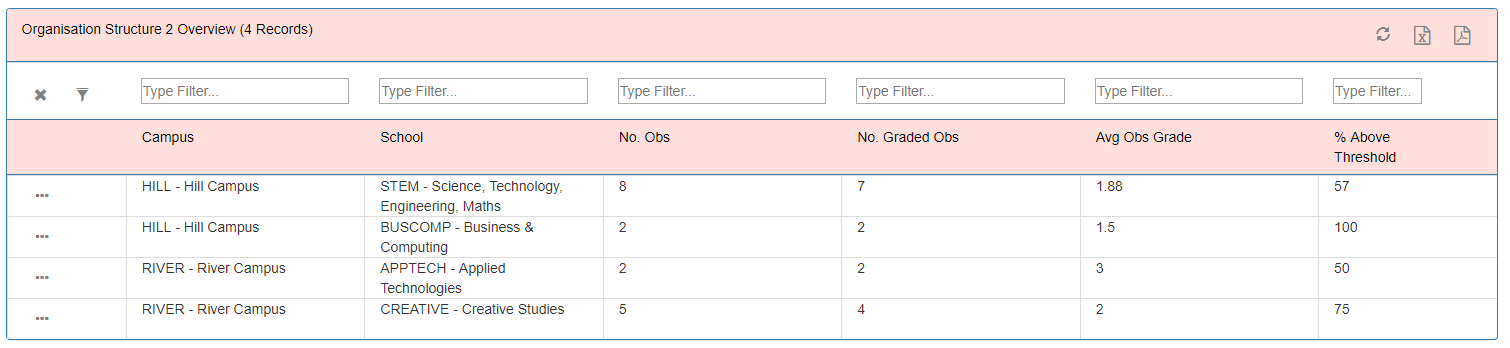
Organisation Structure 1/2/3/4 Overview
Each Observation can be associated with an organisation structure area. There are 4 dashboards with an overview of each level e.g. by Campus, School, Department etc. The grid shows each organisation structure, where it lives within the structure hierarchy and an overview including:
SSA Overview
Each Course can be associated with a Qualification Aim which contains the Sector Subject Area. The grid shows each SSA and an overview including:
NVQ Level Overview
Each Course can be associated with a Qualification Aim which contains the NVQ Level. The grid shows each NVQ Level and an overview including:
Qualification Type Overview
Each Course can be associated with a Qualification Aim which contains the Qualification Type. The grid shows each Qualification Type and an overview including:
Filters
The following filters can be applied to each section:
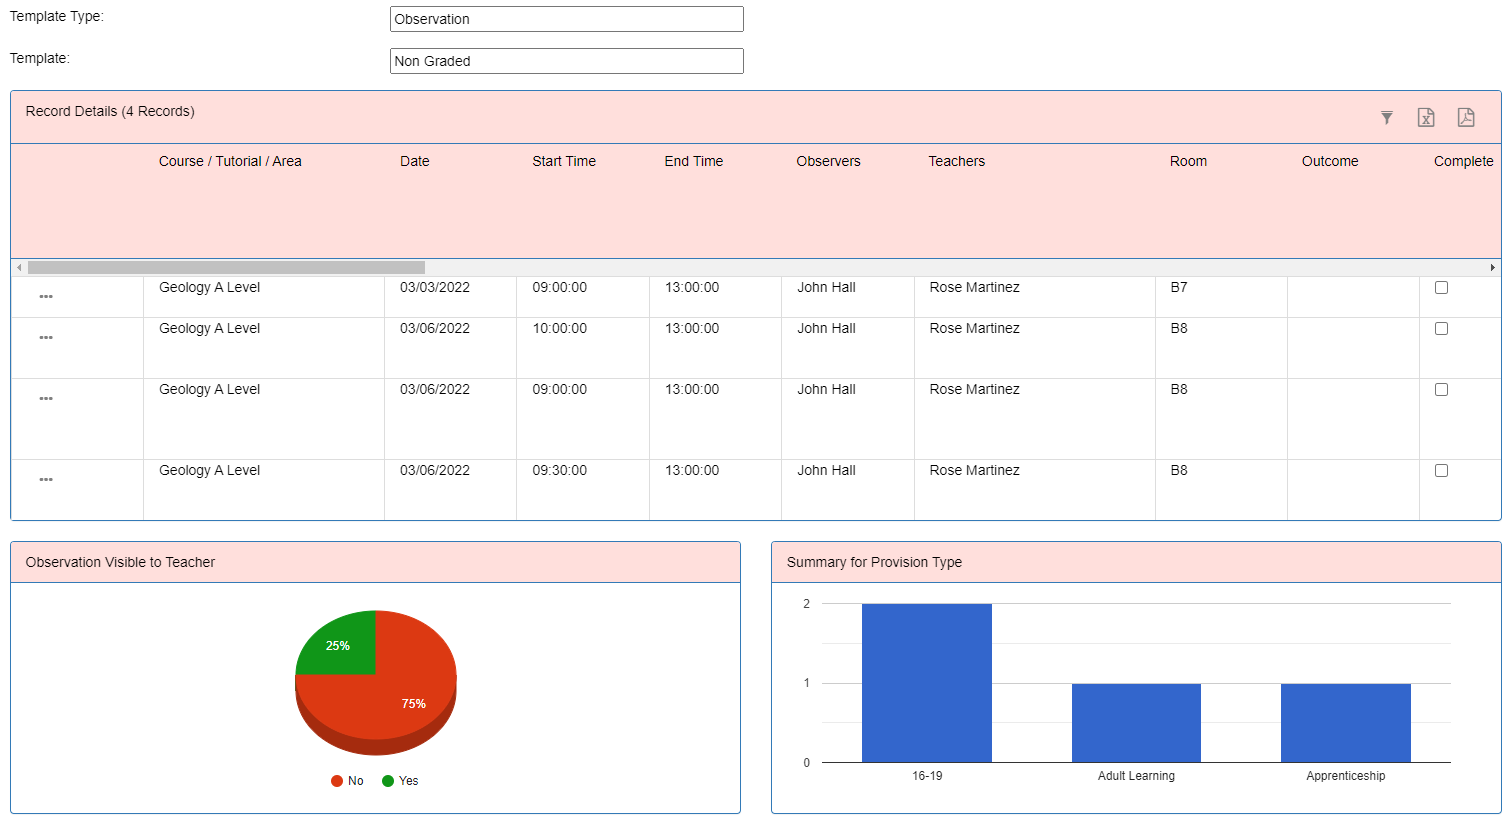
Template Reporting is available under the Reporting menu. This allows a college to easily report on any Observation template that has been created. Under Template Type select Observation. Then choose the Template.
This shows several sections:
The Calendar shows observations and actions on a calendar. Please see the General documentation for more details.
The user can decide which information to show within the calendar or not show the information at all.
The Wall is a cross between a forum and the wall you would find within social media applications such as LinkedIn or Facebook. The concept is that it is a collaborative zone for members of staff to post about aspects of teaching and learning so that other members of staff can view and comment on these posts. Please see the General documentation for more details.
The Search Menu allows users to search information by Course, Group, Staff, Students or Teaching Resources. Please see the General documentation for more details.
Teaching Resources allow your college to add all Resources related to teaching in one central place for example Using IT, Questioning techniques, etc. When adding an action for a teacher from a Lesson Observation then teaching resources can be added to the action and progress monitored.
The Action page allows the user to see actions which are associated with the user. Please see the General documentation for more details.