Planning Live Documentation
For Scheme of Work and Lesson Planning
Manage, Create, Share, Improve your College’s Lesson Planning...
Planning Live has been built from the ground up with the help of teachers and OFSTED inspectors to enhance your college’s Scheme of Work and Lesson Planning process. It allows teachers to create Schemes of Work for their subjects and tutorials, and detailed Lesson Plans for each of their lessons.
Planning Live compromises of the following main components: a Website, a SQL Server database and a Windows Service.
Website
The website provides the front end of the system where all users will login to access. This website can be hosted locally on the college’s intranet and/or made available externally. Typically the website can be accessed from a url which appears as follows http://ServerName/CollegeLive or www.college.ac.uk/CollegeLive. Colleges will often embed this link on their intranet page for a seamless experience.
Prerequisites
Windows Server 2012 or above
IIS7 or above
10 GB Hard Drive
3Ghz Quad Core Processor
8GB RAM
.NET 4.6.2 Installed
Please note that hardware requirements are estimates and maybe higher or lower depending upon the volume of concurrent users. Additionally if the server has other systems installed that are taking up resources then the resources available to the system may be considerably lower. Please contact support if unsure.
Database
The data behind the system is stored within a SQL Server Database.
Prerequisites
SQL Server 2014 or above
100 GB Hard Drive
3Ghz Quad Core Processor
8GB RAM
.NET 4.6.2 Installed
Please note that the Website and Database can be hosted on the same server. However the resources required will be higher to accommodate this.
Windows Service
The Windows Service known as the Process Agent will perform background processes required by the system. This includes scheduling data to be imported into the system and sending emails.
Installation
The Installation Wizard should guide the users in how to install the Website, SQL Server Database and Process Agent.
Configuration
Once installed there are various steps required before staff can enter Schemes of Work and Lesson Plans. This outlines the minimum steps required but other steps might be needed.
User Authentication
The college will need to decide how they want users on the website to be authenticated. There are 4 methods:
In order to use windows authentication the following settings are required in IIS. Under the website navigate to authentication. Make sure that ASP.NET Impersonation and Windows Authentication are turned on, and that Anonymous Authentication and Forms Authentication are turned off.
In order to use any of the other authentication methods the following settings are required in IIS. Under the website navigate to authentication. Make sure that Anonymous Authentication and Forms Authentication are turned on, and that ASP.NET Impersonation and Windows Authentication are turned off.
The system ships with a default administrator account with username: administrator and password: Password. This should be altered as soon as possible to have a password of your choice.
Imports
The system requires data from other systems to be used. At a very minimum staff/users and courses/groups need to be imported. Other useful imports include students and enrolments. The imports need to be SQL Server views or stored procedures. Each import has a specification associated with it showing the columns and data required. Imports can be scheduled using the Process Agent at a specified time in the day. Colleges who use ProMonitor or ProSolution can use preconfigured imports. Colleges who do not wish to use ProMonitor or ProSolution will need to set up SQL Server views from their relevant sources.
Templates
Templates govern how the Scheme of Work and Lesson Plans will look. This includes labels, guide text, visibility of text boxes etc. The system ships with a standard template for Schemes of Work (both Subject and Tutorial) and Lesson Plans. The College will probably wish to alter these to fit their processes and/or create additional templates for different types of courses.
Holidays
The system ships with standard UK holiday times but the college may wish to configure them. These are used to create lesson schedules.
Organisation Structure
The system allows for up to 4 levels of organisation structure e.g. Campus > School > Department. Managers can be assigned to each area.
Managers are responsible for their area. They have elevated permissions. The administrator needs to decide which staff are the Managers.
Once the Managers have been created they should login and add the courses and staff to their area. They can decide which templates to use within their area and if they so wish create their own templates.
Once this setup is completed Staff should be able to login and start creating Schemes of Works and Lesson Plans.
Modules
Planning Live has an additional module called the Student Module. The Student Module is an optional and purchasable module for Planning Live. The module allows for Schemes of Work and Lesson Plans to be made available for students and parents. Students and parents can be given their own accounts for Planning Live to see this information within the Planning Live website. The college has full flexibility about which areas of the Scheme of Work and Lesson Plans will be available for students and parents to view. The college can decide when to make each individual Scheme of Work and Lesson Plans available to the student. In addition students can be given the ability to feedback on their Schemes of Work and Lesson Plans.
When the college has purchased the Student Module extra options will become available throughout the system. The documentation will show features which are only available within the student module.
Online Demo
There is an online demo for Planning Live which can be found here http://www.demo.system-live.com
This can be useful to see an example of how the system can be configured. This can show you sample Schemes of Work and Lesson Plans. The system can be logged in with different types of user.
To access the demo site the following credentials should be used.
Type of User: Administrator
Username: Administrator
Password: Password
Type of User: Head of Campus
Username: Kady.McPhee
Password: Password
Type of User: Head of School
Username: Linzi.Stephenson
Password: Password
Type of User: Head of Department
Username: James.Morris
Password: Password
Type of User: Teacher
Username: Felicity.Jones
Password: Password
Type of User: Student
Username: Karen.Nelson
Password: Password
Type of User: Parent
Username: Parent
Password: Password
Please feel free to try out the demo site and edit information. Please note that the demo site may be regularly reset so any changes will be lost.
Planning Live has many General Features used throughout. Please see the General Documentation for more details.
Please see the General Documentation for more details.
The first page after logging into the system is the homepage. This displays your user with appropriate timely information. The type and scope of the information being shown depends upon the type of user.
The type of user can be split as follows
In order to view the homepage information for PlanningLive the user will need to have the permission ‘Show PlanningLive Homepage’. The homepage for each user can appear different as each section is governed by a permission.
Standard users are shown information which pertains to the Schemes of Work and Lesson Plans they are associated with (as an owner or teacher).
Managers are shown an information overview for their entire area. See the Organisation Structure section to see how users can be made managers.
Global Users are shown an information overview for the entire college. To be a Global User then a user requires the Homepage permission ‘View all data’.
Student users are shown information which pertains to the Schemes of Work and Lesson Plans they are associated with and the staff has made visible to the student.
Parents users are shown information about the Schemes of Work and Lesson Plans associated with their children.
The homepage consists of the following sections.
Notice Board Top Message
The top of the homepage may contain a message or message(s) set by an administrator informing the user how to use the system. This may provide useful links to useful documentation regarding how your college expects you to fill out schemes of work and lesson plans.
Different User Types i.e. Staff, Student and Parent can be given different Notice Board Messages.
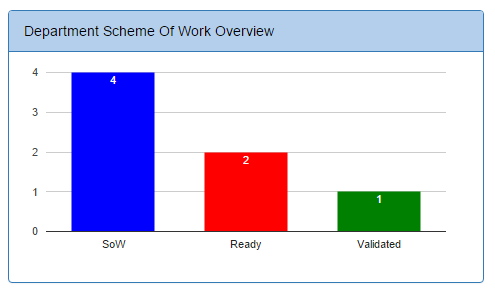
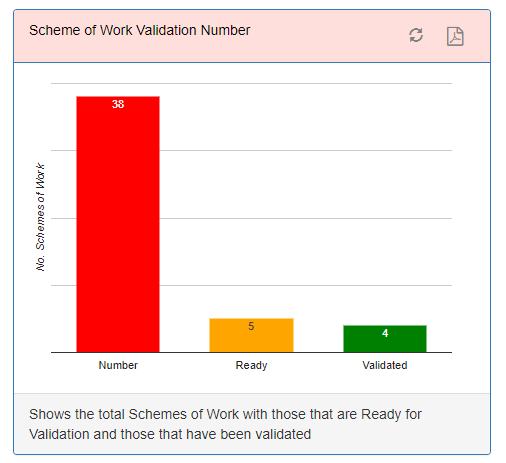
Scheme of Work Overview
Shows how many schemes of work the user is associated with, the number ready for validation and validated. For full compliance a user would expect the number of Schemes of Work to be equal to the number validated. The college would set the date for when schemes of work need to be validated.
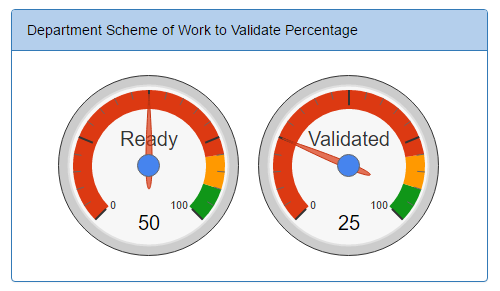
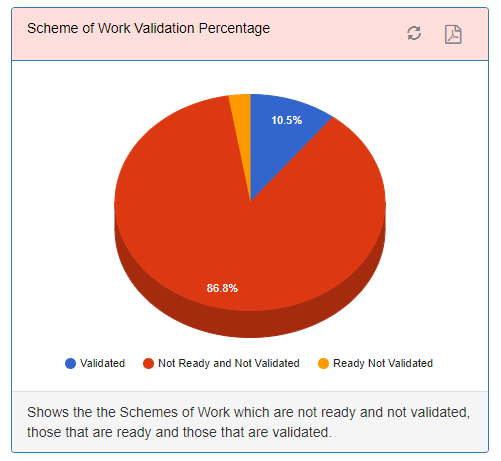
Schemes of Work To Validate Percentage
Shows similar information to the ‘Scheme of Work Overview’ but instead of raw numbers gives the Ready to be validated and Validated as a percentage of the total number of schemes of work.
Notice Board
Administrators can set messages for everybody to appear on the Notice Board and the Manager can show notices for the staff in their particular area. This can provide standard users instructions regarding the Scheme of Work and Lesson Planning process. System wide notices can also be added here.
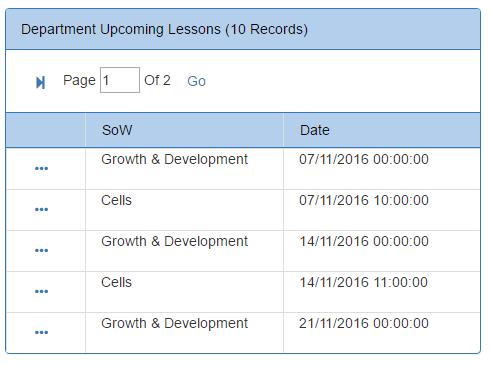
Upcoming Lessons
Shows the user the next 10 upcoming Lessons. The Scheme of Work and Lesson Date is visible. The ‘...’ button will take the user to the Lesson Plan in question.
Previous Lessons
Shows the user the previous 10 Lessons. The Scheme of Work and Lesson Date is visible. The ‘...’ button will take the user to the Lesson Plan in question.
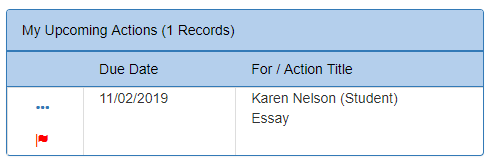
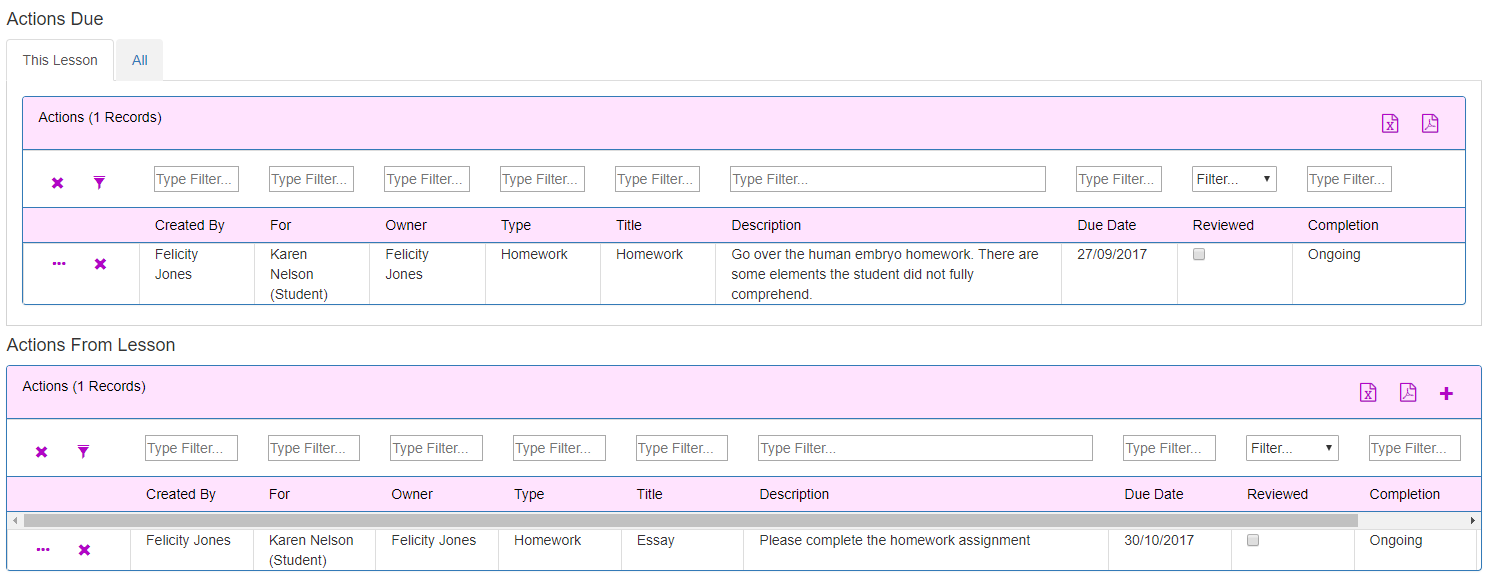
Upcoming Actions
Shows the user the next 10 actions based on the due date which have a completion status of ongoing. For teachers this will display any actions which the teacher has created themselves, or the action has been created by another member of staff for the teacher to do, or the teacher is set as the action owner. For students and parents this will show the upcoming actions for the student.
The record shows when the action is due, who the action is for (either a student or teacher) and the action title. Clicking the details button will show more information about the action and allow the user to go to the Lesson Plan in which the action is due to be completed. The User can view all these actions in the actions tab of the lesson plan.
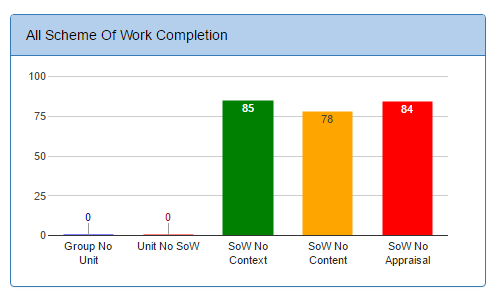
Scheme of Work Completion
This section gives an overview of whether courses have schemes of work and how well they are being filled in. Lower numbers indicate better compliance.
Group - No Unit
Shows the number of Groups which do not have a unit associated with them
Unit - No SoW
Shows the number of Units which have no Scheme of work.
SoW No Context
Shows the number of Schemes of work which have no data within the Context tab.
SoW No Content
Shows the number of Schemes of work which have no data within the Content tab.
SoW No Content
Shows the number of Schemes of work which have no data within the Appraisal tab.
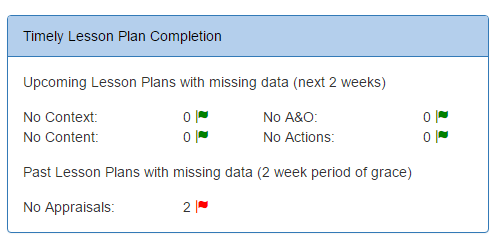
Timely Lesson Plan Completion
Shows an overview of Lesson Plan Compliance
No Context
Shows upcoming Lesson Plans within the next 2 weeks which have no data on the Context Tab.
No A&O
Shows upcoming Lesson Plans within the next 2 weeks which have no data on the Aims & Objectives Tab.
No Content
Shows upcoming Lesson Plans within the next 2 weeks which have no data on the Content Tab.
No Student Actions
Shows upcoming Lesson Plans within the next 2 weeks which have no student actions to be reviewed within the lesson.
No Appraisals
Shows past Lesson Plans which have no data on the Appraisal Tab. A two week period of grace applies for teachers to appraise the lesson plan.
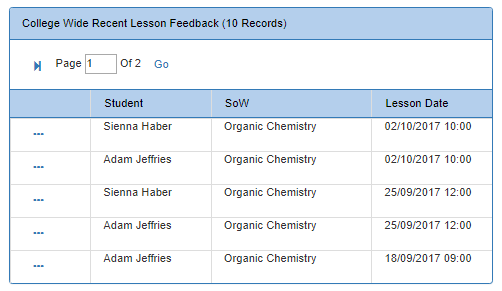
Recent Lesson Feedback
Shows the latest 10 Lesson Feedback created by students for the Lesson Plans where the member of staff is an owner or a teacher. Clicking the … will take the user directly to the Lesson Feedback so the user can see more detail.
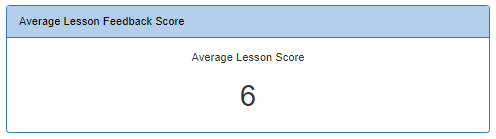
Average Lesson Score
Shows the average Lesson Feedback score given by students for Lessons where the member of staff is a teacher or owner of the Lesson. For Managers this will display the average score for all Lessons in the Area. For staff with the permission to see the entire college overview on the homepage this will show the average for the entire college in the academic year.
For Students this will be the average feedback score they have provided. Students will also see their ‘Peers Average Lesson Score’ which is the average score given by other student who share the same lesson.
Lesson Feedback Percent
Only available to students and parents this will display the percentage of feedback provided for lessons. For example say a student could provide feedback for 10 lessons but has only done so for 5 this will show 50%.
My Lesson Feedback Request
Only available for students and parents. Once a Lesson has passed this Lesson will display here if the student has not provided any student feedback. The … will take the user directly to the Lesson where they can provide feedback. Once feedback has been provided then this Lesson will disappear from the homepage.
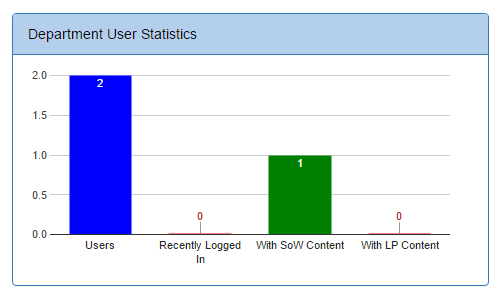
User Statistics.
This is only available for Managers or Global Users. Provides an overview of how well the system is being used. For Managers looks only at staff within the area. For Global Users looks at all staff. For good compliance the number of users should be equal to the recently logged in users, users with SOW Content and users with LP Content.
Users
The total number of users.
Recently Logged In
The number of users logged in within the last 7 days.
With SOW Content
The number of users associated with at least one Scheme of Work with data within the Content tab.
With LP Content
The number of users associated with at least one Lesson Plan with data within the Content tab..
The system menu contains the following sub menus.Please see the General Documentation for more detail.
Allows users to be added, details changed and associated to permission groups.
Allows Permission Groups to be altered.
Sets up connects to SQL Server Databases used for Imports, Message Creator and Dashboards.
Import data into the system.
Course
Required to use the system. Populates the system with courses and teaching groups which sit within the course. This allows staff to add Schemes of Work and Lesson Plans to the Course or Group.
Enrolment
Recommended if the college wishes to creates actions for learners within the Lesson Plan and the college wishes to see Group Profiles. Enrolments are attached to the teaching group within the course.
GradeBook Element
This import attaches GradeBook Elements e.g. units to the Groups. This can be useful if the college stores unit information for example in ProMonitor. This import can be set to automatically create a blank Scheme of Work for the unit. This in combination with the Scheme of Work Teacher will mean that staff can see immediately their schemes of work from their homepage for each of their units.
Organisation Structure
Imports Organisation Structure and their Managers. Up to 4 levels can be imported e.g. Campus > School > Department > Team. This is useful for reporting and for the managers to keep track of their area.
Organisation Structure Course
Imports the Courses assigned to each Organisation Structure. Allows Planning Live to work out which area the Scheme of Work might live in. This makes it easier for staff to add schemes of work for courses in their area.
Organisation Structure Staff
Imports the Staff members assigned to each Organisation Structure. Allows Planning Live to work out which area the Scheme of Work might live in. This makes it easier for staff to add schemes of work for courses in their area.
Room
Imports a list of Rooms into the system. Useful if the college wants to allocate the Room(s) the Lesson or Scheme of Work will take place in.
Other User
Other non-staff and non-student user accounts can be configured. At the moment this allows for the creation of parental account so that parents can login to Planning Live. A parental account can be associated with one or more student record so that when a parent logs in they see their child’s information within Planning Live. For parents to be able to login the college will require the Student Module.
Scheme of Work Teacher
Associates the Scheme of Work with Teacher(s). This is a not essential import but will mean that teachers do not have to manually add themselves.
Staff
Required by the system. The staff import creates staff user accounts including passwords. Staff Users can be associated with a teaching staff member. There is a distinction between users and staff in the system. Users do not need to be staff and staff do not need to be users. A user can log into the system and in most cases will be a teaching staff. However there may be users who are not teaching staff for example the IT Administrator or Head of Quality. On the flip side a college may have a member of teaching staff who is not a user of the system. This will mean that the member of staff can be used within the system but they will not be able to login
Student
Recommended if the college wishes to create actions for learners within the Lesson Plans or access quick links to the Learner’s ILP. If the college owns the Student Module student accounts can be created in this import for students to access Planning Live.
Timetable
The timetable import will import each Lesson Date, Start Time, End Time, Room and Teacher for each Group. This allows teachers to quickly add the appropriate day of the week and times when each lesson will run and add appropriate rooms to their schemes of work and lesson plans.
Recommended Order Import
The order in which the imports are imported is important as imports rely on other data being present and should be as follows.
View pending emails and emails sent. Allows the system to be setup to send emails.
View pending SMS and SMSs sent. Allows the system to be setup to send SMSs.
Allows Message Creators to be generated which allows you to create your own custom emails/sms or app notifications to be sent out on an adhoc basis or scheduled periodically. The system ships with some default creators:
A college can change the theme of the website including colours, the name of the Action Live and images.
View the status of the Process Agent. The Process Agent performs various background jobs including imports.
View and edit system settings which change the overall functionality of the system.
Managers Define Templates
If this is set to true then Managers of Organisation Structure Areas are responsible for the Scheme of Work and Lesson Plan templates available for teachers when adding a new Scheme of Work or modifying an existing Scheme of Work. If this setting is false this will remove this responsibility from Managers. Instead the templates are centrally managed. When creating a new Scheme of Work the user will be able to choose from any template which is set as a system template.
Show Lesson Plan Validation
A flag to show whether lesson plans can be validated. The Lesson Plan Detail screen has a Validation section. Not all colleges validate at the Lesson Plan level so this section can be turned off.
GradeBook Element Import - Add SOW
A flag to say whether to automatically add a Scheme of work against Level 1 GradeBook Elements e.g. units which do not already have a Scheme of Work. The SOW will be given the same name as the Level 1 Element.
Student Module- Action Visible to Student
A flag when creating Actions for Students whether the 'Visible to Student' checkbox should be ticked or not by default.
Scheme of Work Label - Staff
The shortened name alternative for 'Scheme of Work used' throughout the system which staff will see.
Scheme of Work Shorted Label - Staff
The shortened name alternative for SoW used throughout the system which staff will see.
Scheme of Work Label - Student
When students and parents use the student module they will see the text 'Scheme of Work' by default throughout the system. This might not mean anything to these users so this can be altered throughout the system.
Scheme of Work Shortened Label - Student
When students and parents use the student module they will see the label 'SoW' by default throughout the system. This might not mean anything to these users so this can be altered throughout the system.
View resources attached to all schemes of work and lesson plans.
View details error log and system status.
This screen allows organisation structure areas to be set up.
This screen is useful in Planning Live for the following reasons:
Please see the General documentation for more information about how to use the Organisation Structure page.
The Homepage Noticeboard page allows Observation based notifications to be placed on the Observation Live homepage. This could give users an overview of the system or key dates or milestones.
Please see the General documentation for more information about how to use the Noticeboard page.
When adding posts to the Wall each post requires a category. For example a Teaching and Learning Category could be set up for all users to view and post, etc.
Please see the General documentation for more information about how to use the Wall Post Category page.
Accessed from the Maintenance menu
Rooms can be allocated to Schemes of Work and Lesson Plans on the details tab of these areas. Please see the General documentation for more information about how to use the Noticeboard page.
Accessed from the Maintenance menu
Templates govern how the Scheme of Work and Lesson Plans will look. This includes labels, guide text, visibility of text boxes etc. The system ships with a standard template for Schemes of Work (both Subject and Tutorial) and Lesson Plans. The College will probably wish to alter these to fit their processes and/or create additional templates for different types of courses. Schemes of Work and Lesson Plans can be associated with a template.
The Template page is also used to determine how each action type will look. Each action needs to be given an action type. This is used for the following reasons:
Please see the General Documentation for more information about the Template page.
Accessed from the Maintenance menu
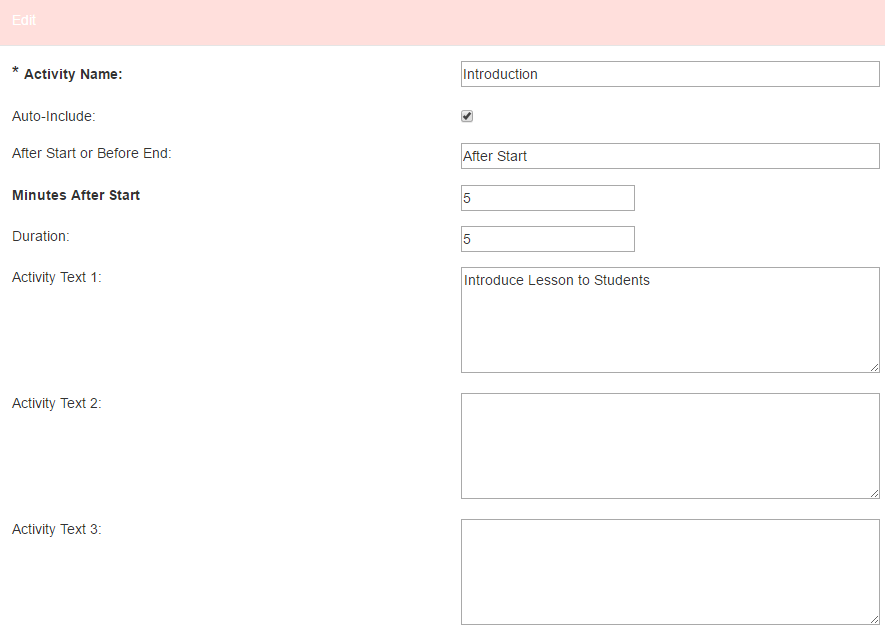
Users can create activities within their lesson on the Lesson Plan Content page. This screen allows the auto population of these activities (the duration and text boxes can be automatically populated). For example the first 10 minutes of a lesson involves a standard introduction then this allows an easy way for the college to ensure that every Lesson Plan has an introduction. Please note that even though the activity will be populated they can still be overwritten by the user. Please also note that Lesson Plan Activities can also be added in against the Lesson Plan Template. Adding default activities to the Lesson Plan Activity screen affects all Lesson Plans. If the activity is specific to a type of Lesson Plan then this should be done within the Template itself.
New default Lesson Plan Activities can be created by clicking the add new button on the top of the grid.
Activity Name
The name of the activity so that users can easily identify it.
Auto-Include
A flag to say whether the activity will be automatically added into the lesson when the user saves the Time information on the Lesson Plan Details tab. If this is unselected the activity will not be automatically added but can be selected by the user to add into the Lesson Plan content manually.
After Start of Before End, Minutes after Start (Before End)
When the Auto-include option is selected this will decide when to create the activity. If the user chooses ‘after start’ and ‘5 minutes’ and the lesson started at 10:00 then at 10:05 the activity will automatically be added to the Lesson Plan Content.
Duration
The length of the activity in minutes. This does not need to have a value. If a value is given then the duration for the activity will be automatically displayed.
Activity Text 1-6
The Lesson Plan activity can have up to 6 text boxes on the grid. If the text box is filled in then the text will be inserted into the Lesson Plan Content grid. If it is not filled in then it will be left blank.
Enabled
If the enabled flag is deselected then the activity will not be able to be selected by the user.
Accessed from the Maintenance menu
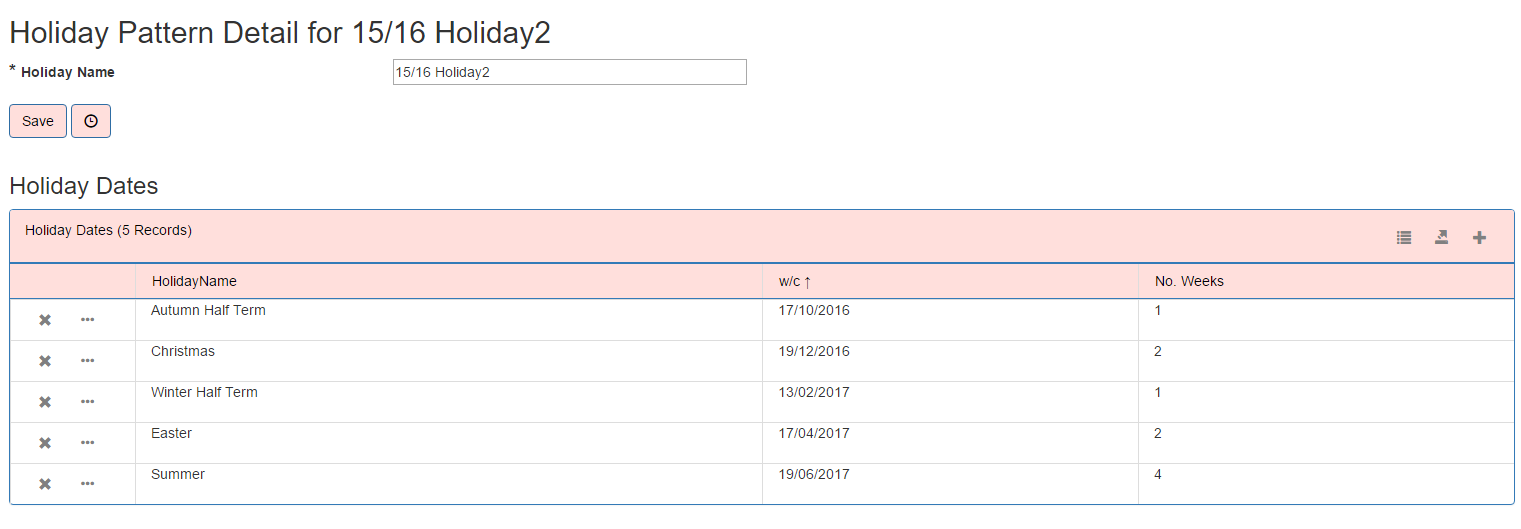
Holidays Patterns can be added into the system. The Holiday Pattern page shows all the Holiday Patterns in the system. Colleges might have multiple holiday patterns if different courses have different holidays for example Work Based Learning might be different to Classroom Learning. Holiday Patterns are made up of individual holidays.
When adding new holidays the holiday needs to be given a name in order to identify it.
Clicking the details button allows the addition of individual holidays for example the Christmas or Easter Break. The individual holiday consists of a name, a start date and an end date.
Holidays are important when saving Schemes of Work dates in order to create the Lesson Schedule on the Content tab. For instance a scheme of works start date is 12/09/2016, for 20 weeks with 1 lesson per week. There is a mid term holiday on 24/10/2016 for 1 week. A Lesson will be created for each week before the holiday (6 weeks worth), a week’s worth of holidays will start on 23/11/2016. Lesson 7 will then start on 30/10/2016. Lessons will then be created up to christmas and the same principle applied to the christmas holiday period. It is important that these are correct when beginning the planning process for the academic year.
Accessed from the Maintenance menu
Validation Periods allows the Scheme of Work to be validated once or more than once across the academic year. This screen allows validation periods to be set up and the dates with the validation periods defined.
Different periods can be set up. For example the Termly Validation period above has three periods for Term 1 to Term 3. Each period has a start and end date. This is important for the system to work out if the scheme of work is currently ready for validation or validated.
Validation Periods can then be associated with the Scheme of Work template.
This screen allows academic years to be turned on or off and information copied between academic years such as templates and rooms.
Scheme of Work Selection
The Scheme of Work Selection screen shows list of the Schemes of Work the user has access to. Clicking the detail button at the start of each grid row will take the user to the Detail page for the Scheme of Work. The tabs displayed on the screen depend upon the type of user. On the side panel the user has the option to add/find a scheme of work.
My SoW
This tab shows all the Schemes of Work that the user is an owner or a teacher.
All SoW in Area
This tab shows all the Schemes of Work in the area(s) which the user sits within.
All SoW
Shows all Schemes of Work within the academic year. This tab is only available to Managers or users with the permission ‘Can View All Schemes of Work’.
My SoW As Validator
Shows all the Schemes of Work where the staff member has been set as the validator against the Scheme of Work or has validated the Scheme of Work. Schemes of work which have been set as ready for validation but not yet validated will appear on the top of the list. This tab is only available to Managers users with the permission ‘Impersonate Organisation Structure Manaher’, users set up as validators by their Manager or users with the permission ‘Impersonate Validator’.
Grid
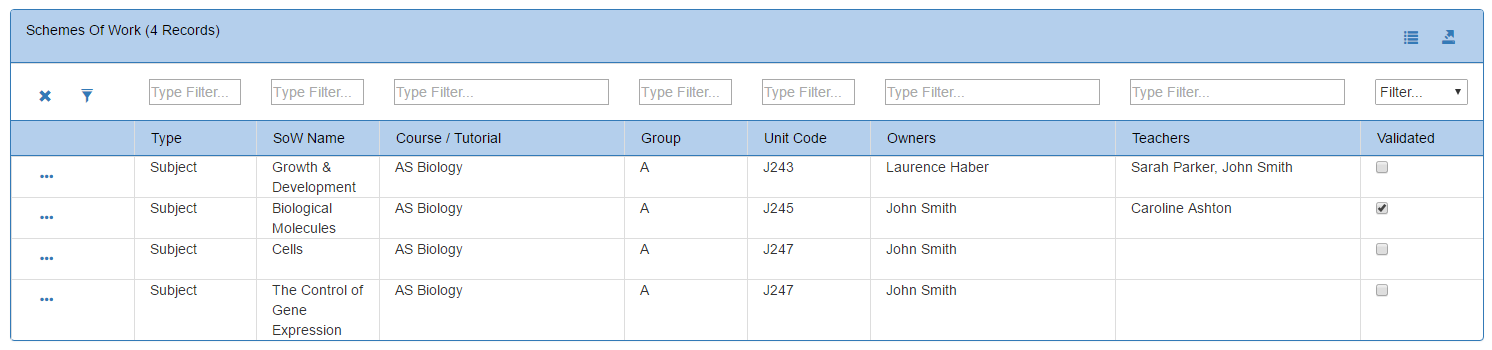
Type
Either Subject or Tutorial. Subject refers to curriculum based Schemes of Work
SOW Name
The name of the Scheme of Work. This is often the name of the unit.
Course/ Tutorial
For Subject based Schemes of Work this will be the name of the course. For Tutorial based Schemes of Work this will be the Tutorial Name.
Group
For Subject based Schemes of Work this will be the Group within the course. For Tutorial based Schemes of Work this will be empty.
Unit Code
For Subject based Schemes of Work this will be the Unit Code. For Tutorial based Schemes of Work this will be empty.
Owners
A comma separated list of owners against the Scheme of Work. Owners are the staff who can edit the Scheme of Work. Owners are set up on the Scheme of Work Details page.
Teachers
A comma separated list of teachers against the Scheme of Work. Teachers are set up on the Scheme of Work Details page.
Ready
A flag to show whether the Scheme of Work has been set as ready to be validated.
Validated
A flag to show whether the Scheme of Work has been validated.
Add/Find Scheme of Work
The Add/Find Scheme of Work can be found under Actions on the side panel. This option is only available for users who have the Edit ‘Scheme of Work Selection’ Page Permission. This allows users to associate themselves as teachers to existing schemes of work or add completely new schemes of works. Clicking the action will open a wizard which will guide the user through the process. The steps are shown on the top of the wizard and give an indication of how far through the process the user is. Green indicates a completed step. The steps shown depend upon the options selected in the wizard. The user can go forward or backwards through the wizard by clicking the forward and backwards button.
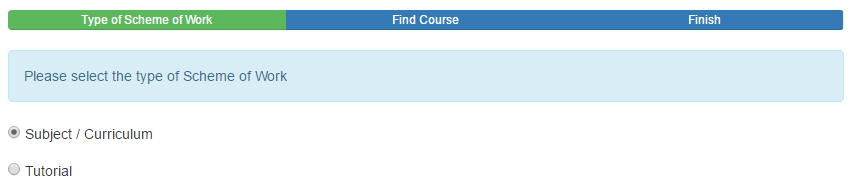
Type of Scheme of Work
The user can select either subject/ curriculum or tutorial based scheme of work. Subject based are associated with a course and teaching group. Tutorial based scheme of work are associated with a tutorial. They can be used for any non curriculum based adhoc scheme of work. The option selected changes the options in the wizard.
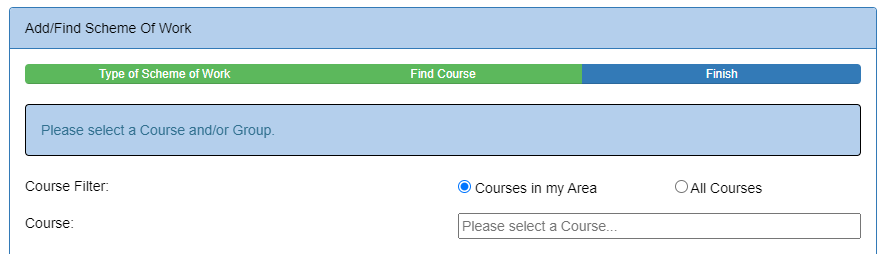
Find Course
This option is only available when the subject scheme of work is selected in the first step. From here the user can select the course which the scheme of work sits within.
Course Filter
This will filter the Course List for either Courses in the user’s organisation structure or All Courses.
Course
Typing text known within the course code or course title will filter the list down.
Group
The Group dropdown will only be visible if the course has more than one teaching group within it. The Group dropdown will show all the groups within the course.
Can’t see your course click here?
The Planning Process often starts before the new academic year which can be before new courses have been added into the MIS system. Teachers can still plan for new courses not yet in the system by creating a temporary course or they could use an old but similar course. Once the real course is known the Manager can replace these temporary or new courses with the actual course. Ticking this option will create a new step in the wizard to create a temporary course.
Add Course
If the ‘Can’t see your course click here?’ option is ticked in the Find Course Step then the user can give the temporary course a new name.
Course Code
The system will auto generate a course code based upon your user’s username. For example if your username is JoeBloggs the first course you add will be JoeBloggs1, the second course JoeBloggs2 etc. This allows for more easy identification of temporary courses.
Course Name
The name of the course. This should be in line with the actual course name that the course would have if it was not temporary. Good naming of the course will allow the Organisation Structure Manager to better identify the real course once it is known within the college’s MIS system
Existing Schemes of Work
If an existing course/group is chosen and the course/group contains at least one Scheme of Work then the user will see the existing scheme of works page. The user can review the existing schemes of work to verify that it does not already exist before adding a new one.
If the user sees their scheme of work(s) then they can tick the teacher checkbox against the row and then click save on the top of the grid. This will add the user as teacher. If the scheme of work has no owners then the user can add themselves as an owner to be able to modify it. Managers of Organisation Structure and validators also have the option to add themselves as a validator. The user can click the details button at the beginning of the row which will open the scheme of work in a new tab. This allows the user to check that the scheme of work is the correct one they wish to add themselves to.
If the user has reviewed the existing schemes of work and still wishes to add a new one then they can click ‘Can’t see your scheme of work. Click here’. This will add a ‘add new scheme of work step to the wizard.
This step is slightly different for tutorial schemes of works. The user sees all their existing tutorial schemes of works as a reminder before adding a new one. They cannot add themselves as a teacher or owner.
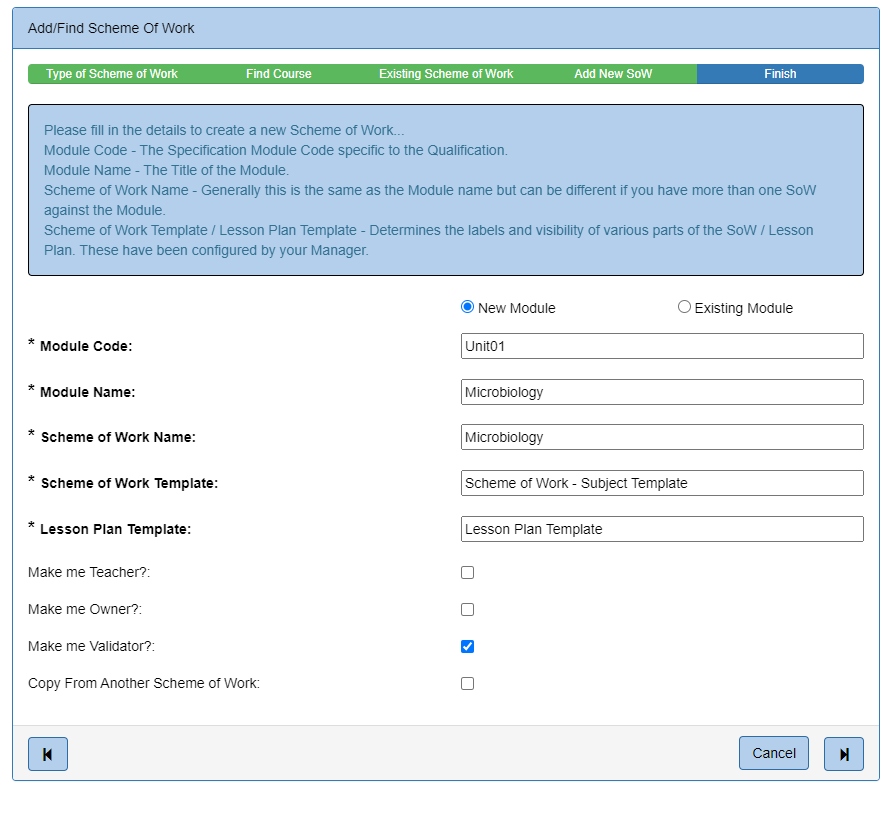
Add New Scheme of Work
The Add new Scheme of Work step is different for subject versus tutorial schemes of work.
Subject
Choose to either add a new unit or attach the scheme of work to an existing unit.
Unit Code
The Unit Code. When choosing the New Unit option. If the unit code is new then a new unit will be added to the course/group. If the unit code already exists then the scheme of work will be added to the unit against the course/group.
Unit Name
The name of the unit. When choosing the New Unit option. If the Unit Code already exists then this option will not be available.
Unit
When selecting the Existing Unit option. Choose an existing unit against the course/group. The Scheme of Work will then be attached to the unit.
Scheme of Work Name
By default takes the unit name but can be modified to be different. If a unit has more than one scheme of work then you may wish to identify this within the name
Scheme of Work Template
A list of templates will be available which is determined by the System Setting ‘HODs Define Templates’. The Template determines the look and feel of the Scheme of Work. Subject and Tutorial schemes of works have different sets of templates.
Lesson Plan Template
A list of templates will be available which is determined by the System Setting ‘HODs Define Templates’. The Template determines the look and feel of the Lesson Plan.
Copy from Existing Scheme of Work
This option allows the user to copy all or some of the elements from another scheme of work. This can be a scheme of work from another year or from the current year. Please see the Copy Scheme of Work section here for more details.
Tutorial
The Tutorial Scheme of Work is similar but does not have the Unit Code and Unit Name option.
Tutorial Code
The system will auto generate a tutorial code based upon your user’s username. For example if your username is JoeBloggs the first tutorial you add will be JoeBloggs1, the second tutorial JoeBloggs2 etc.
Tutorial Name
The name given to the tutorial.
Copy Scheme of Work
This step is available only if the ‘Copy from Existing Scheme of Work’ option is selected in the add new scheme of work step. Please see the Copy Scheme of Work section here for more details.
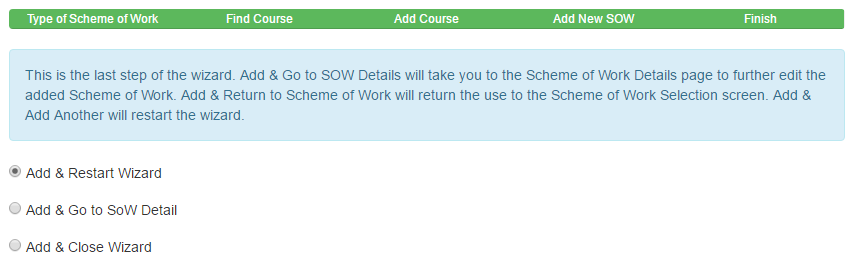
Finish
The Finish step allows the new scheme of work to be added. Click the finish button and select the required option
Restart
Saves the data and restarts the wizard.
Close
Saves the data and closes the wizard.
Add & Go to Details
Adds the Scheme of Work and takes the user to the scheme of work details pages to further edit.
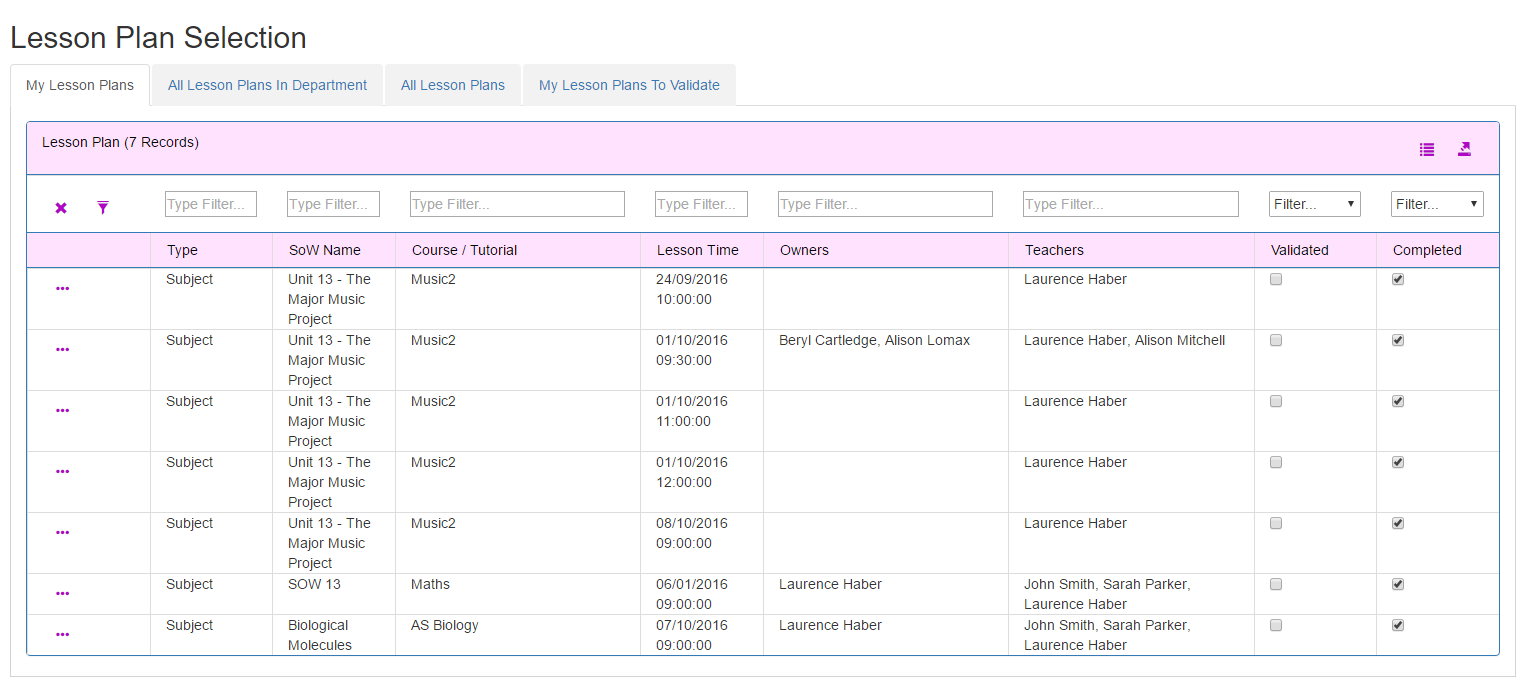
Lesson Plan Selection
The Lesson Plan Selection screen shows a list of the Lesson Plans the user has access to. Clicking the detail button at the start of each grid row will take the user to the Detail page for the Lesson Plan. The tabs displayed on the screen depend upon the type of user.
My Lesson Plans
This tab shows all the Lesson Plans that the user is an owner or a teacher.
All Lesson Plans in Area
This tab shows all the Lesson Plans in the area(s) which the user sits within.
All Lesson Plans
Shows all Lesson Plans within the academic year. This tab is only available to Managers or users with the permission ‘Can View All Lesson Plans’.
My Lesson Plans As Validator
Shows all the Lesson Plans where the staff member has been set as the validator against the Lesson Plan or has validated the Lesson Plan. This tab is only available to Managers, users with the permission ‘Impersonate Manager of Organisation Structure’, users set up as validators by their Manager or users with the permission ‘Impersonate Validator’.
Grid
Type
Either Subject or Tutorial. Subject refers to curriculum based Schemes of Works.
SOW Name
The name of the Scheme of Work which the Lesson Plan sits within. This is often the name of the unit for subject based schemes of work.
Course/ Tutorial
For Subject based Schemes of Work this will be the name of the course. For Tutorial based Schemes of Work this will be the Tutorial Name.
Lesson Time
The Date and time when the Lesson takes place.
Owners
A comma separated list of owners against the Lesson Plan. Owners are the staff who can edit the Lesson Plan. Owners are set up on the Lesson Plan Details page.
Teachers
A comma separated list of teachers against the Lesson Plan. Teachers are set up on the Lesson Plan Details page.
Ready
A flag to show whether the Lesson Plan has been set as ready to be validated.
Validated
A flag to show whether the Lesson Plan has been validated.
Completed
A flag to show whether the Lesson has already taken place. A Lesson Plan is considered as completed if the date is after the date and time of the lesson.
Comment 1-6
The information from the Scheme of Work Content tab columns. As different templates can have different names these are just called Comment 1-6 but against the Scheme of Work they might be called Activity, Topic etc.
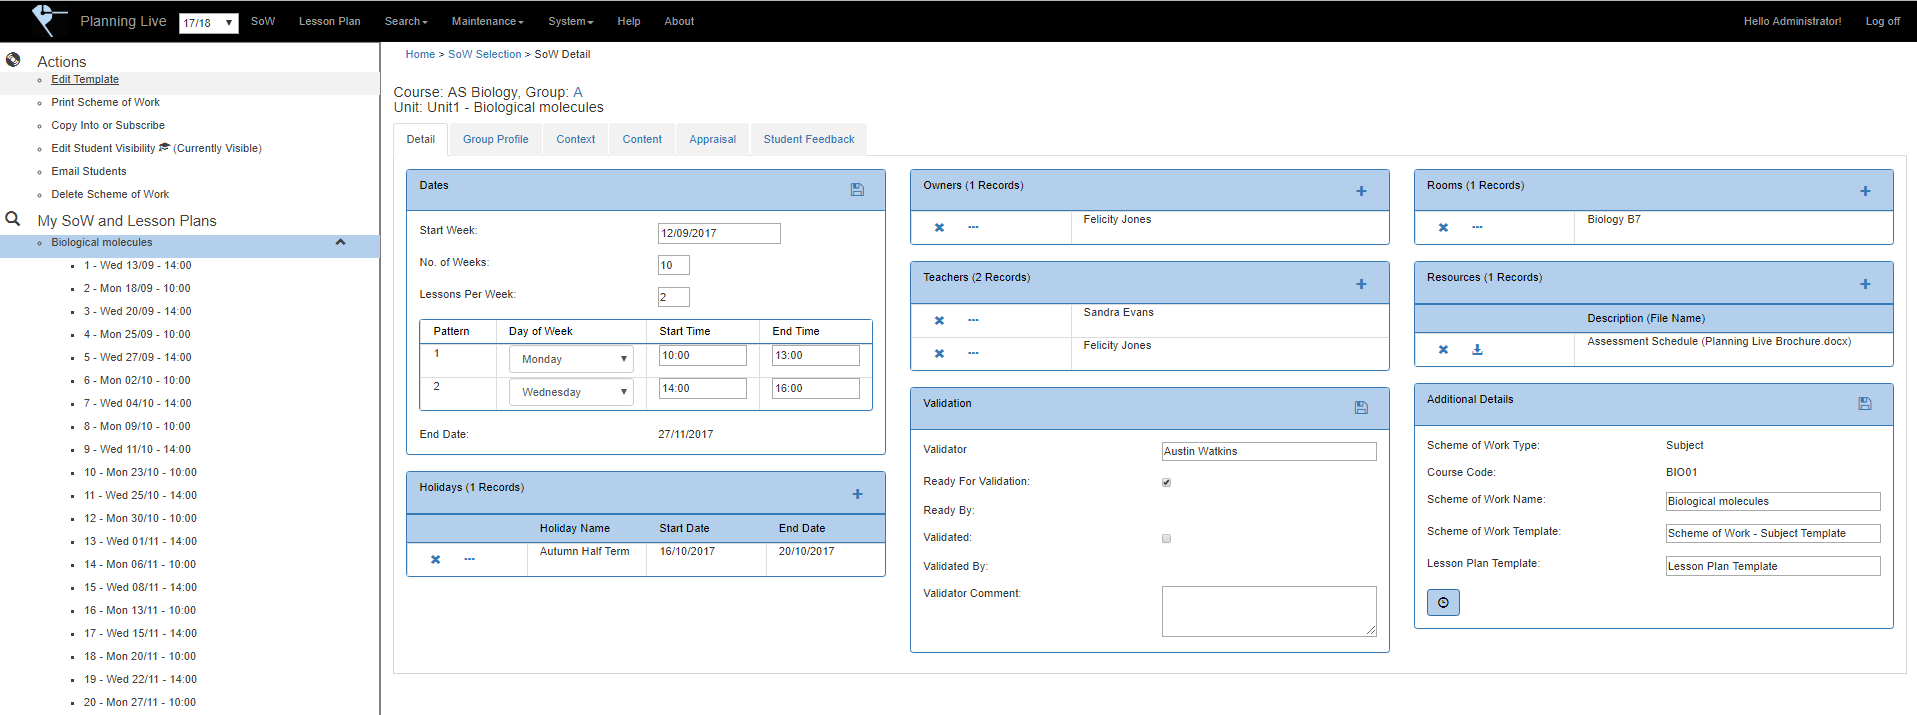
Scheme of Work Details
The Scheme of Work Details page allows the user to view and edit their schemes of work. This page can be accessed from the side panel ‘My SoW and Lesson Plans’ and the Scheme of Work selection screen. Please bear in mind that Schemes of Work can be given different Templates so may look different from the descriptions below and may look different between different schemes of work at your college.
The Schemes of work contains the following tabs.
And the following actions.
Details
For Subject based Schemes of Work top of the page shows the course name and group code, and the unit code and unit name. The Group Code may be a hyperlink taking which will open up the group in a new tab within an external system e.g. ProMonitor Student Group. The Group For Tutorial based schemes of work the top of the page shows the Tutorial name.
The Details tab allows the user to save dates, holidays, teachers, owners, validation, rooms and resources.
Dates
Start Week
The week in which the Lessons are due to start. Normally should be set to the Monday of the week. For example if the lesson starts on Tuesday 5th then the Start Week should be Monday 4th.
Weeks
The number of teaching weeks.
Lesson Per Week
The number of lessons taught per week.
Lesson Pattern
For each weekly lesson the user can include the day of the week, start time and end time. For example if the Scheme of Work has 2 Lessons per week the first lesson can be set on a Monday from 10:00 - 13:00 and the second lesson can be set on a Wednesday from 14:00 - 16:00.
The system uses the Start Week, Number of Weeks and Lessons Per Week and the Lesson Pattern as well as the holidays to work out the lesson schedule on the Content tab. For example the Scheme of Work has a start week of 11th September, 10 weeks and 2 lesson per week. This will create 20 lessons starting on 11th September, 2 per week taking into account the holidays specified within the Holiday section. The Lesson Pattern is specified as above so the first lessons will be as follows.
If the start week, weeks and lessons per week, lesson pattern or holidays are changed this will automatically alter the lesson schedule. The existing data against the scheme of work content will always be maintained. If the lesson numbers are reduced then the lessons will be disabled so that they no longer appear. However the information will still exist in the database so if the number of lessons is subsequently increased the lessons will reappear with the information intact against them.
For subject based Schemes of Work a button will appear next to the Lessons Per Week. Clicking this button will open a popup which shows each timetabled slot this group is taught on. This includes the day of the week, start time and end time. Users can select the appropriate session(s) and click update to quickly populate the Lesson Pattern.
End Date
The End Week of the Scheme of Work. This is automatically calculated based upon the start week, weeks, lesson pattern and holidays.
Holidays
Holidays can be added, removed or modified. The grid shows the holiday name, the week the holiday commenced and the number of weeks.
New holidays can be added by clicking the add button on the top of the grid. The user can select from an existing predefined holiday pattern. This will be the most common option. Alternatively if a bespoke holiday is required the user can manually add a holiday providing the name the start week and the number of weeks.
When adding predefined holidays there is also the option ‘Only Include Holidays between the start and end date of the SoW’. For example say the scheme of work runs from January to April then any system holidays before January or after April will not be added. Holidays between January and April however will be added.
When adding a bespoke holiday or editing an existing holiday the user can add a holiday note. These notes will appear against the holiday on the Scheme of Work content tab.
Holiday are used when creating a lesson schedule on the Content tab. Lessons dates never appear within the holiday period. Instead the lesson is scheduled after the holiday. Editing holidays will reconfigure the lesson dates.
Owners
Owners are members of staff who can edit the scheme of work. Standard users need to be set as owners in order to modify a scheme of work. The only exception to this is users who are not owners can still add themselves as a teacher. Manager of Organisation Structure Areas can always edit the Scheme of Work regardless of whether they are an owner or not.
The owners grid allows owners to be added, edited or deleted. Clicking add shows the owner popup. The dropdown allows a member of staff to be picked by their staff code and name. The list of staff can be restricted by typing in a part of their name or staff code. For subject schemes of work the staff list can be restricted to just staff in the course’s organisation structure or all staff. For tutorial schemes of work all members of staff are shown.
The ‘Add To All Lesson Plans’ flag additionally adds the staff as an owner to all the lesson plans within the Scheme of Work.
Teachers
Teachers are members of staff who will teach the lessons within the scheme of work.
The teachers grid allows teachers to be added, edited or deleted. Clicking add shows the teacher popup. The dropdown allows a member of staff to be picked by their staff code and name. The list of staff can be restricted by typing in a part of their name or staff code. For subject schemes of work the staff list can be restricted to just staff in the course’s organisation structure or all staff. For tutorial schemes of work all members of staff are shown.
The ‘Add To All Lesson Plans’ flag additionally adds the staff as a teacher to all the lesson plans within the Scheme of Work.
Validation
The validation tab allows the college to keep track of the state of the Schemes of Work. A member of staff should be set as the validator. The validator will check the scheme of work and set it as validated once they are happy with it. Organisation Structure Managers and Validators can keep track on their homepage regarding the current state of validation for example the percentage of their schemes of work which have been validated.
Validator
The member of staff who will validate the scheme of work. The dropdown list will only show members of staff who are validators. For subject schemes of work only validators or managers who are within the area or in higher level areas where the course sits will be shown. For tutorial schemes of work all validators will be shown.
Ready for Validation
When the owner is happy that the scheme of work is complete they can set it as validated. This will flag on the scheme of work selection screen for validators that they can validate this scheme of work.
Ready By
The member of staff who set the scheme of work as ready for validation.
Validated
Once the validator has checked the scheme of work they can set the scheme of work as validated.
Validated By
The member of staff who set the scheme of work as validated.
Validator Comment
The comment provided by the validator. This might for example explain why the validator has not been able to set the Scheme of Work as validated due to problems with the Scheme of Work.
Multiple Validation Periods
The scheme of work template can be associated with a Validation Period. This could just have one validation period or multiple validation periods for example if the scheme of work needs to be validated each year. If the Scheme of work has multiple periods then a validation period grid will display instead as below:
The above example shows that the Scheme of Work has been validated in Term 1 but is ready for validation in term 2. When a comment has been added against the validation period a note field will display. Hovering over the note field will show more information about the comment
The Validation can be altered or viewed by clicking the ‘...’ button which will open a popup.
Rooms
A list of rooms associated with the schemes of work. This will be the rooms where the lessons will be taught in. Rooms can be added, edited or deleted. The rooms can be selected from a list of rooms imported into the system.
When adding a room to the Scheme of Work there is the option to add the room to all the underlying Lesson Plans within the Scheme of Work.
If the college has imported timetabling information the rooms associated with the group will appear at the top with the word ‘timetabled’ against them to be able to quickly access the correct room(s).
Resources
Resources can be added to the scheme of work. Resources can either a file, url or a simple description e.g. whiteboard.
The grid displays a list of resources attached to the scheme of work. The description and file name will be displayed. The resource can be downloaded by clicking on the download button at the start of the row.
Attachments can be added by clicking the add button at the top of the grid.
Description
A brief description to identify the resource. Description which are urls will appear as a hyperlink and once clicked will open a new tab.
File
Choose from a file on your machine/network. This is not needed if the resource is simply a description. More than one file can be added at once by selecting multiple files.
Additional Details
Extra information against the Scheme of Work.
Scheme of Work Type
This can be either subject or tutorial. Once the scheme of work has been created this cannot be modified.
Scheme of Work Name
The name can be modified
Scheme of Work Template
The Template being used within the scheme of work. A scheme of work requires a template. The template governs the look and feel of the scheme of work. If the system setting ‘Managers Define Templates’ is set to true, for subject schemes of work the list will show all the templates allocated to the area where the course lives (or higher areas). For tutorial schemes of work all tutorial templates will be visible for the area where the staff member is associated with (or higher areas). If this setting is set to false all system templates will be shown.
Changing the schemes of work template will alter how the scheme of work looks.
Lesson Plan Template
The Template being used within the Lesson Plans within the scheme of work. A scheme of work requires a lesson plan template. The template governs the look and feel of the lesson plan. If the system setting ‘Manager Define Templates’ is set to true, for subject schemes of work the list will show all the templates allocated to the area where the course lives (or higher areas). For tutorial schemes of work all tutorial templates will be visible for the area where the staff member is associated with (or higher areas). If this setting is set to false all system templates will be shown.
Changing the lesson plan template will alter how all the lessons plans within the scheme of work will look.
The Audit trail icon will display...
Last Modified
The user who last modified the scheme of work as well as the date and time it was modified.
Created By
The user who created the scheme of work as well as the date and time it was created.
Group Profile Tab
The Group Profile tab shows information about the students and enrolments within the group to allow teachers to make an informed decision about creating the Scheme of Work based on their individual group. For example a teacher may tailor their Scheme of Work differently if all the students are 16-18 rather than 19+. This information will all be imported into the system by an administrator and kept up to date. See the General Documentation > Group Profile section for more details about the information on this tab.
Context Tab
The context tab contains up to 12 input areas which may be standard text areas, rich text areas which allow formatting or dropdown list where a value can be selected. Each input comprises of a heading label and optionally some guide text provided by the college to help staff fill in the box. Inputs may also be set up to contain some default text. Speak to your Manager if you are unsure how to fill this in.
The context tab is designed for staff to place the scheme of work within a larger context for example how they might go about embedding English and Maths into their lessons or safeguarding vulnerable learners.
The inputs can be typed in. Once the user is happy with the content they can click the save button to save the data.
The users and managers can keep track from the home page as to how the context tab is being filled in.
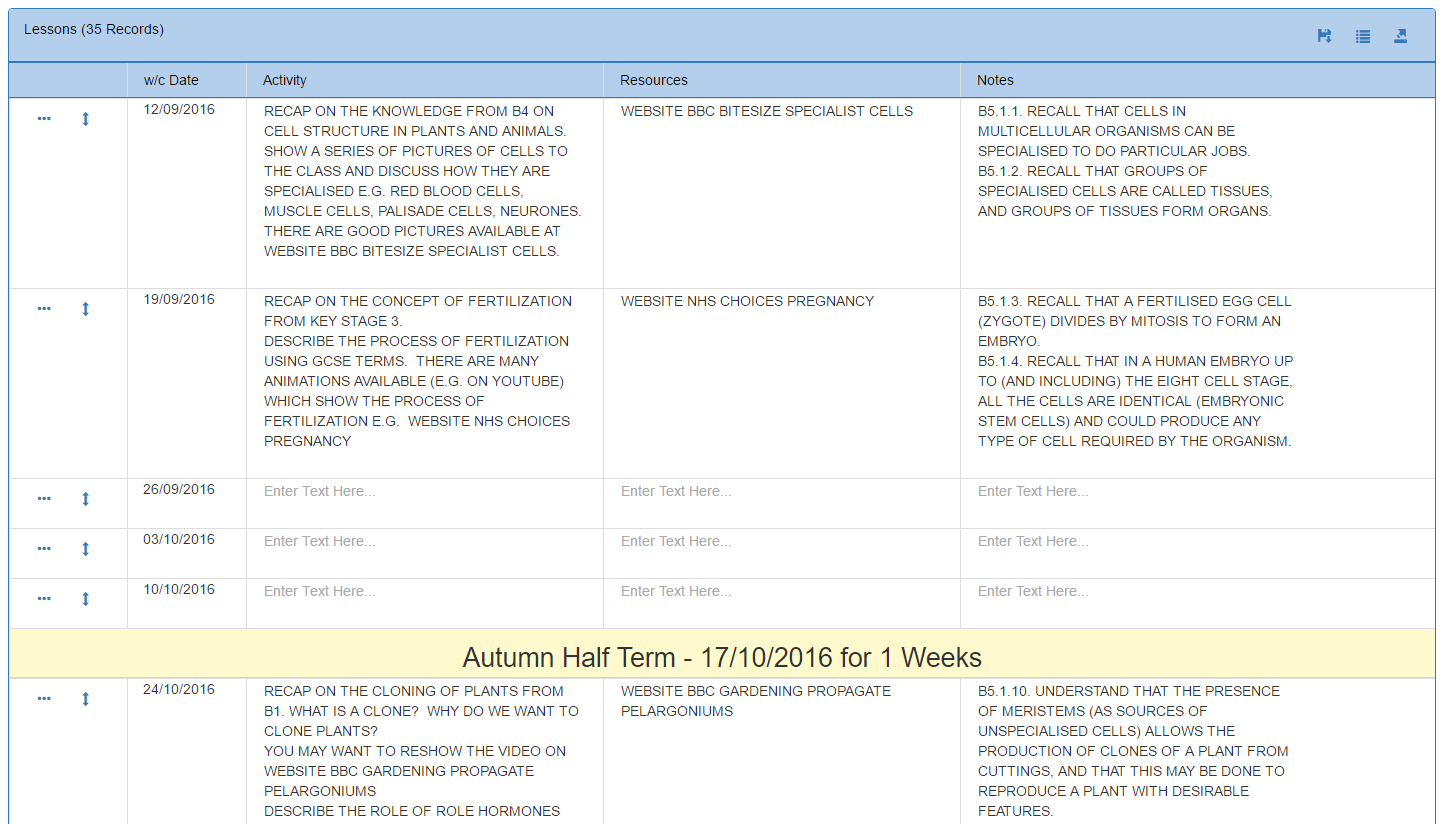
Content Tab
The Content Tab allows the user to plan an overview of each Lesson. The dates of each lesson are automatically created based upon the date detail and holidays entered into the details tab. If no date details have been entered the user will receive a message to enter date information. Each Lesson can have up to 6 text box columns depending upon the scheme of work template being used. The column headings will also be different depending upon the scheme of work template being used.
The user can enter data into each input against the lesson and then click save in the top right of the grid. Clicking the details button against the row will take the user to the Lesson Plan details page.
Holidays entered in the details tab will appear here in a yellow row. Any extra holiday notes entered will also appear under the holiday information.
The Up-Down arrow button against the row allows the lessons to be swapped around. Clicking this button opens a popup where the list of lessons to swap with is displayed. The user can select the lesson and then click save. This will swap all the lesson content and the lesson plan between the lesson dates.
The Document button shows the number of documents associated with the activity. These can be viewed by clicking the button and collapsed by clicking the button again. The resource can be downloaded by clicking on the download button at the start of the row. Attachments can be added by clicking the add button at the top of the grid.
The Colour button against each lesson shows the colour given to the lesson so that groups of lessons can be quickly identified. This can be altered by clicking the button and selecting the appropriate colour then saving.
For colleges using Grade Live, GradeBook Elements e.g. assessments, with a Date Set or Date Expected can be shown by clicking the options icon on the grid.
The user can decide to show GradeBook Elements based on the Date Set or Date Expected. These will appear chronologically in the correct date order within the.
Content from other Schemes of Work in the same group can be included on the grid. Content from other schemes of work shows as read only with a grey background. Other Schemes of Work can be added by clicking the Options icon in the grid and selecting ‘Include Other Schemes of Work’.
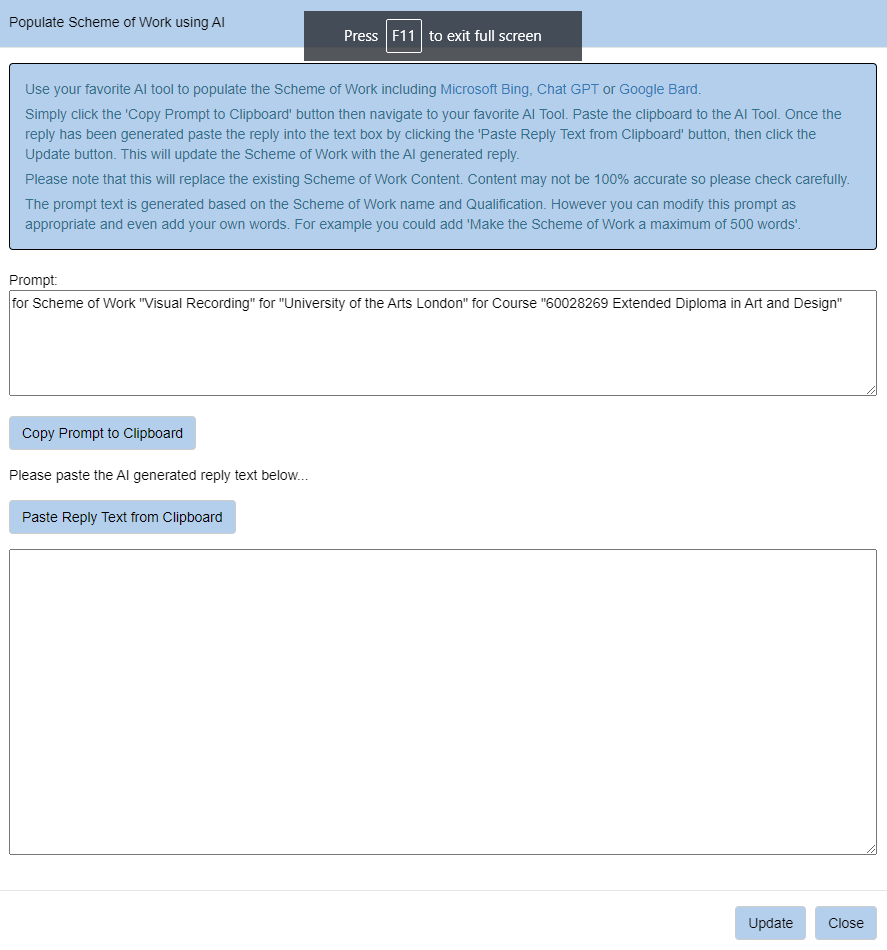
The AI Button (whose visibility is set by the System Setting ‘Scheme of Work Allow AI’) allows the Content to be generated by AI. Clicking this will open up the ‘Populate using AI’ popup. The popup will automatically create an AI prompt using:
This prompt can be further modified/added to by the user to supply more detail to the AI. Once the user is happy the ‘Copy Prompt to Clipboard’ button can be clicked and the text can be pasted into an AI Tool such as Microsoft Bing, Chat GPT or Google Bard.
The generative AI tool will produce a reply whose text can be copied and then pasted into the ‘Please paste the AI generated reply text below…’ by clicking the 'Paste Reply Text from Clipboard' button.
Clicking update will update the Scheme of Work content.
Please note that this will replace the existing Scheme of Work Content.
This tool is experimental and may not always work successfully:
If this happens it may be worth experimenting with a different AI.
Appraisal Tab
The appraisal tab contains up to 12 input areas which may be standard text areas, rich text areas which allow formatting or dropdown list where a value can be selected. Each input comprises of a heading label and optionally some guide text provided by the college to help staff fill in the box. Inputs may also be set up to contain some default text. Speak to your Manager if you are unsure how to fill this in.
The Appraisal tab should be filled in after the course has finished to give staff a chance to say what went well in the lesson and how they could improve.
The inputs can be typed in. Once the user is happy with the content they can click the save button to save the data.
The users and managers can keep track from the home page as to how the appraisal tab is being filled in.
Student Feedback Tab
Staff will see the student feedback for each student within the group.
Edit Template Action
Under Actions on the side panel a user may see the option to ‘Edit Template’. This option will only be available to either users who have access to the Template page or Managers who have created the currently viewed template for their area. This provides a quick way for the template to be edited rather than the user having to go to the Template page to edit all of their templates. Please see the Template section for more details about editing templates.
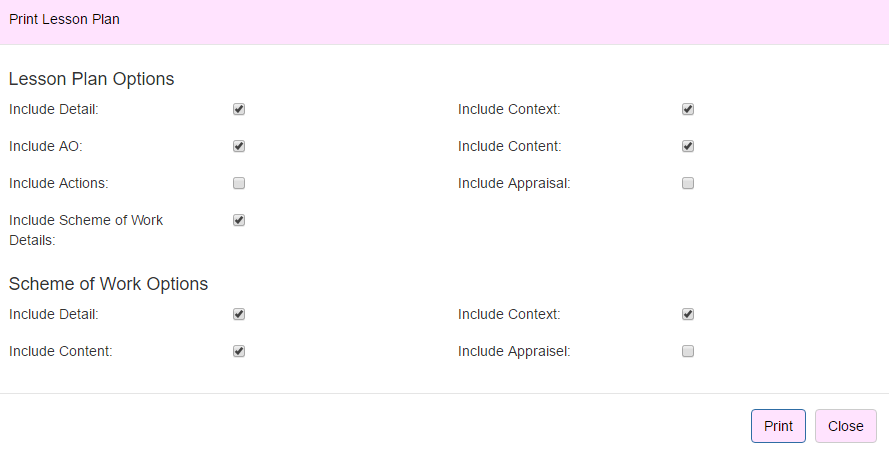
Print Scheme of Work Action
Users may print the scheme of work and the associated lesson plans through the action on the side panel. This will open up a popup where the user can choose which sections of the scheme of work to print/save as a pdf.
Scheme of Work Options
Each section of the scheme of work can be included within the report. This includes the detail, context, content and appraisal tab. Selecting Include ‘Lesson Plan Detail’ will include the Lesson Plans which sit within the scheme of work and make the Lesson Plan Options appear.
Lesson Plan Options
If the include ‘Lesson Plan Detail’ option is selected then the user can choose which lesson plans to include. This can be all the lesson plans or a subset for example lessons 10 to 20. The user can again choose which of the section(s) of the Lesson Plan to show. This includes the detail, context, aims and objectives, content, actions and appraisal tabs.
Lesson Sets
If the Lesson has more than one lesson set then the user can choose which one to print.
Lesson From/To
The Lesson From and To shows dropdowns of all the lesson dates and lesson numbers within the scheme of work (and Lesson Set). The user can choose the range of lessons to include within the report. By default the report will show all lessons.
Note to Administrators: Colleges who wish to alter the print format of the scheme of work can go into the root folder of the website within UserArea > Reports and ensure a file named ‘SOWDetail.rdl’ is present. This file can be altered using Microsoft Report Builder 3.0. When printing the Scheme of Work the system will use the report definition in the userarea folder. To return to the default option simply rename the file to something other than ‘SoWDetail.rdl’.
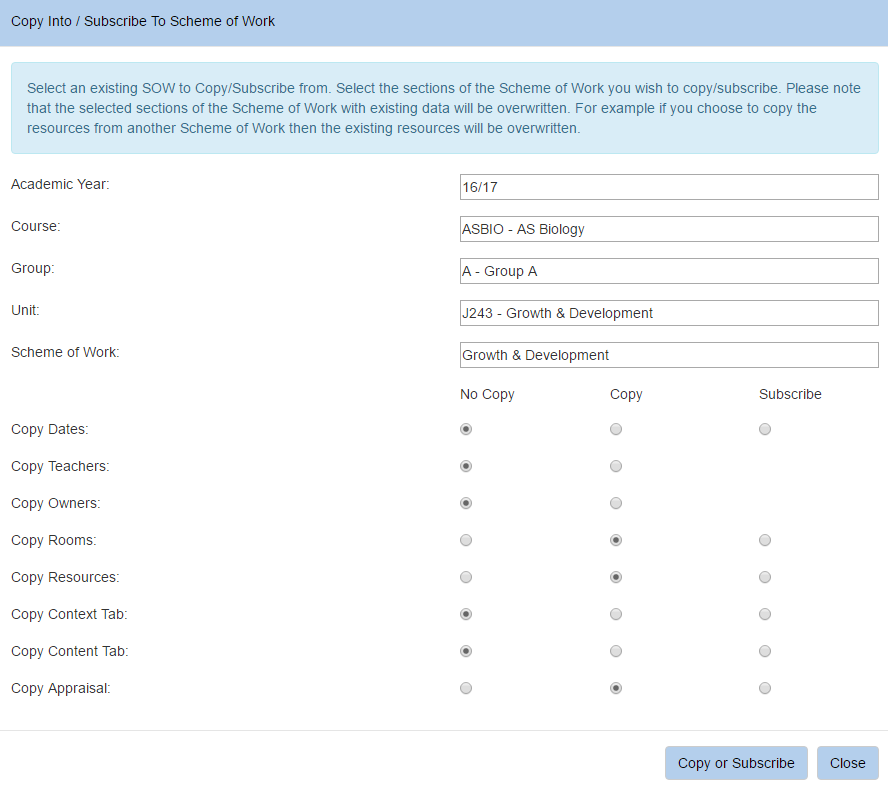
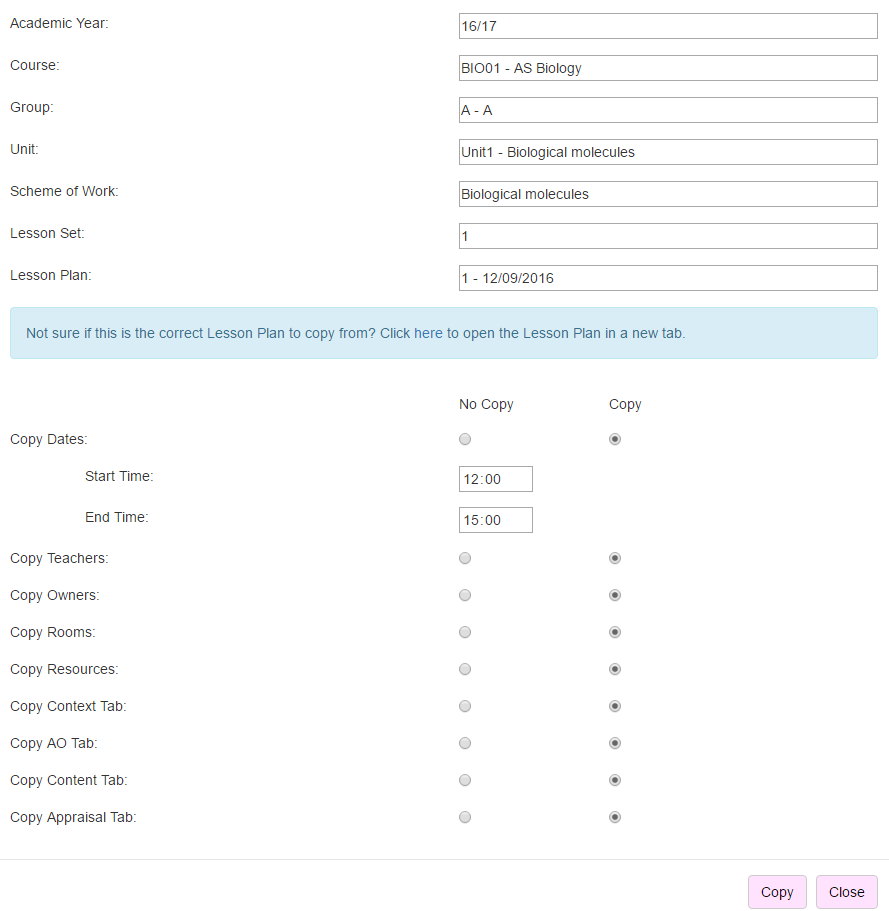
Copy or Subscribe Action
This option is available under the actions on the side panel. This option is only available to Managers of Organisation Structure or users with the permission ‘Can Copy Schemes of Work’. Copying refers to a one time copy of information from one scheme of work to another. The sections of the scheme of work to be copied can be selected. Subscribing to a scheme of work means that when the scheme of work changes it will automatically merge the changes into the scheme(s) of work which subscribe to it. This is very useful if a course is taught by different teachers who wish to have a slightly different scheme of work but might wish to keep certain data e.g. the context in sync with the user who is in charge of this section.
Clicking the Copy or Subscribe Action will open a popup window. Firstly the user selects the scheme of work to copy from. For subject schemes of work the user will select from a series of dropdowns to help find the scheme of work. Firstly the user will choose from the academic year, this will in turn restrict the list of courses which will restrict the list of groups which will restrict the list of units which will restrict the list of schemes of work. For Tutorial schemes of work the dropdowns will be academic year which restrict the tutorials which restricts the schemes of work.
Once the user selects a schemes of work the copy options will become available. The user can check if the Scheme of Work is correct by clicking the link below which will open the Scheme of Work in a new tab.
Users can choose to copy or subscribe to the following sections of the scheme of work. Please note that copying or subscribing will wipe existing data against the section. Sections not included will be unaffected.
Dates
Copies/Subscribes the date details on the details tab. This includes start week, number of week and lessons per week. The user can change this information for example if they wish to change the start week to a different week this will keep everything the same but change the lesson dates in line with this change. This can be very useful when copying from a previous year where the dates will be different or going from a course which was taught over a longer length with less lessons per week to a shorter length with more lessons per week.
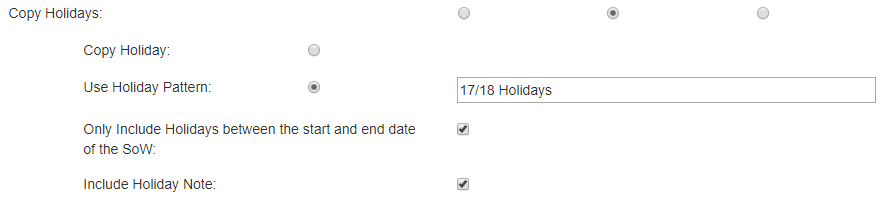
Holidays
Copies the Holidays. When this option is selected the user will be given various options.
Selecting Copy Holiday will copy all the holidays from the Scheme of Work. The user may not wish to do this for example when copying from a different academic year. In this case the user can choose ‘Use Holiday Pattern’ and choose the set of holidays to use within the academic year. The system will then use this set of holidays when configuring lesson dates etc.
There is a further option ‘Only include Holidays between start and end date of the SOW’. This will remove holidays which lie outside the lesson dates in the scheme of work.
The option can also be included to ‘Include Holiday Note’ which have been set against the scheme of work holidays. The system will try to match the equivalent note from the scheme of work even if a holiday pattern is used and not the original holidays from the scheme of work.
Visible to Student
Copies the student visibility. Please note that if the Template settings do not allow for manual editing, the visibility will be governed by this template setting and not the manual visibility set against the Scheme of Work.
Teachers
Copies all the teachers from the detail tab. If you are a teacher on the new scheme of work but not on the old scheme of work you will still be a teacher on the new scheme of work.
Owners
Copies all the owner from the detail tab. If you are a owner on the new scheme of work but not on the old scheme of work you will still be an owner on the new scheme of work.
Rooms
Copies/Subscribes all the rooms from the detail tab.
Resources
Copies/Subscribes all the resources from the detail tab.
Context
Copies/Subscribes all the context text boxes from the context tab.
Content
Copies/Subscribes the data from the content tab. When this option is selected the user can choose to copy all lessons or just a subset of lessons e.g. lessons 10 to 20. The user can also select the option to copy lesson plans. This will then provide the user with the ability to copy specific sections of the lesson plan. This includes times, visible to student, teachers, owners, rooms, resources, the Context tab, the Aims and Objectives tab, the Content tab, the Appraisal tab.
Appraisal
Copies all the appraisal text boxes from the appraisal tab.
More about Subscribe
If a scheme of work subscribes to another screen of work or vice versa then the action in the side panel will have a star symbol to show this. When clicking the copy or subscribe link if the scheme of work is subscribed by another scheme of work then the schemes of work that subscribe to it will be shown in a list.
If the scheme of work is subscribed to a scheme of work then there will also be a unsubscribe button which will remove the subscription.
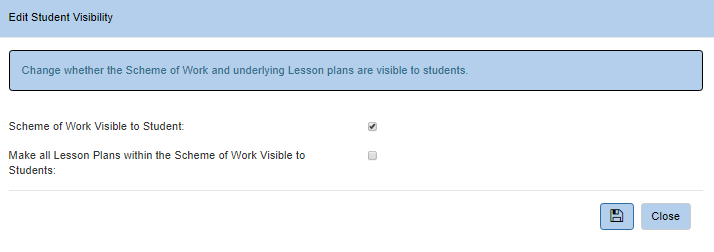
Edit Student Visibility
The Visibility of the Scheme of Work can be altered in the Action panel under ‘Edit Student Visibility’. This will open a popup which allows a user to change the visibility if it is manually editable for the user and the template setting above allows.
For the Scheme of Work there is the added option to ‘Make all Lesson Plans within the Scheme of Work Visible to Students’. This will make the Lesson Plans visible if the Lesson Plan is editable to the user and the Lesson Plan templates allows the visibility to be edited.
Email Student
The Scheme of Work action called ‘Email Students’ which allows all students against the group to be emailed a direct link to the scheme of work at once.
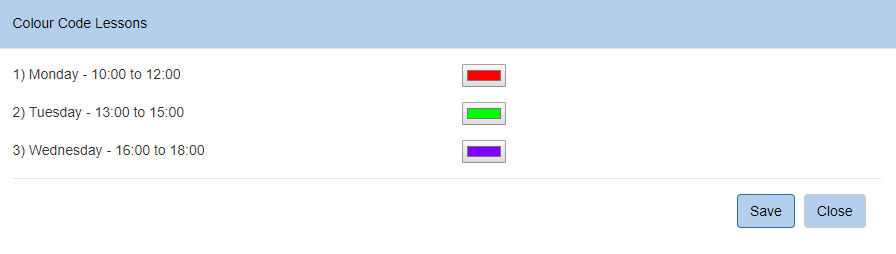
Colour Code Lessons
This action allows lessons to be given a colour. This can be useful when the scheme of work has multiple owners who are dealing with different lessons. This provides a quick mechanism to colour code each lesson based on the day of week, start time and end time the lessons are scheduled for.
Each Lesson slot can be given a colour and then saved. The above example will colour all Monday lesson red, Tuesday lessons green etc. The colours appear in various parts of the system including the Lessons on the side panel, Scheme of Work Content page and the Lesson Plan Detail page.
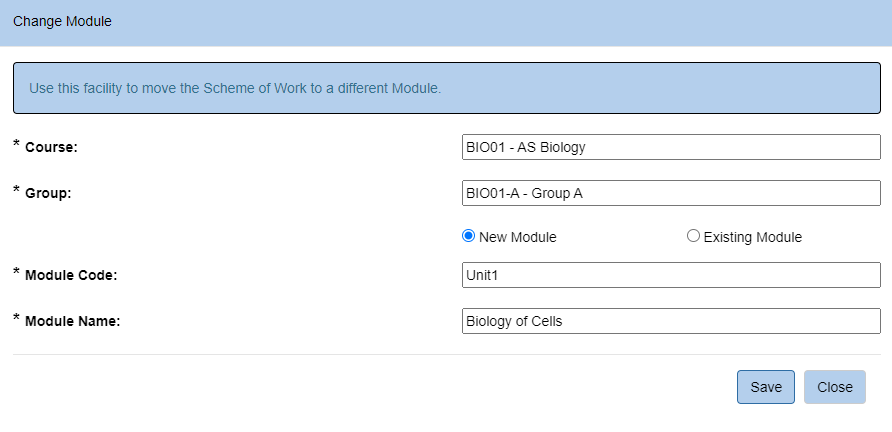
Change Unit
The Scheme of Work can be moved to a different element in a different group. This can either be a new element or an existing element. This is particularly useful if a user has created a scheme of work against a temporary course before the actual courses/groups have been imported. This allows the user to transfer the scheme of work to the real group.
Delete Scheme of Work
This action deletes the entire schemes of work and underlying lesson plans. It is only available for users who have the permission ‘Can Delete Schemes of Work’.
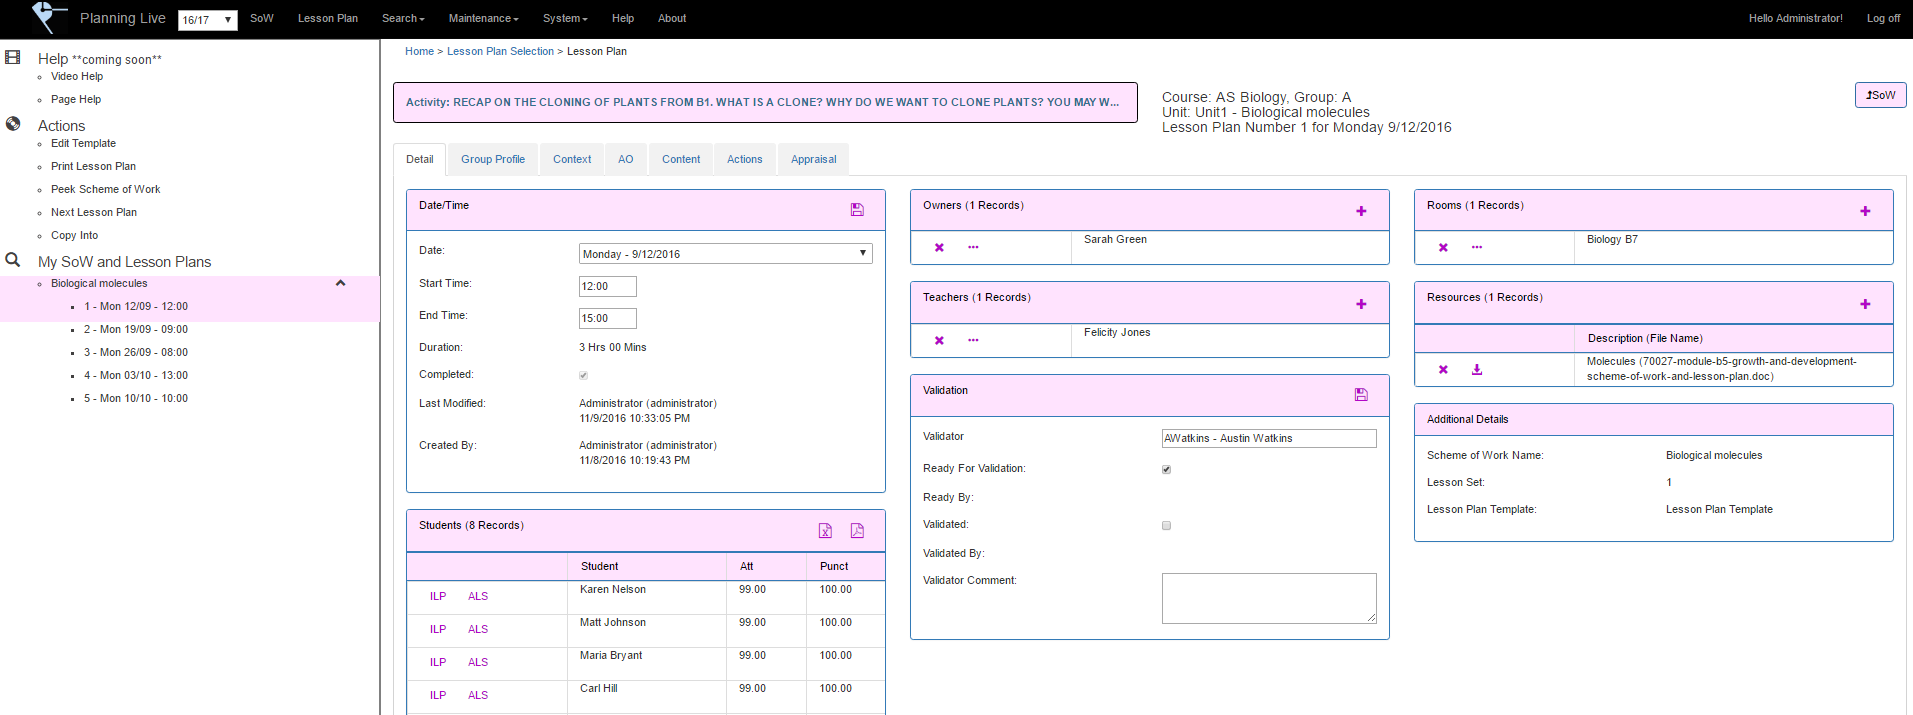
Lesson Plan Details
The Lesson Plan Details page allows the user to view and edit their Lesson Plans. This page can be accessed from the side panel ‘My SoW and Lesson Plans’ and the Lesson Plan selection screen as well as the content tab on the Scheme of Work page. Please bear in mind that Lesson Plan can be given different Templates so may look different from the descriptions below and may look different between different lesson plans at your college.
The Lesson Plan contains the following tabs.
And the following actions.
The top of the page displays the course and group e.g. AS Biology - A (or the tutorial name for tutorial schemes of work), the unit code and scheme of work name e.g. J245 - Biological Molecules, and the lesson number and date of the lesson e.g. Lesson Plan 1 for 07/10/2016.
The Group Code may be a hyperlink taking which will open up the group in a new tab within an external system e.g. ProMonitor Student Group.
Details
The Details tab allows the user to save times, teachers, owners, validation, rooms and resources as well as view students associated with the lesson.
Date/Time
Start Time
The time when the lesson is due to start
End Time
The time when the lesson is due to end.
Once the start and end date information is saved the content tab will be updated so that the first activity begins at the start time. If the lesson plan contains no content then an initial blank activity will be created on the content tab whose start time is the start time of the lesson. For example the lesson start time is 10:00 then a blank activity will be added at 10:00. If the start date changes then the lesson content activity times will change to reflect this. For example the lesson originally starts at 10:00. It now starts at 12:00. All the activity will be moved forward by two hours.
Additionally if there are default activities set up within the lesson plan template and the content is blank then these will automatically be added in. For example there is a default activity which should start 30 minutes after the lesson starts. The lesson starts at 10:00 then an activity will automatically be added at 10:30 with its associated text.
Duration
The length of the lesson. This is automatically calculated from the start and end times of the lesson.
Last Modified
The user who last modified the lesson plan as well as the date and time it was modified.
Created By
The user who created the lesson plan as well as the date and time it was created.
Students
The students sections shows a list of students enrolled within the course and group. This is set up by an administrator using the enrolment import for subject based Schemes of Work. The student section may provide a link to an online ILP (Individual Learner Plan) and ALS (Additional Learner Support) if this has been set up within the enrolment import by the administrator. If this is set up then the student’s ILP e.g. ProMonitor will appear in a separate tab and provide a very quick access method to the student’s data.
Each row also contains an email button if the student has an email address which will create an email in the user’s default email client which contains a direct link to the lesson plan.
This section will also show the learner’s attendance and punctuality for the course to give an indication of the student’s progress.
For Tutorial based Schemes of Work the user will be able to add students to the lesson plan from a list of any student with the academic year. Please note that adding students to one lesson plan will add the student to all the lesson plans within the scheme of work.
Owners
Owners are members of staff who can edit the Lesson Plan. Standard users need to be set as owners in order to modify a lesson plan. The only exception to this is users who are not owners can still add themselves as a teacher. Managers can always edit the Lesson Plan regardless of whether they are an owner or not.
The owners grid allows owners to be added, edited or deleted. Clicking add shows the owner popup. The dropdown allows a member of staff to be picked by their staff code and name. The list of staff can be restricted by typing in a part of their name or staff code. For subject schemes of work the staff list can be restricted to just staff in the course’s organisation structure or all staff. For tutorial schemes of work all members of staff are shown.
Teachers
Teachers are members of staff who will teach the lesson within the lesson plan .
The teachers grid allows teachers to be added, edited or deleted. Clicking add shows the teacher popup. The dropdown allows a member of staff to be picked by their staff code and name. The list of staff can be restricted by typing in a part of their name or staff code. For subject schemes of work the staff list can be restricted to just staff in the course’s organisation structure or all staff. For tutorial schemes of work all members of staff are shown.
Validation
The validation tab allows the college to keep track of the state of the Lesson Plan. A member of staff should be set as the validator. The validator will check the lesson plan and set it as validated once they are happy with it. This section is governed by the system setting ‘Show Lesson Plan Validation’ as not all colleges validate at the lesson plan level.
Validator
The member of staff who will validate the lesson plan. The dropdown list will only show members of staff who are validators. For subject schemes of work only validators or managers who are within the area or in higher level areas where the course sits will be shown. For tutorial schemes of work all validators will be shown.
Ready for Validation
When the owner is happy that the lesson plan is complete they can set it as validated. This will flag on the lesson plan selection screen that they can validate this lesson plan.
Ready By
The member of staff who set the lesson plan as ready for validation.
Validated
Once the validator has checked the scheme of work they can set the lesson plan as validated.
Validated By
The member of staff who set the lesson plan as validated.
Validator Comment
The comment provided by the validator. This might for example explain why the validator has not been able to set the Lesson Plan as validated due to problems with the Lesson Plan.
Rooms
A list of rooms where the lesson will be taught. Rooms can be added, edited or deleted. The rooms can be selected from a list of rooms imported into the system.
If the college has imported timetabling information the rooms associated with the group will appear at the top with the word ‘timetabled’ against them to be able to quickly access the correct room(s).
Resources
Resources can be added to the lesson plan. Resources can either a file or a simple description e.g. whiteboard.
The grid displays a list of resources attached to the lesson plan. The description and file name will be displayed. The resource can be downloaded by clicking on the download button at the start of the row.
Attachments can be added by clicking the add button at the top of the grid.
Description
A brief description to identify the resource. Description which are urls will appear as a hyperlink and once clicked will open a new tab.
File
Choose from a file on your machine/network. This is not needed if the resource is simply a description. More than one file can be added at once by selecting multiple files.
Additional Information
The Additional Information tab shows read only information about the lesson plan.
Scheme of Work Name
The Schemes of work where the Lesson Plans sits within
Lesson Set
A Scheme of Work can have multiple sets of lessons for different teachers. This shows which lesson set it is e.g. 1,2,3 etc
Lesson Plan Template
The template being used by the lesson plan. This governs the looks and feel of the lesson plan. This can only be altered from the scheme of work where the lesson plan lives.
Group Profile Tab
The Group Profile tab shows information about the students and enrolments within the group to allow teachers to make an informed decision about how to teach the lesson based on their individual group. For example a teacher may decide to teach a lesson differently if all the students are 16-18 rather than 19+. This information will all be imported into the system by an administrator and kept up to date. See the General Documentation > Group Profile section for more details about the information on this tab.
Context Tab
The context tab contains up to 12 input areas which may be standard text areas, rich text areas which allow formatting or dropdown list where a value can be selected. Each inputs comprises of a heading label and optionally some guide text provided by the college to help staff fill in the box. Inputs may also be set up to contain some default text and also can be locked. Speak to your manager if you are unsure how to fill this in.
The context tab is designed for staff to place the lesson plan within a larger context for example how they might go about embedding English and Maths into the lesson or safeguarding vulnerable learners.
The inputs can be typed in. Once the user is happy with the content they can click the save button to save the data.
The users and managers can keep track from the home page as to how the context tab is being filled in within the lesson plan compliance section of the homepage.
AO Tab
The Aims and Objectives tab contains up to 12 input areas which may be standard text areas, rich text areas which allow formatting or dropdown list where a value can be selected. Each inputs comprises of a heading label and optionally some guide text provided by the college to help staff fill in the box. Inputs may also be set up to contain some default text and also can be locked. Speak to your Manager if you are unsure how to fill this in.
The tab is designed for staff write the aims and objectives for the lesson.
The input can be typed in. Once the user is happy with the content they can click the save button to save the data.
The users and managers can keep track from the home page as to how the Aims and Objectives tab is being filled in within the lesson plan compliance section of the homepage.
Content Tab
The content tab allows the lesson schedule to be created and modified. Each row represents an individual activity with a start time and a duration with up to 6 columns worth of text boxes against it. A Start and End Time needs to be set up within the Details tab to be able to use the Content tab.
The user can directly type into the grid to modify an activity. The grid can be saved by clicking the save button on the top of the grid. The Start Time cannot be directly modified. Instead the duration of each activity can be altered. This in effect alters the start time of all subsequent activities. For example there is an activity at 10:00 for 30 minutes and one at 10:30 for 60 minutes The 10:00 activity is changed to 45 minutes. The 10:30 activity will then be moved automatically to start at 10:45 which will end at 11:45.
The top of the tab gives the user an indication of the length of activities required to fill the lesson duration or whether the user has allocated too many activities to the lesson. For example the lesson duration is 4 hours. The user has allocated 3 hours of activities. Therefore the message will show that there is 1 hour remaining and will appear orange. Conversely if 5 hours of activities have been allocated the message will show that the activity duration has overrun by an hour and will appear red.
Each activity has various buttons at the start of the row.
Add Button
Creates a new activity below the record. Duration and information in the text boxes can be added.
Delete Button
Removes the activity from the grid. The activity start time of subsequent activities will be modified. For example there is an activity at 10:00, 10:30 and 11:00. The activity at 10:30 is removed. The 11:00 activity will then be automatically moved to 10:30.
Up Button
Swaps the activity with the previous activity. For example the activity starts at 10:30 for 40 minutes. The previous activity starts at 10:00 for 30 minutes. After the swap there will be an activity at 10:00 for 40 minutes and an activity at 10:40 for 30 minutes.
Down Button
Swaps the activity with the next activity. For example the activity starts at 10:00 for 30 minutes. The next activity starts at 10:30 for 40 minutes. After the swap there will be an activity at 10:00 for 40 minutes and an activity at 10:40 for 30 minutes.
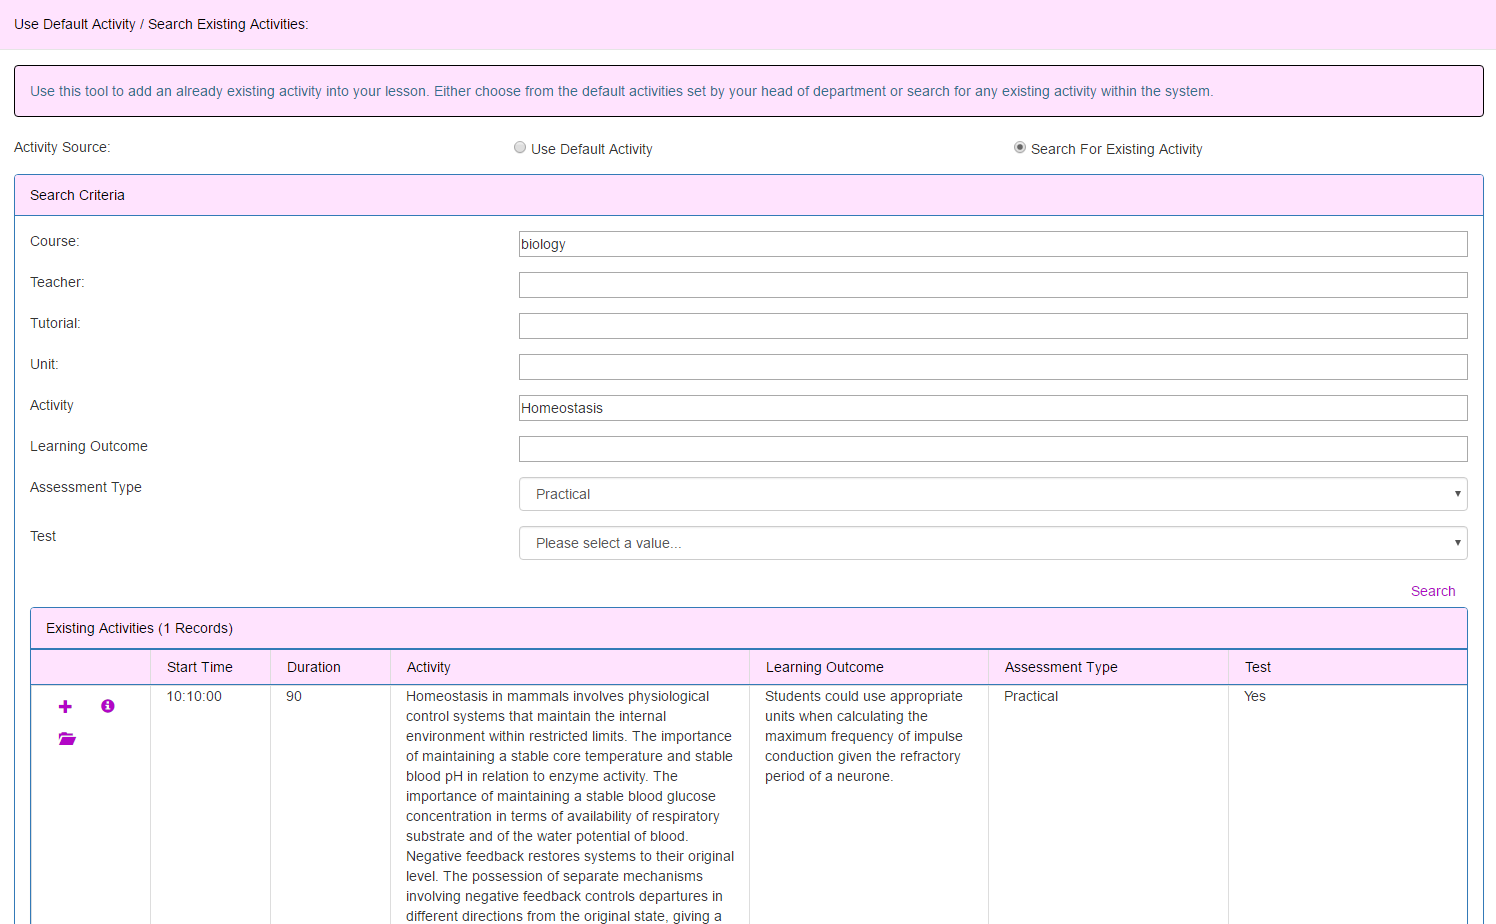
Search Activity Button
This button allows default activities to be added from either the default activity set up within the lesson plan template or system wide activities, or any existing activity can be searched for and added. Clicking the button opens a popup which allows the default activity to be selected or an existing activity to be searched for.
Use Default Activity
Once the activity is selected a preview will be shown about the data which will be added to the activity. Clicking save will add the duration and text information from the default activity into the grid record. For instance the user choose the default activity of ‘lesson introduction’ which last for 10 minutes and has a specific text in column 1 of the grid. The activity will be populate with the text but can subsequently be modified by the user.
Search For Existing Activity
Clicking the ‘Search for Existing Activity’ option will allow the user to search for any existing activities in the system and pull in duration, text information and any documents attached to the activity.
The user can search on various criteria to find the activity including course, unit and the teacher who created the activity. The search looks for any characters in the data for example searching for the course ‘bio’ will find all activities within ‘AS Biology’. Clicking search will show all the activities which relate to the search criteria. Clicking the Add button against the row will add the activity to the main content grid and also include any attached documents. The activity can subsequently be modified from the content grid before being saved. The info button will give the user more information about the activity for example which lesson it is associated with or the teacher who created the activity. The document icon will show the user how many documents are associated with the activity. Clicking this button will show the user all the documents. The user can subsequently download these documents if they wish to preview the information.
Add Attachment Button
The Add document button shows the number of documents associated with the activity. These can be viewed by clicking the button and collapsed by clicking the button again.
The resource can be downloaded by clicking on the download button at the start of the row.
Attachments can be added by clicking the add button at the top of the grid.
Description
A brief description to identify the resource.
File
Choose from a file on your machine/network. This is not needed if the resource is simply a description. More than one file can be added at once by selecting multiple files.
Generate Using AI
The AI Button (whose visibility is set by the System Setting ‘Lesson Plan Allow AI’) allows the Content to be generated by AI. Clicking this will open up the ‘Populate using AI’ popup. The popup will automatically create an AI prompt using:
This prompt can be further modified/added to by the user to supply more detail to the AI. Once the user is happy the ‘Copy Prompt to Clipboard’ button can be clicked and the text can be pasted into an AI Tool such as Microsoft Bing, Chat GPT or Google Bard.
The generative AI tool will produce a reply whose text can be copied and then pasted into the ‘Please paste the AI generated reply text below…’ by clicking the 'Paste Reply Text from Clipboard' button.’
Clicking update will update the Lesson Plan content.
Please note that this will replace the existing Lesson Plan Content.
This tool is experimental and may not always work successfully:
If this happens it may be worth experimenting with a different AI.
Actions Tab
The Actions tab allows actions to be created for a subsequent lesson and actions to be reviewed for the current lesson. Actions can either be specific to learners in the lesson or against the teacher as a reminder or for any other member of staff.
The Actions Due list grid shows all the actions set to be reviewed for the current lesson. The ‘All’ tab will show all actions within all of the lessons within the scheme of work. The details button against each row will allow the details of the action to be modified.
The ‘Actions from Lesson’ grid will show all actions created from the current lesson. A new action can be created by clicking the add new button.
The next 10 upcoming actions will be displayed on the user’s homepage.
More information about adding new actions and action functionality can be found in the General documentation.
Appraisal Tab
The appraisal tab contains up to 12 input areas which may be standard text areas, rich text areas which allow formatting or dropdown list where a value can be selected. Each inputs comprises of a heading label and optionally some guide text provided by the college to help staff fill in the box. Inputs may also be set up to contain some default text and also can be locked. Speak to your Manager if you are unsure how to fill this in.
The Appraisal tab should be filled in after the course has finished to give staff a chance to say what went well in the lesson and how they could improve.
The inputs can be typed in. Once the user is happy with the content they can click the save button to save the data.
The users and managers can keep track from the home page as to how the appraisal tab is being filled in within the lesson plan compliance section of the homepage.
Student Feedback Tab
Staff will see the student feedback for each student within the group. Recent feedback can be viewed on the homepage as well as the average feedback score provided by students for the teacher’s lessons.
Edit Template Action
Under Actions on the side panel a user may see the option to ‘Edit Template’. This option will only be available to either users who have access to the Template page or Managers who have created the currently viewed template for their area. This provides a quick way for the template to be edited rather than the user having to go to the Template page to edit all of their templates. Please see the Template section for more details about editing templates.
Print Lesson Action
Users may print the Lesson Plan and the associated Scheme of Work through the action on the side panel. This will open up a popup where the user can choose which sections of the Lesson Plan to print/save as a pdf.
Lesson Plan Options
Each section of the Lesson Plan can be included within the report. This includes the detail, context, AO, content, actions and appraisal tab. Selecting ‘Include Scheme of Work Detail’ will include the Scheme of Work where the Lesson Plan sits and make the Scheme of Work Options appear.
Scheme of Work Options
If the ‘Include Scheme of Work Detail’ option is selected then the user can choose to include the Scheme of Work details along with the Lesson Plan. The user can again choose which of the section(s) of the Scheme of Work to show. This includes the detail, context, content and appraisal tabs.
Note to administrators - Colleges who wish to alter the print format of the scheme of work or lesson plan can go into the root folder of the website within UserArea > Reports and ensure a file named ‘SOWDetail.rdl’ is present. If the folder is not present then it should be created. The file can be copied from the Reports folder in the root of the website. This file can be then be altered using Microsoft Report Builder 3.0. When printing the scheme of work or lesson plan the system will use the report definition in the userarea folder. To return to the default option simply delete the file.
Peek Scheme of Work Action
This provides a quick way of viewing the scheme of work associated with the lesson plan. Clicking this option will open the scheme of work on the content tab above the lesson plan in the same screen. The scheme of work can be used like it would on the scheme of work details page.
Once shown the label will change to ‘Unpeek Scheme of Work’. Clicking again will close the scheme of work.
There is also a button on the top right of the Lesson Plan which gives the same functionality.
Next Lesson Plan Action
The Next Lesson Plan action will open the next lesson plan within the scheme of work. For example the Lesson number 7 is being viewed. Clicking the action will open the lesson number 8. Please note that if the lesson being viewed is the last lesson then this option will not be available.
Previous Lesson Plan Action
The Previous Lesson Plan action will open the previous lesson plan within the scheme of work. For example the Lesson number 7 is being viewed. Clicking the action will open the lesson number 6. Please note that if the lesson being viewed is the first lesson then this option will not be available.
Copy Action
This option is available under the actions on the side panel. This option is only available to Managers or users with the permission ‘Can Copy Lesson Plans’. Copying refers to a one time copy of information from one lesson plan to another. The sections of the lesson plan to be copied can be selected.
Clicking the Copy Action will open a popup window. Firstly the user selects the lesson plan to copy from. For subject schemes of work the user will select from a series of dropdowns to help find the lesson plan. Firstly the user will choose from the academic year, this will in turn restrict the list of courses which will restrict the list of groups which will restrict the list of units which will restrict the list of schemes of work which will restrict the lesson sets which will restrict the lesson plans. For Tutorial schemes of work the dropdowns will be academic year which restrict the tutorials which restricts the schemes of work.
Once the user selects a lesson plan the copy options will become available. The user can check if the Lesson Plan is correct by clicking the link below which will open the Lesson Plan in a new tab.
Users can choose to copy the following sections of the Lesson Plan. Please note that copying or subscribing will wipe existing data against the section. Sections not included will be unaffected.
Times
Copies the date details on the details tab. This includes the start and end time. Users can change the start and end time which will move the lesson plan content activity times accordingly. For example the original lesson plan started at 10:00. The user changes the times to 11:00 then the lesson plan activity time will be moved forward by one hour accordingly.
Visible to Student
Copies the student visibility. Please note that if the Template settings do not allow for manual editing, the visibility will be governed by this template setting and not the manual visibility set against the Lesson Plan.
Students
Copies all the students from the details tab. This option is only available for tutorial schemes of work.
Teachers
Copies all the teachers from the detail tab. If you are a teacher on the new lesson plan but not on the old lesson plan you will still be a teacher on the new lesson plan.
Owners
Copies all the owner from the detail tab. If you are a owner on the new lesson plan but not on the old lesson plank you will still be an owner on the new lesson plan.
Rooms
Copies all the rooms from the detail tab.
Resources
Copies all the resources from the detail tab.
Context
Copies all the context text boxes from the context tab.
AO
Copies the data from the Aims and Objectives tab.
Content
Copies the lesson plan activities from the content tab. Times can be altered in the dates section.
Appraisal
Copies all the appraisal text boxes from the appraisal tab.
Edit Student Visibility Action
The Visibility of the Lesson Plan can be altered in the Action panel under ‘Edit Student Visibility’. This will open a popup which allows a user to change the visibility if it is manually editable for the user and the template setting above allows.
Email Student
The Lesson Plan action called ‘Email Students’ which allows all students against the group to be emailed a direct link to the lesson plan at once.
Planning Live ships with sophisticated reporting which allows the college to slice and dice the Scheme of Work data within the system. Please see the General documentation guide for more information.
The reporting can be accessed from the menu. The will open up the Reporting Homepage. The user should see the Planning Live section with two dashboards:
Default Dashboard
The default dashboard contains the following sections which are all filterable in the side panel:
Scheme of Work Validation Number
This section displays a chart which shows:
Scheme of Work Validation Percentage
This section displays a pie chart which shows:
Scheme of Work Completion
This section shows Scheme of Work Completion. If the schemes of work are being populated correctly the user would expect to see high number here:
Schemes of Work List
A grid of the Schemes of Work under the current filter. The Columns displayed include:
Lesson Plan List
A grid of the Lesson Plans under the current filter. The Columns displayed include:
Organisation Structure 1-4 Overview
An overview of each organisation structure level e.g. Campus, Faculty, Department. The column displayed include:
Staff Usage
A list of staff with statistical information against them. The column displayed include:
Staff Usage Chart
A graphical representation of staff usage which can be filtered by organisation structure area. The columns include:
Academic Year Checklist
A grid which shows various measures and their corresponding values. This is useful particular at the start of an academic year to see if core information has been populated. Much of this information is crucial if Planning Live is to be used properly. The information includes:
Filters
The following filters can be applied to each section:
The Calendar shows lesson plans and actions on a calendar. Please see the General documentation for more details.
The user can decide which information to show within the calendar or not show the information at all.
The Wall is a cross between a forum and the wall you would find within social media applications such as LinkedIn or Facebook. The concept is that it is a collaborative zone for members of staff to post about aspects of teaching and learning so that other members of staff can view and comment on these posts. Please see the General documentation for more details.
The Search Menu allows users to search information by Course, Group, Staff, Students. Please see the General documentation for more details.
The Action page allows the user to see actions which are associated with the user. Please see the General documentation for more details.
File Upload Size
By Default the maximum upload file size is 30MB. This can be changed by altered the web.config file in the root of the website. Under system.webServer > security > requestFiltering the maxAllowedContentLength can be added as such
<security>
<requestFiltering>
<requestLimits maxQueryString="32768" maxAllowedContentLength=”2147483648”/>
</requestFiltering>
</security>
The setting above will allow files up to 2GB in size to be uploaded. The value displayed represents the maximum length in bits.
In order to use the charting features the web server will need Internet access to www.google.com
Database Diagram
The following shows the main tables in the database and how they link.