WhatsApp Live Documentation
WhatsApp Live taps into WhatsApp’s API for colleges to be able to send WhatsApp messages to Students, Applicants, Potential Students, Parents, Alumni or anybody else associated with your College…
It has the following key features:
Integrating WhatsApp Live within your Applications 33
Notification Live compromises of the following main components: a Website, a Web Service, a SQL Server database and a Windows Service
Website
The website provides the front end of the system where all college staff will login to access. Used primarily for configuration and sending WhatsApp messages. This website can be hosted locally on the college’s intranet and/or made available externally. Typically the website can be accessed from a url which appears as follows http://ServerName/CollegeLive or www.college.ac.uk/CollegeLive. Colleges will often embed this link on their intranet page for a seamless experience.
Prerequisites
Windows Server 2012 or above
IIS7 or above
10 GB Hard Drive
3Ghz Quad Core Processor
8GB RAM
.NET 4.6.2 Installed
Please note that hardware requirements are estimates and may be higher or lower depending upon the volume of concurrent users. Additionally if the server has other systems installed that are taking up resources then the resources available to the system may be considerably lower. Please contact support if unsure.
Web Service
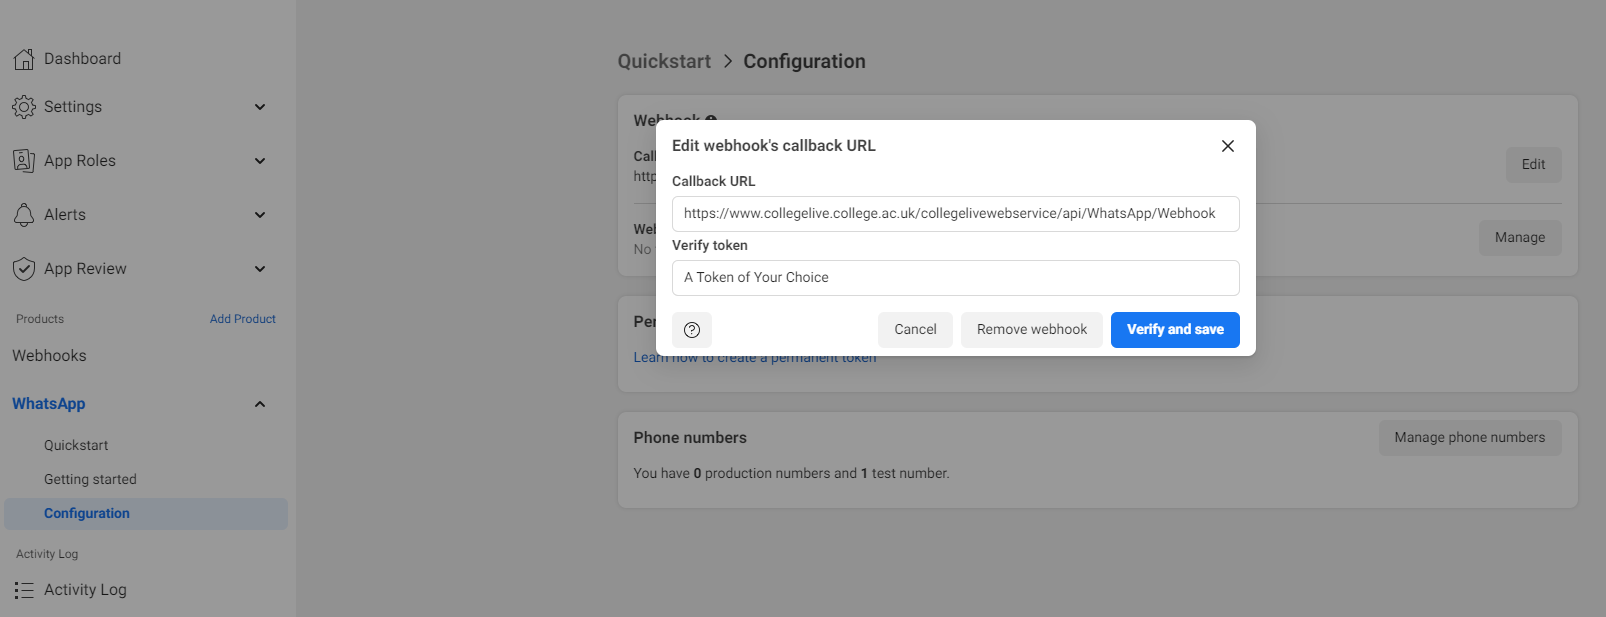
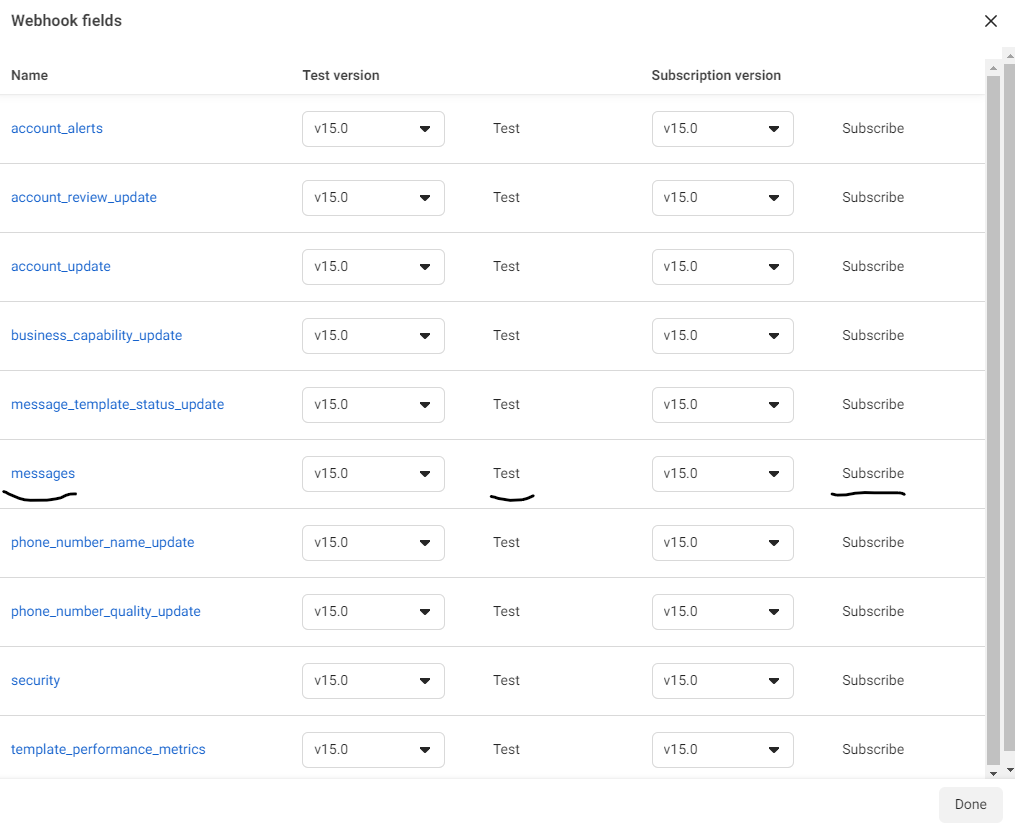
The Web Service is used by the WhatsApp API to communicate back to WhatsApp Live. This allows WhatsApp Live to keep track of the status of messages for example has the message been opened. The Web Service needs to be externally facing and have SSL enabled. Port 443 needs to be enabled to communicate.
Prerequisites
Windows Server 2012 or above
IIS7 or above
10 GB Hard Drive
3Ghz Quad Core Processor
8GB RAM
.NET 4.6.2 Installed
For the firewall, it is possible to whitelist a range of IP addresses that the WhatsApp API uses to communicate back to the Web Service. Please see this article from WhatsApp about how to get a list of current ip addresses. https://developers.facebook.com/docs/whatsapp/cloud-api/guides/set-up-webhooks/#ip-addresses. However WhatsApp periodically changes this list so would need a method of regularly updating the ip addresses.
Database
The data behind the system is stored within a SQL Server Database.
Prerequisites
SQL Server 2014 or above
100 GB Hard Drive
3Ghz Quad Core Processor
8GB RAM
.NET 4.6.2 Installed
Please note that the Website and Database can be hosted on the same server. However the resources required will be higher to accommodate this.
Windows Service
The Windows Service known as the Process Agent will perform background processes required by the system. This includes scheduling data to be imported into the system and sending Whats App messages.
Installation
The Installation Wizard should guide the users in how to install the Website, Web Service, SQL Server Database and Process Agent.
Configuration
Once installed there are various steps required before using WhatsApp. This outlines the minimum steps required but other steps might be needed.
User Authentication for Website
The college will need to decide how they want users on the website to be authenticated. There are 4 methods:
In order to use windows authentication the following settings are required in IIS. Under the website navigate to authentication. Make sure that ASP.NET Impersonation and Windows Authentication are turned on, and that Anonymous Authentication and Forms Authentication are turned off.
In order to use any of the other authentication methods the following settings are required in IIS. Under the website navigate to authentication. Make sure that Anonymous Authentication and Forms Authentication are turned on, and that ASP.NET Impersonation and Windows Authentication are turned off.
The system ships with a default administrator account with username: administrator and password: Password. This should be altered as soon as possible to have a password of your choice.
System Setting
Under System > System Setting set the ‘Web Service Root URL’ so that the website can talk back to the Web Service when the WhatsApp Configuration is altered.
WhatsApp Configuration
In order for WhatsApp messages to be sent out several configuration steps need to be configured. See the WhatsApp Configuration section for more details.
Emails
WhatsApp Live can be used to send out emails. To send out emails the links to your Exchange server need to be set up. Please see the Email sections.
SMS
WhatsApp Live can be used to send out Text messages. To send out SMS the links to the college’s JanetTxt account need to be configured. Please see the Email sections.
Users
The college will need to add the Staff into WhatsApp Live for the staff they need to use the system. This can either be done manually or with the Staff Import. Some colleges may only require a few users to have access. These will be the users configuring and sending WhatsApp messages. Other colleges may wish a larger number of staff to have access so they can see the messages that have been sent out e.g. a teacher could see the messages sent to their students.
Imports
The college may wish to import data into WhatsApp Live from a source such as their student record system. These are not required to use WhatsApp Live but may be useful for some colleges. These are outlined in order of importance:
WhatsApp Templates
WhatsApp Templates are message formats you can use again and again. These need to be configured in the WhatsApp Developer tool. The college can have as many templates as they like. For example a snow day template or a successful application template.
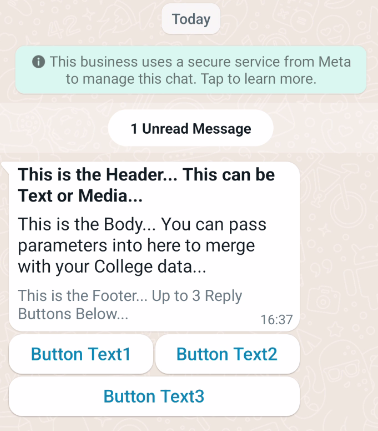
A template consists of a header, body text and footer text, and optionally reply buttons. See the WhatsApp Templates section for more details.
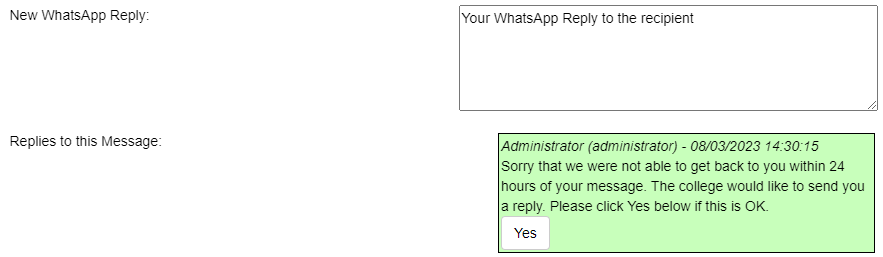
WhatsApp only allows you to reply to received WhatsApps within 24 hours of the recipient contacting the college. If this is longer than 24 hours ago then you will only be able to reopen the conversation if the recipient replies to a WhatsApp sent by a Template. You should set up a ‘Reopen Conversation’ Template e.g. ‘Sorry that we were not able to get back to you within 24 hours of your message. The college would like to send you a reply. Please click Yes below if this is OK.’ If the recipient then clicks yes you will be able to reply directly. Once created the Reopen Conversation template should be selected within System > WhatsApp Settings > Account Tab.
Sending Messages
Once templates have been set up the college can use the Message Creator for each campaign. The message creator is used to merge data in the WhatsApp Template with data in your college systems. In the Message Creator you will need to return a list of telephone numbers and other required data e.g. firstname, course name. You will also tell it how to merge the parameters in the template with the data in your college system, and optionally schedule messages to be sent out. View the Sending Message section for more details.
It is also important to understand the WhatsApp pricing structure for sending messages which can be found in the Pricing section.
Chatbot
The Chatbot functionality users to WhatsApp Hashtags and receive WhatsApp replies back with appropriate answers context sensitive to the user. For example a student sends the WhatsApp #Timetable and receives a WhatsApp back with their timetables for the week. If the college wants to use this then they will need to use the Page Creator to create searchable pages. These pages will need to contain sections - either grids, text or web pages to be returned by the search. For grids these can tap into information with the college’s systems using SQL queries.
Online Demo
There is an online demo for WhatsApp Live which can be found here http://www.demo.system-live.com
This can be useful to see an example of how the system can be configured. This can show you sample messages. The system can be logged in with different types of users.
To access the demo site the following credentials should be used.
Type of User: Administrator
Username: Administrator
Password: Password
Type of User: Head of Campus
Username: Kady.McPhee
Password: Password
Type of User: Head of School
Username: Linzi.Stephenson
Password: Password
Type of User: Head of Department
Username: James.Morris
Password: Password
Type of User: Teacher
Username: Felicity.Jones
Password: Password
Please feel free to try out the demo site and edit information. Please note that the demo site may be regularly reset so any changes will be lost.
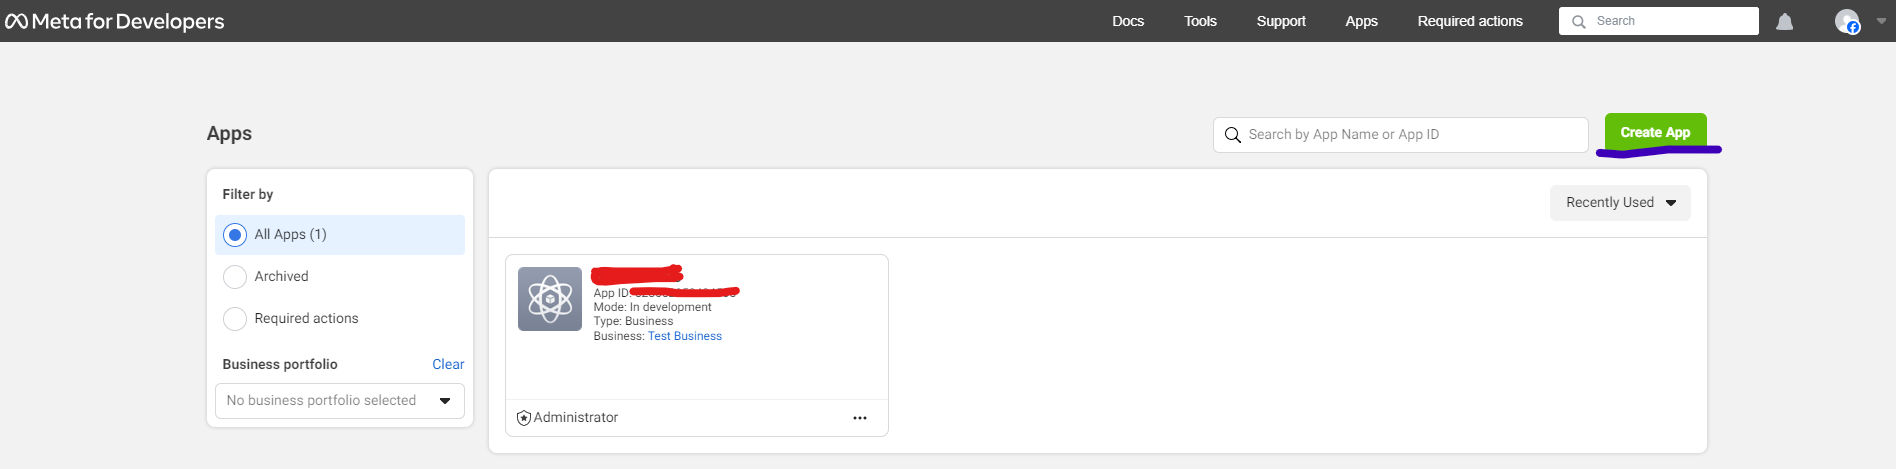
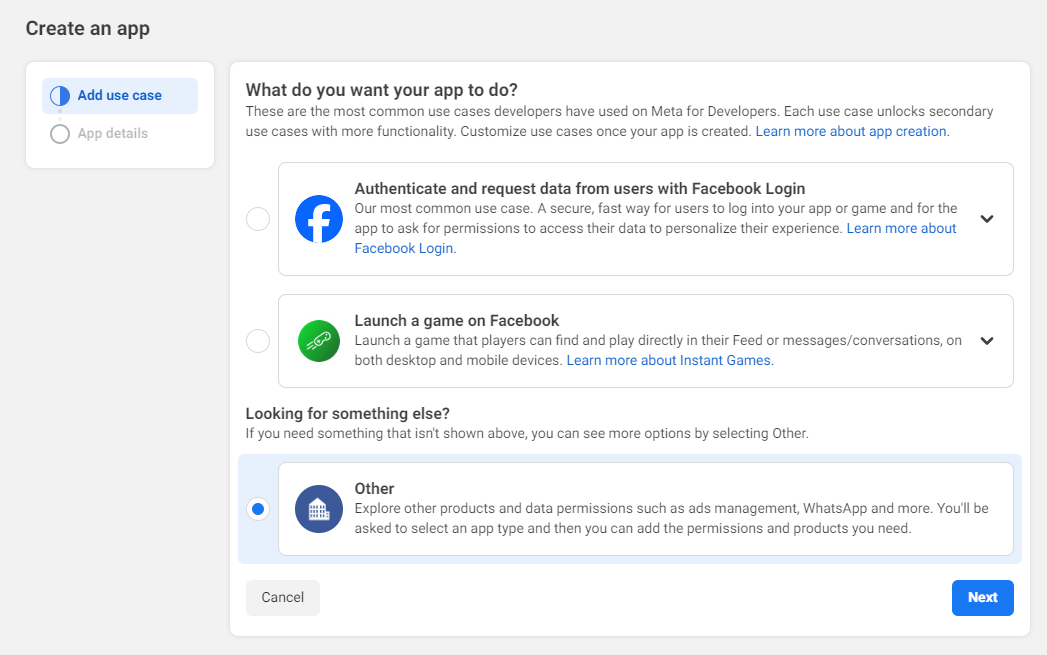
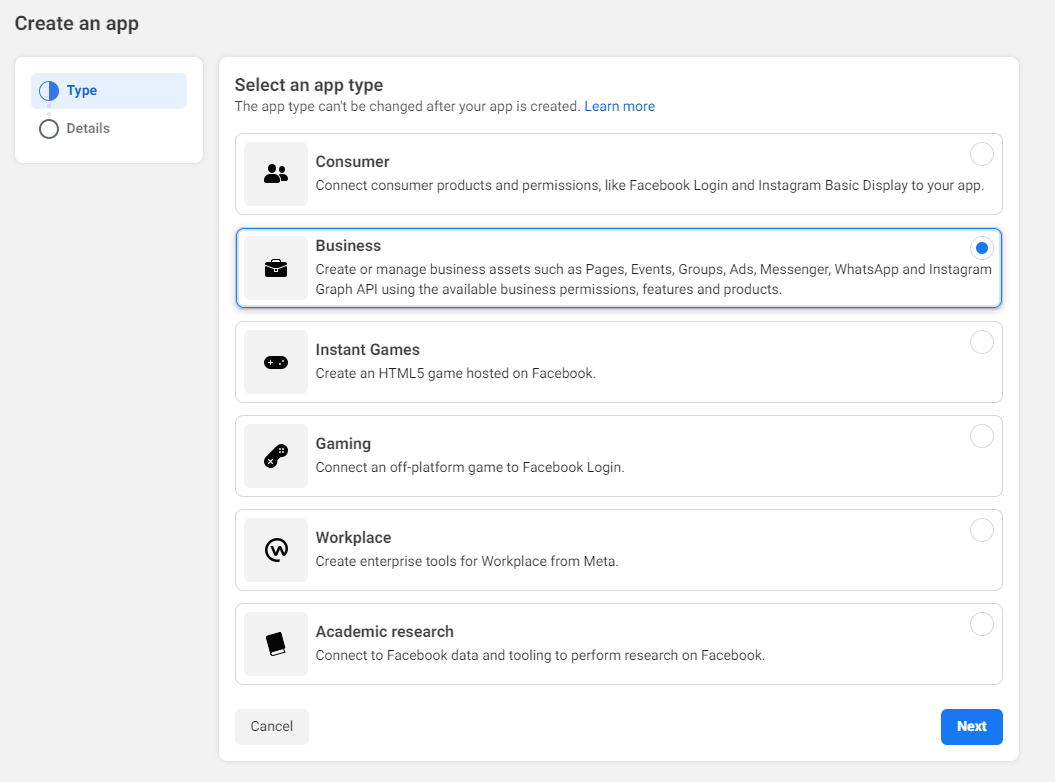
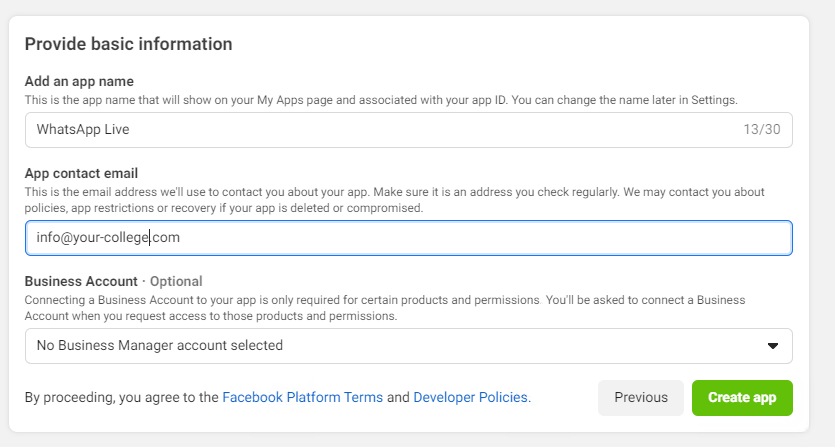
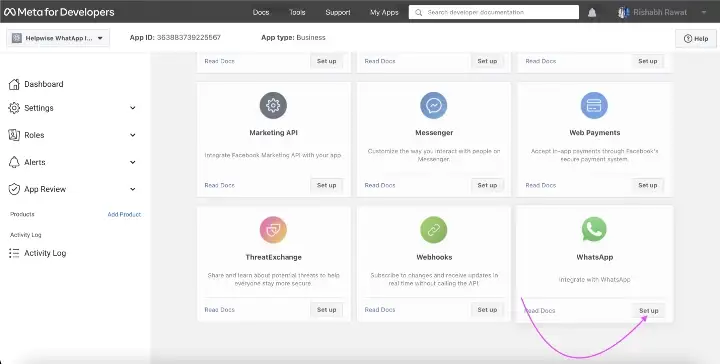
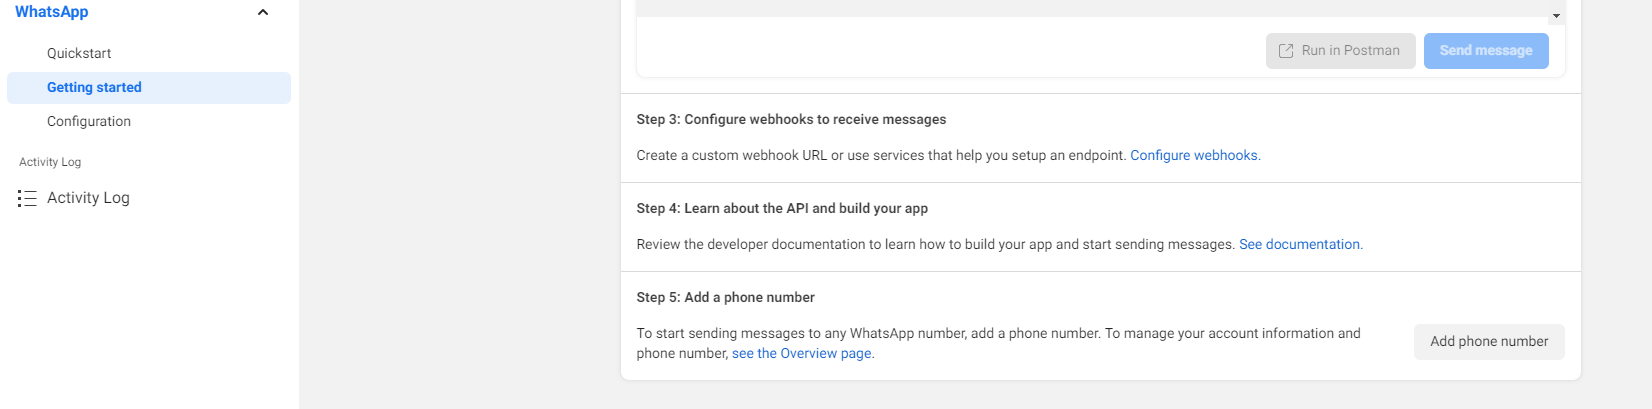
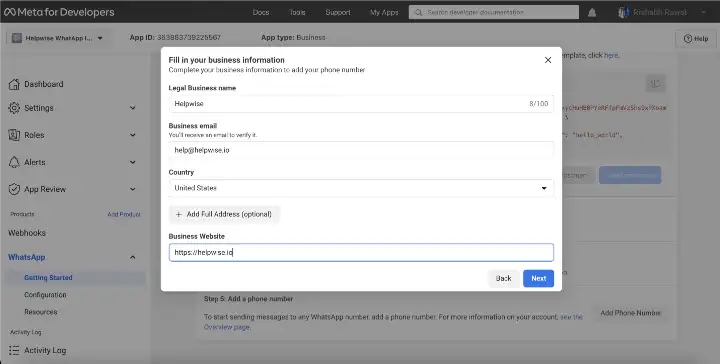
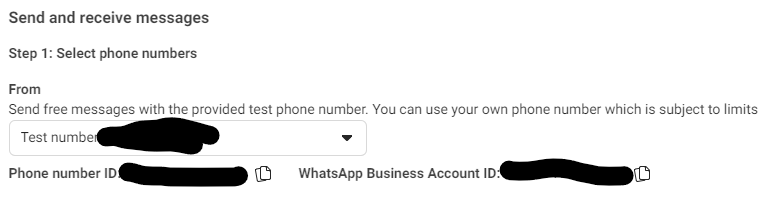
There are various steps required to set up WhatsApp Live. If the college has more than one Facebook/Instagram account for different college brands then the same steps should be followed to setup each account.
WhatsApp will charge your college for sending messages. How WhatsApp prices messages can be found at https://developers.facebook.com/docs/whatsapp/pricing/.
To summarise, WhatsApp does not charge per message but per conversation per 24 hour period. So let’s say you send a student a WhatsApp message at 9:30am you can send as many WhatsApp messages to them until 9:30am the next day. This will still be charged as one conversation.
The cost per conversion depends on the WhatsApp Template category. As of March 2023, WhatsApp Templates classified in the ‘Marketing’ category will be charged slightly more at 5.09 pence per conversation. Those in the ‘Utility’ category will be charged less at 2.87 pence per conversation. An example of a Marketing template would be ‘Hi Steve would you be interested in attending the college next year?’. An example of a ‘Utility’ template would be ‘Hi Steve your application has been successful’.
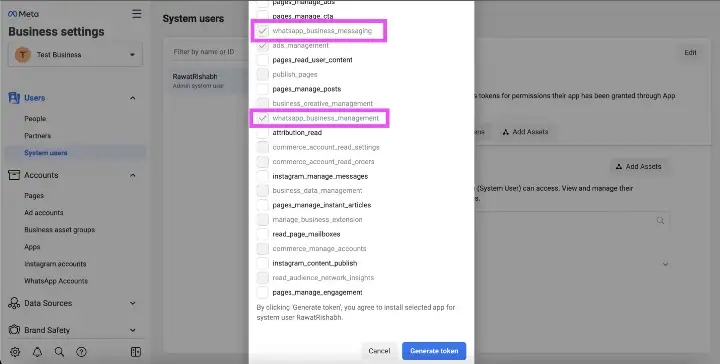
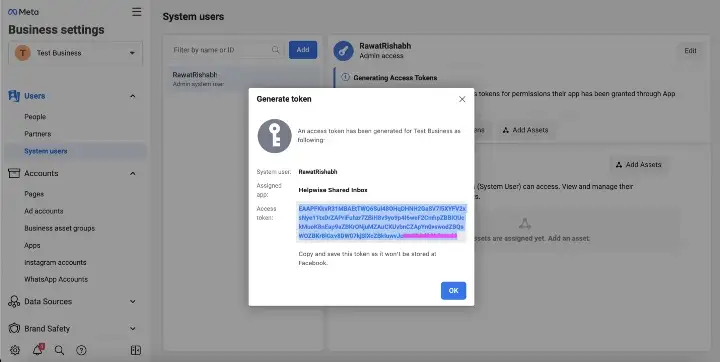
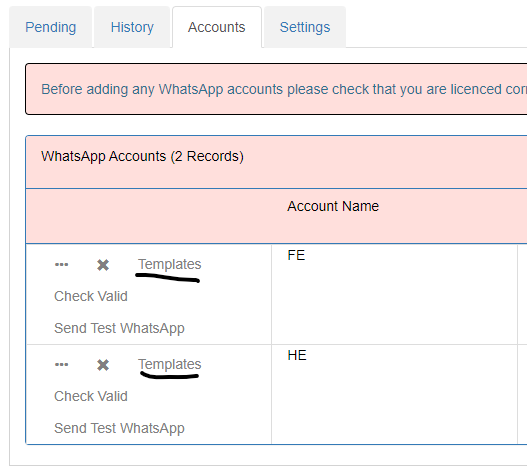
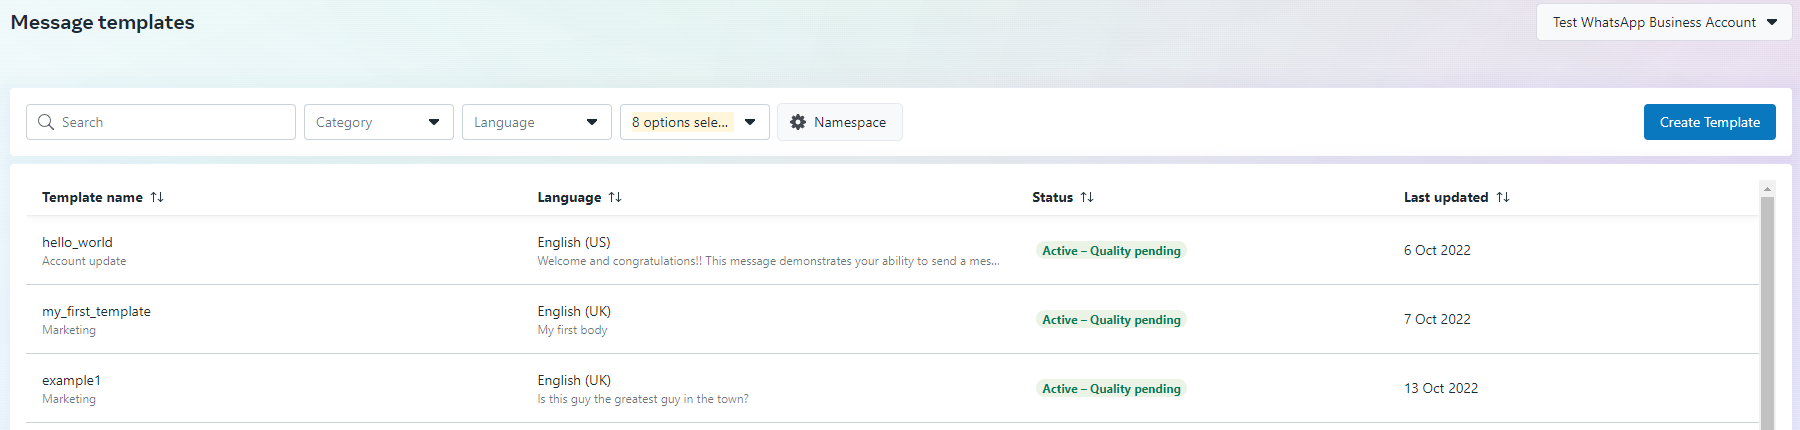
WhatsApp Templates are message formats you can use again and again. They define the text and structure of the WhatsApp Message. The college can define as many templates as required. For example you may have a template for ‘College Closed’ or ‘Successful Application’ or ‘Lesson Timetable this week’. Templates are set up within your business developer account. Within WhatsApp Live you can quickly go to the Template page under System > WhatsApp > Accounts tab for each account.
This then opens up the list of templates
Each template has a name, a language (usually English (UK)) and a status. When you first create a template the status will be Pending Review and so will not be able to be used to send a message until it is set to an active status. WhatsApp review all templates first which can take up to 24 hours but in practice is much quicker.
To Create a new Template click ‘Create Template’.
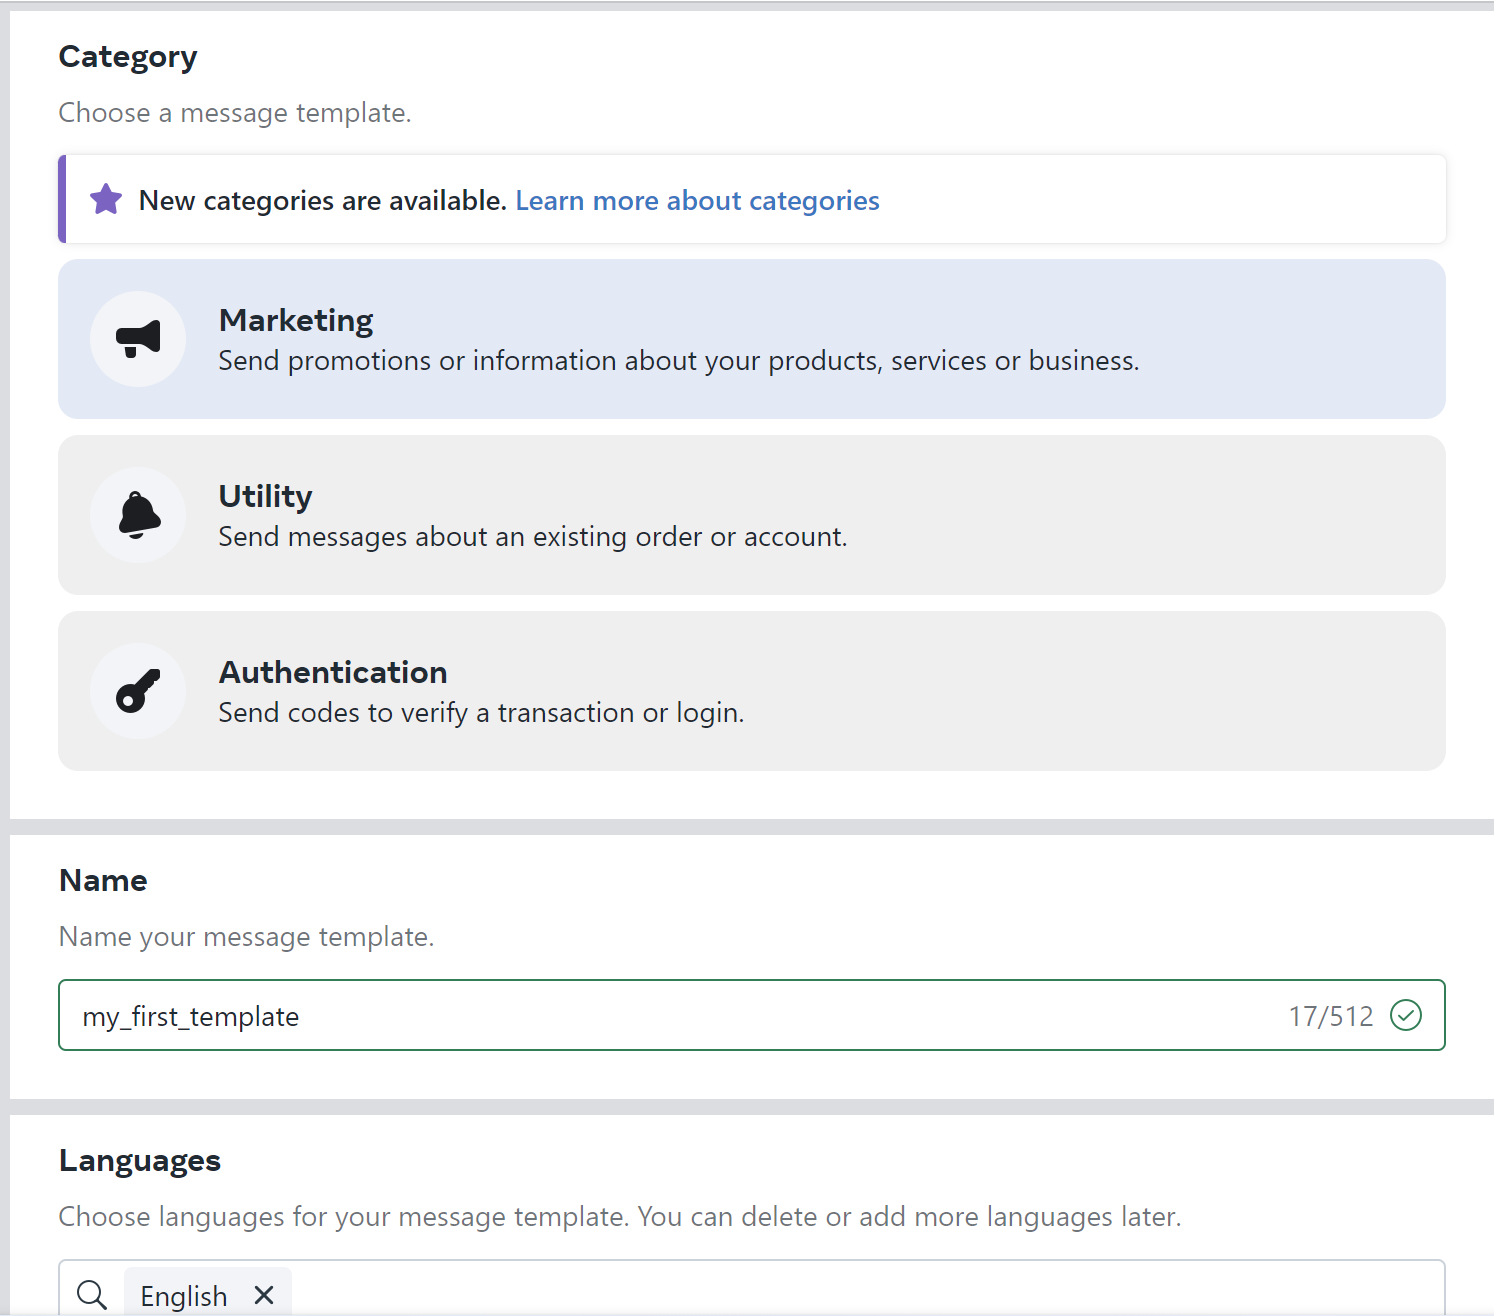
Firstly decide on the Category - either utility, or marketing. There is little difference between the two apart from if marketing is chosen then WhatsApp Live will take into account users who opt out of being sent marketing messages. Marketing Categories are also charged more per ‘conversation’ by WhatsApp. There are also restrictions about what type of message can be sent for each category.
Next, give the template a name. And lastly a language. We recommend using English (UK).
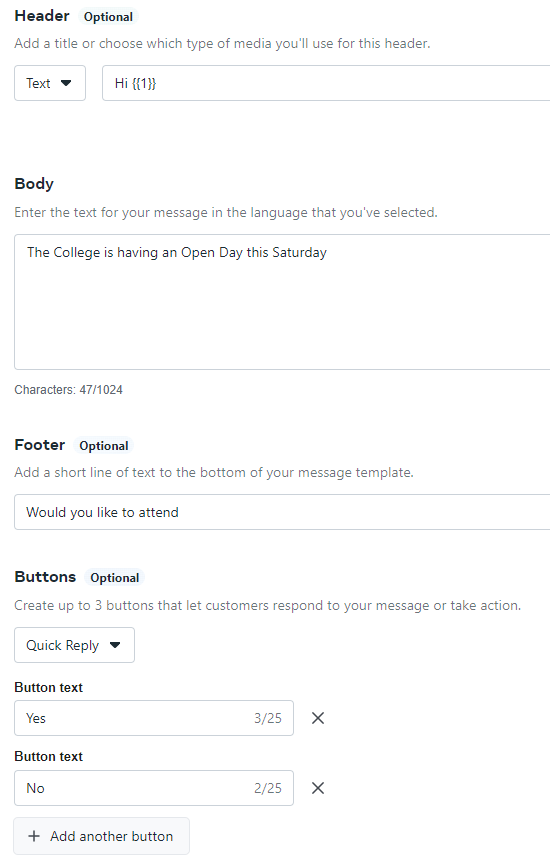
A Template consists of the following:
Both the Header and Body can pass in optional parameters. This is the mechanism used to customise each message.
For example a Header Text of Hi {{1}}. 1 is the parameter and could be replaced by the First name of the student which may be returned within your datasource of students to send the message out to.
Another example. You have an interview on {{1}} for your application for Course {{2}} at {{3}}. This example contains 3 parameters which can be merged within your datasource within WhatsApp Live.
Optionally reply buttons can be added to the bottom of the message. Up to 3 Reply Buttons can be created. You can decide the Text of each reply button. For example Yes/No. If the user presses this button the reply can be viewed in WhatsApp Live.
Other types of Reply Button include:
Messages can also be replied to by swiping right. Then the user can type their reply. This reply is also recorded in WhatsApp Live. This can be used if there are more than 3 different types of replies or if it is a more open ended question. For example a survey asking for a 1 to 10 rating. If the user does not swipe right to reply but simply types into the text box to reply this will not be recorded on WhatsApp Live. Therefore in the message template it is a good idea to say that the user should swipe right to reply.
Once the Template has been created you can use the template to bulk send messages within WhatsApp Live.
This can be done within the Message Creator under System > Message Creator. Navigate to the WhatsApp tab to see existing WhatsApp Message Creators.
This will show a list of existing Message Creators, their name, description, whether they are scheduled and when they were last run.
Each Message Creator can be manually added to the queue to be sent out by clicking the Play button at the beginning of the row.
Existing Message Creators can be modified by clicking the … button.
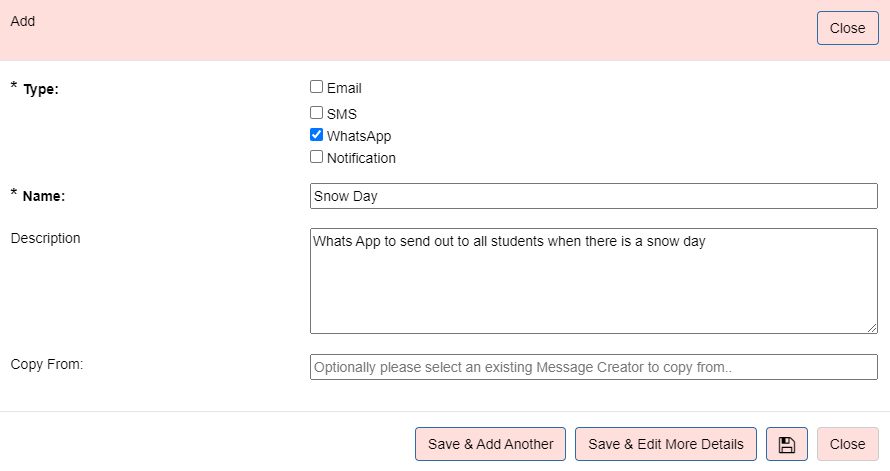
New Message Creators can be created by clicking the Add button.
The type should be set as WhatsApp. The Message Creator should be given an appropriate name and description. Optionally you can choose to Copy From an existing Message Creator which will create an exact copy.
Once added the details of the message creator can be modified.
The first step is to tell the Message Creator where the Datasource behind the data is coming from. This can be any SQL Server datasource or Excel File of your choice.
If the Datasource Type of SQL is chosen then new SQL Datasources can be added under System > Datasources. This will allow you to specify the Server and Database name and connection parameters. For example the database of the student record system. Alternatively if you import students or other types of users into WhatsApp Live you can leave the datasource as blank which will use the WhatsApp Live database instead.
The next step is to provide the SQL to return the data which will be merged with the WhatsApp template. At the very least this should return a table of MobileTelephone numbers but if the template contains parameters extra columns could be returned which hold this data. For example your Template Body contains 3 parameters. You have an interview on {{1}} for your application for Course {{2}} at {{3}}. In the returned SQL you would want to return a table with 4 columns. One for MobileTelephone, one for Interview Date, one for course name and one for Interview Time.
If the Datasource Type of Excel is chosen then add the .xlxs Excel file to the grid beneath.
The data within the excel file should be added to the first sheet. The first row of the sheet will be treated as the column header. These column headers should be treated in the message creator in the same way as a column returned in a SQL Query would be. For example One for MobileTelephone, one for Interview Date, one for course name and one for Interview Time. Note that this is not a link to the excel file but the file itself so if data in the file changes you will need to remove the original file and reupload.
The permission groups that can Run and Edit the Message Creator should be added. Note that the creator and users with the permission ‘Can Edit All Message Creators’ can always run and edit the Message Creator. This allows different types of users access to different sets of Message Creators.
Under ‘To Mobile Telephone’ you will need to tell the message creator which of the Datasource columns contains the Mobile Telephone number. This defaults to ‘MobileTelephone’ but your Datasource may contain this within a different column name e.g. Mobile. In this case the ‘To Mobile Telephone’ should be set to ‘Mobile’.
Under ‘To User Name’ it is recommended to return the username of the imported user who will receive the WhatsApp. For students this would generally be the Student Reference Number. This is how the system maps the WhatsApp message with the user so you can for example see WhatsApps sent to a particular user or student within the website. However you may not import students or other users into the system so in this case this field can be left blank.
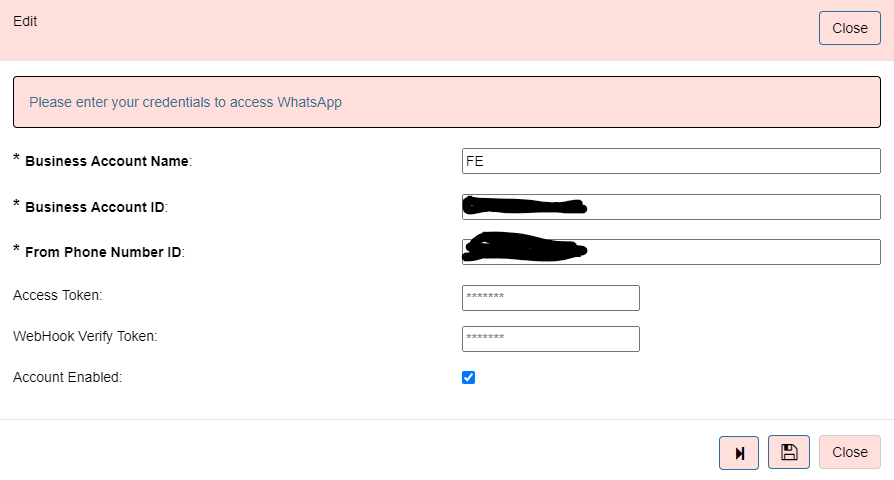
Under the WhatsApp Business Account choose the account to use if the college is using different accounts for different brand identities e.g. FE or HE.
Under WhatsApp Template Name choose the WhatsApp Template to use. This will lookup a list of available templates within the selected account. You can quickly search by typing in the box. The ‘Maintain Templates in WhatsApp’ link will take the user to the list of templates where they can add/edit templates.
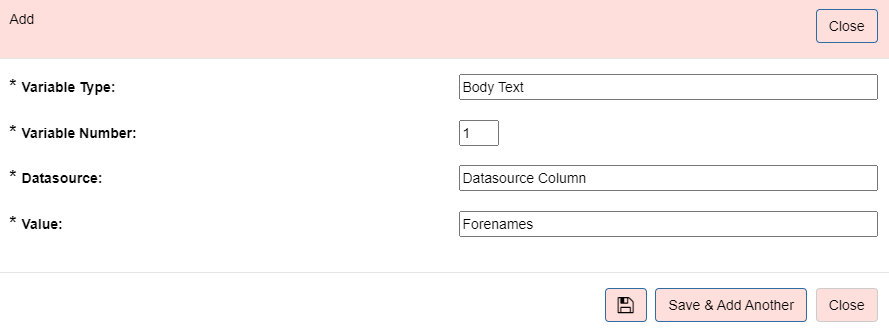
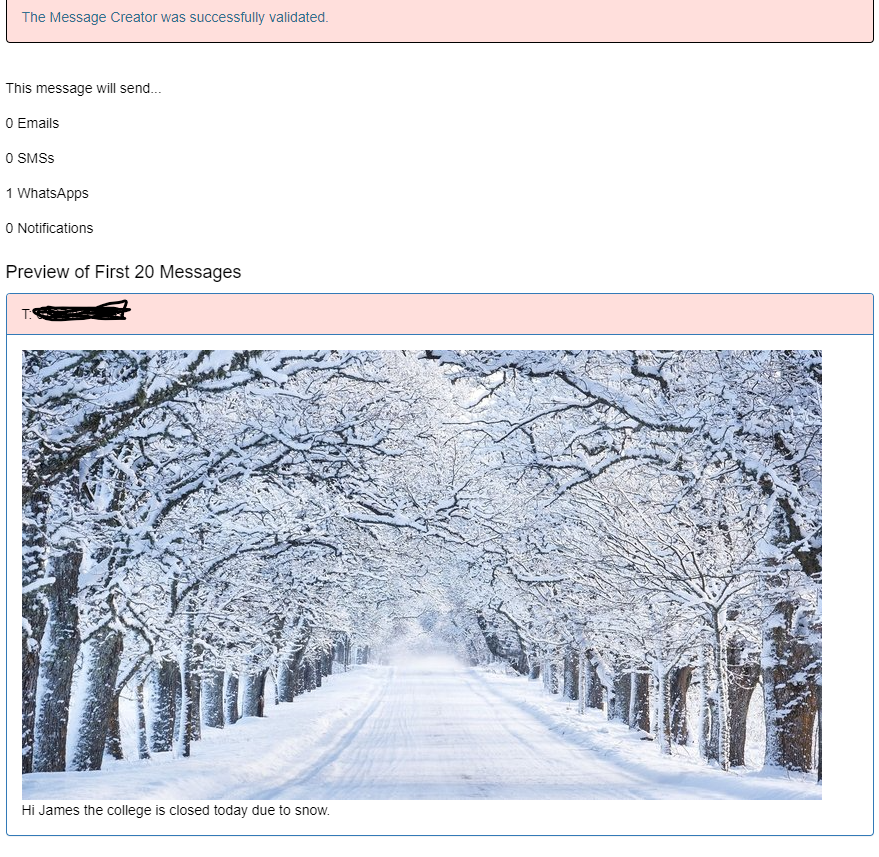
The WhatsApp Variables grid allows you to merge the variables in the WhatsApp Template with the columns in your SQL/Excel datasource or a Custom Text Value.
For the above example for a WhatsApp Template with a Body of Hi {{1}} the college is closed today due to snow. The Variable 1 will be replaced by the data within the Datasource column ‘Forenames’.
The Body text can have more than 1 variable so you would do the same for Variable Number 2,3,4, etc.
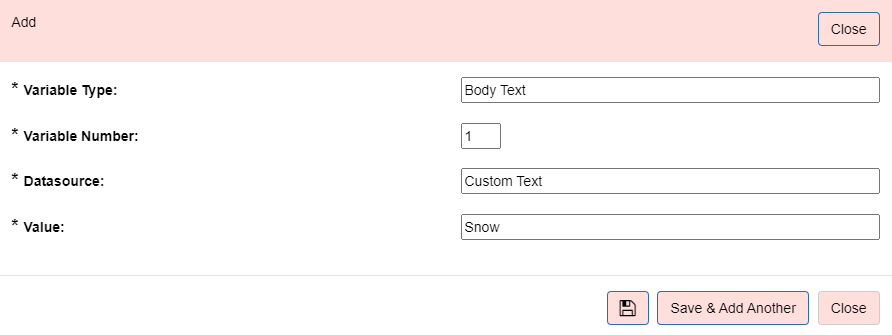
Header Text and Header Media can only have one variable so for this reason you will not be able to select a Variable Number.
The above example uses ‘Custom Text’ instead. This is useful for Variables which do not change on a row by row basis. For example if your template body had the following ‘The College is closed today due to {{1}}’. Here you could just set the value as ‘Snow’ and every message would be sent out as The College is closed today due to Snow.
The Header Media option should be used if rather than Text you wish to show either an image, video or document. In this case you should return a Datasource column which returns the URL of the image, video or document. For example if you wanted to show a picture of your college then find the url of the image from your college website e.g. https://www.college.ac.uk/collegephoto.jpeg and return this in the Datasource as a column e.g. ImageURL. Then use this column for the Header Media. You could return different urls for different students if you wished to send them different media. If the url is the same for each record then instead of choosing the datasource of ‘Datasource Column’ and returning the url in SQL you could choose Datasource of Custom Text and set the Value to be https://www.college.ac.uk/collegephoto.jpeg. Note that if the URL is invalid then the WhatsApp message will be sent but never received by the recipient.
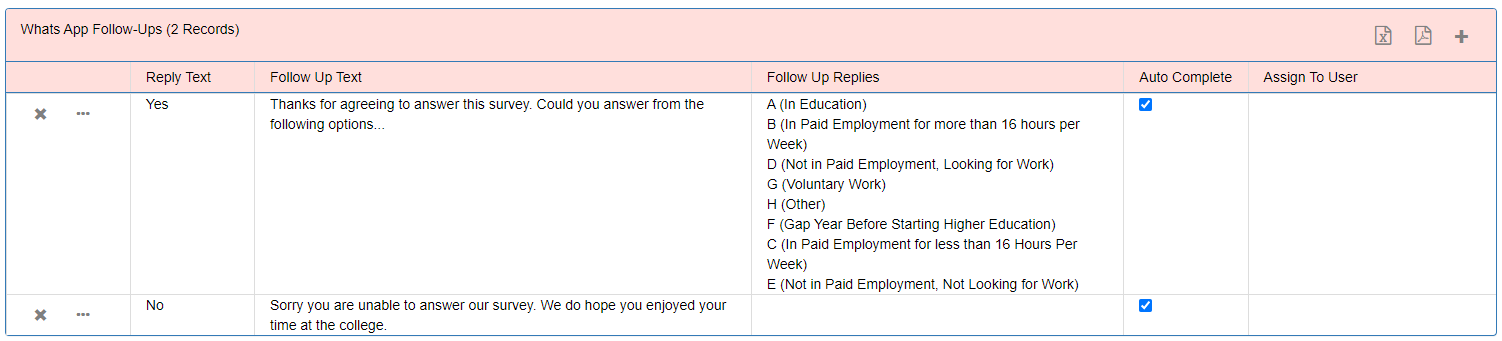
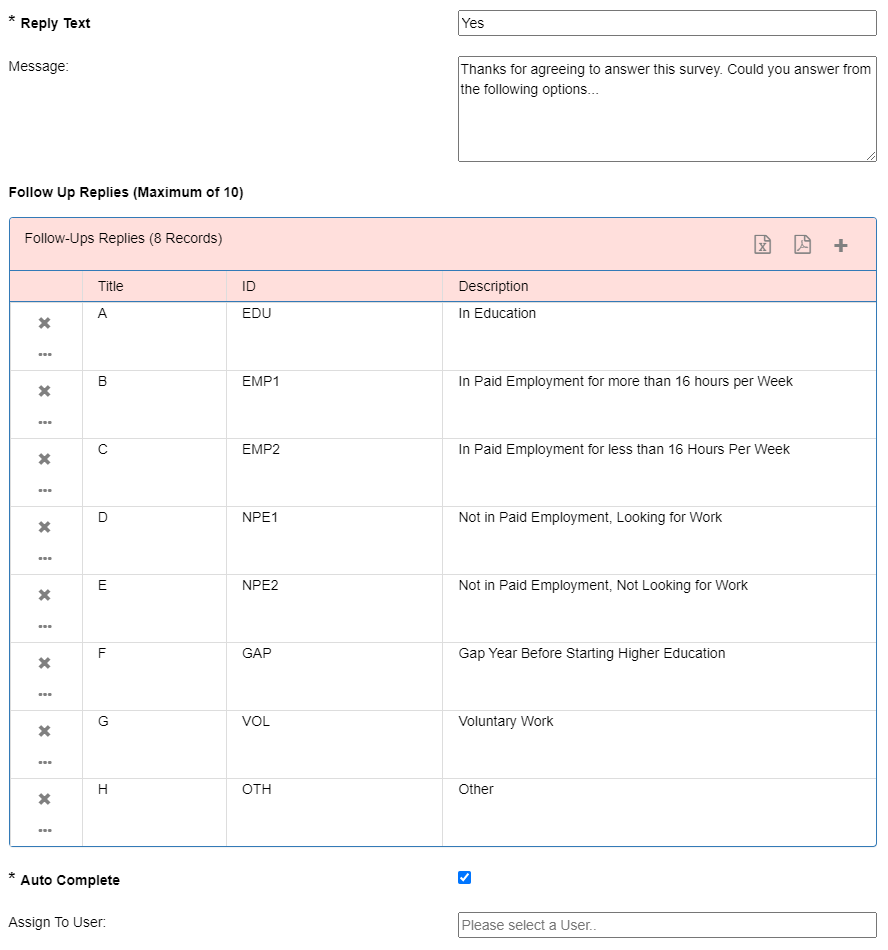
Follow Ups
The Message Creator has the ability to automate follow ups based on a reply. For example you have created a WhatsApp Template ‘Hi would you be able to tell us what you did after your studies finished at the college’. This has the reply options Yes or No.
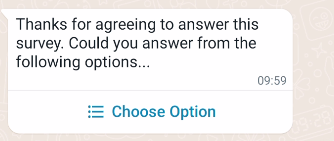
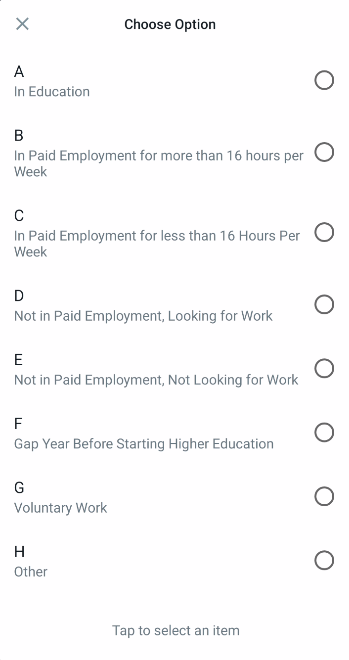
If the ex-student replied Yes. You could follow up with the WhatsApp ‘Thanks for agreeing to answer this survey. Could you answer from the following options’:
If the ex-student replied No you could follow up with ‘Sorry you are unable to answer our survey. We do hope you enjoyed your time at the college’.
This is particularly good for surveys because the WhatsApp Templates only allow for 3 different reply options. This method allows up to 10 reply options.
A New Whats App Follow-Ups grid has been added to the Message Creator Details page.
This has the following options:
Scheduling
The messages can be scheduled to automatically sent at a specific time and day of week until a specified Expiry Date
Currently Queued
Displays a list of queued Message Creators
History
Shows a record for each time this Message Creator has been used. Returns date, time, any problems and how many messages have been sent. More information about the messages sent out can be viewed by clicking the down chevron.
Add To Queue
Under the Action panel this will immediately add the Message Creator to the queue to be processed.
Validate
Under the Action panel this will allow you to preview the messages sent out before you enable the message creator.
If the Message Creator is invalid the message will appear on the top providing the reason.
If the message does validate successfully the pop.up will say how many whatsapp messages would be sent out and give you a preview of the first 20 messages.
The Message Creator also allows you to send out multi-media campaigns in one go by Email, SMS and our Mobile App Notification Live. This can be configured at the top of the page under Type. So a student could receive WhatsApp, Email and SMS at the same time.
You may want to only send SMS to students who are not using WhatsApp to save costs. You could find all users who have successfully received WhatsApps with the following SQL.
SELECT DISTINCT UserID FROM WhatsApp WHERE HasReceived = 1 AND UserID IS NOT NULL
You can imply from this any users not in this list do not use WhatsApp.
More information about this functionality can be found in the General Documentation.
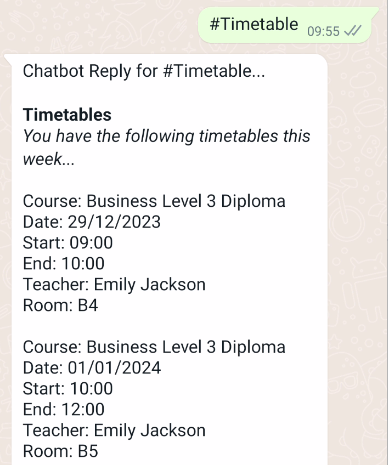
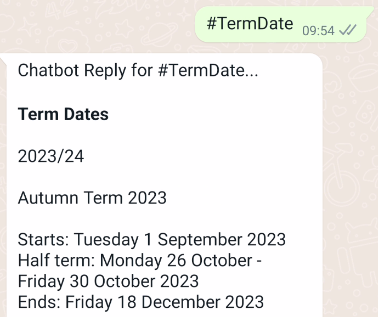
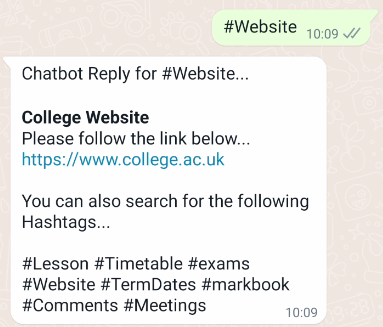
This allows users to WhatsApp Hashtags and receive WhatsApp replies back with appropriate answers context sensitive to the user. For example a student sends the WhatsApp #Timetable and receives a WhatsApp back with their timetables for the week. A parent sends the WhatsApp #Attendance and receive a WhatsApp back with the Attendance for their child.
The college can set up their own hashtags and associate these tags with either data, text or a url. Users are authenticated with their mobile telephone number. The system then can identify the user based on their mobile number to give the user information which is specific to that user.
To use this functionality there is a WhatsApp setting called ‘Chatbot Enabled’.
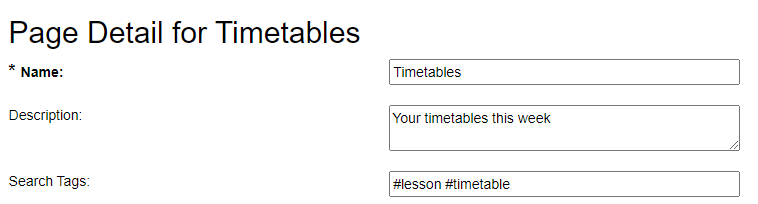
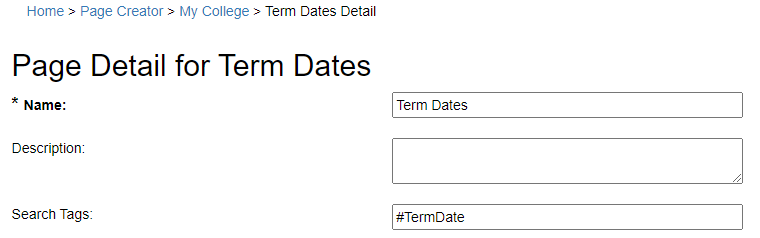
This functionality uses the Page Creator facility used for Notification Live. This allows pages to be created e.g. Timetable and sections added to the page e.g. Weekly timetables for the student. Each page can be given search tags e.g. #Timetable #Lesson to find the particular page.
In the above example either #lesson or #timetable will find this page.
Each page can be associated with a Permission Group so that the data could only be viewed by students or parents for example. Most of the Page Creator settings are only relevant for Notification Live apart from:
The following Sections can be added to each page:
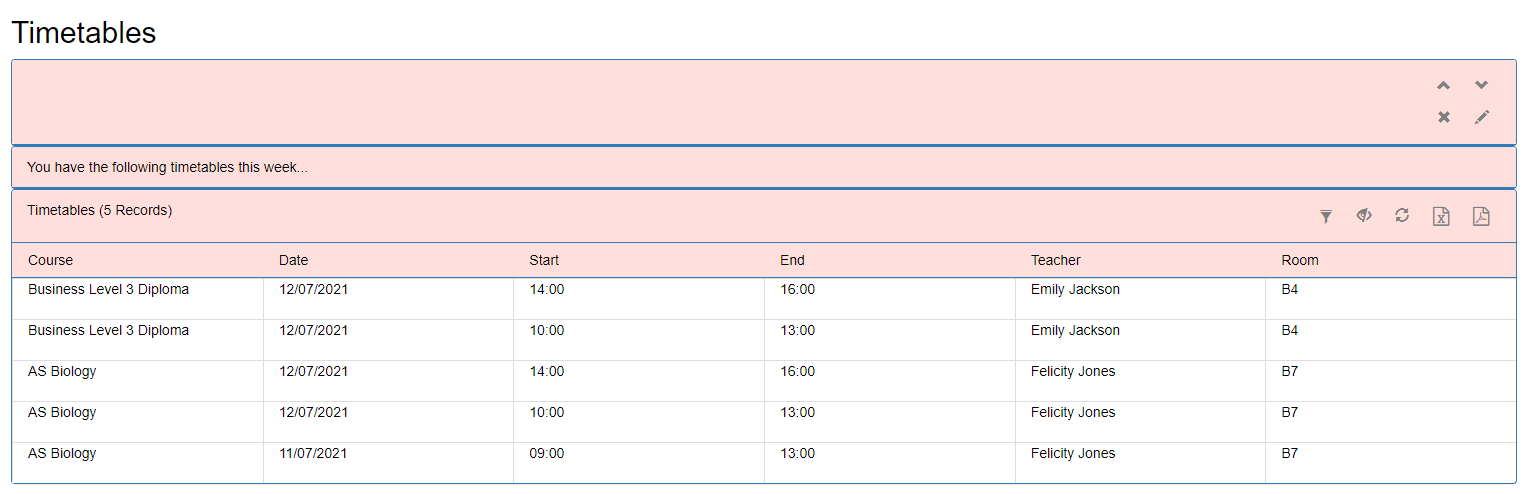
The Data Grid which can be context sensitive to the student who has sent the WhatsApp. This is done using SQL looking for example returning Timetable data filtering for a particular UserName or StudentRef.
They will then receive a WhatsApp summarising the Data Grid.
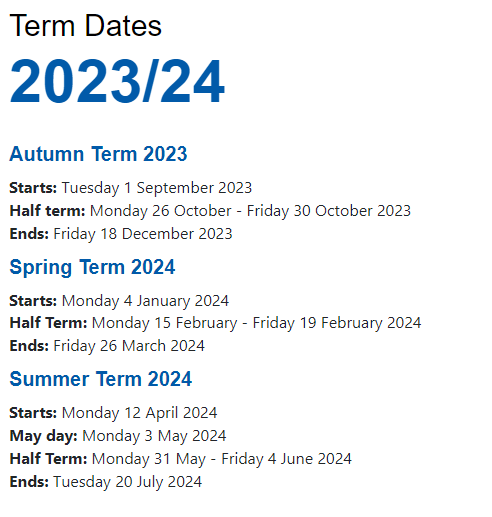
The next example for #TermDate.
Has been associated with a ‘Text’ Section.
They will then receive a WhatsApp summarising the Data Grid.
The next type of section is Web Page which will return a link to a website.
If the college is using ILP Live and they have for example created a survey page then #Survey will return a summary of the entered data in a similar way to the Data Grid.
Multiple sections can be added to the page for example #markbook could show information from 2 separate data grids - one for units and one for assessments. These will show one after the other on the WhatsApp reply.
The Page Creator contains a Search Text tab which will show how many times each search has been made and if there are any mappings to pages.
More information about how to use the Page Creator can be found within the Notification Live documentation.
Automatically replying to WhatsApp in this way does have a cost of 1 conversation which is roughly 2 pence. This means that it will cost the college around 2p per day per user. A 1000 students use for 50 days in the year means a cost of around 1000 x 50 X 2p = £1000. However there is a WhatsApp Setting called ChatBot Reply with Email which will send the reply by email instead and so have no cost at all.
This section is for developers who wish to integrate their current applications with WhatsApp Live in order to send out WhatsApp messages.
There are many use cases for this where a college may wish to automate a WhatsApp message when an event happens in one of their systems. For example a student’s application is successful. This is updated in the college’s student record system. As soon as this happens the college wants to send out a WhatsApp message to the student telling them that their application is successful.
This can easily be done by running the stored procedure called spWhatsApp_AddMessage on the WhatsApp Live database (normally called CollegeLive).
It can be run as follows passing in parameters some of which are optional
EXEC spWhatsApp_AddMessage
@MobileTelephone = '07974912708',
@UserName = 'Karen.Nelson',
@FromAccount = 'University Centre',
@MessageTemplate = 'successful_application',
@MessageLanguage = 'en_GB',
@MessageCategory = 'marketing',
@Campaign = '23/24 Applications',
@HeaderVariableType = 'Text',
@HeaderVariable = 'John',
@BodyVariableCount = 2,
@BodyVariableText1 = 'Diploma in Forestry',
@BodyVariableText2 = '20/03/2023',
@BodyVariableText3 = 'C',
@BodyVariableText4 = 'D',
@BodyVariableText5 = 'E',
@BodyVariableText6 = 'F',
@BodyVariableText7 = 'G',
@BodyVariableText8 = 'H',
@BodyVariableText9 = 'I',
@BodyVariableText10 = 'J'
Parameter | Required | Description |
MobileTelephone | Yes | The mobile telephone number. Don’t worry about the format - WhatsApp Live takes care of this. |
UserName | No | It is recommended to return the username of the imported user who will receive the WhatsApp. For students this would generally be the Student Reference Number. This is how the system maps the WhatsApp message with the user so you can for example see WhatsApps sent to a particular user or student within the website. However you may not import students or other users into the system so in this case this field can be left blank. |
FromAccount | No | The Account Name which will send the WhatApp Message. This is the account name under System > WhatsApp > Accounts. If only one account is used then this parameter can be left out. If multiple accounts are being used e.g. an HE and FE account then the appropriate account should be used. |
MessageTemplate | Yes | The name of the WhatsApp Template. |
MessageLanguage | No | The language of the WhatsApp Template. This defaults to English UK so if your WhatsApp Template is English UK then this parameter can be left out. However the WhatsApp Template may have been set to English. Some common options and the code to use include:
|
MessageCategory | No | The category of the WhatsApp Template. Either marketing or utility. This parameter can be left out and will default to utility. Used to check if a user has opted out of marketing before sending marketing messages. |
Campaign | Yes | This is a way of grouping together WhatsApps under one campaign category so you can view the engagement. |
HeaderVariableType | No | Only required if using the Header Variables in the WhatsApp Template. Only values of ‘Text’ or ‘Image’ or ‘Video’ or ‘Document’ are allowed. |
HeaderVariable | No | The data to be used within the Header Variable. If media this should be a url to either the image, video or document. |
BodyVariableCount | No | This should be used if passing in variables into the WhatsApp Template Body. This should be the number of variables which the template body uses |
BodyVariableText1-10 | No | The data for each Body Variable should be returned here. For example if using 2 variables BodyVariable1 and BodyVariable2 should both be populated. |
The above example could be used for a WhatsApp Template called 'successful_application':
Header - Hi {{0}}
Body - Congratulations your Application for {{1}} has been successful on {{2}}.
Would produce the following WhatsApp
Hi John
Congratulations your Application for Diploma in Forestry has been successful on 20/03/2023.
Please note that WhatsApp is quite fussy for messages which contain variables. Message will not send if the data passed in is empty so ensure each used parameter is populated.
Colleges normally have a process where students are required to opt in to receive correspondences sent out by the college as part of the enrolment process. However you may be sending messages to people who are not currently students for the purpose of marketing your college. It is important that these users are allowed to opt out of marketing messages.
When you send these types of messages the category of the template should be set to marketing. You should include an opt-out button. If the user clicks this button their user will be flagged to no longer receive marketing messages to ensure GDPR compliance. The button text should match the WhatsApp setting ‘Marketing Opt Out Button Text’ under System > WhatsApp > Settings tab. By default this is set to ‘Stop promotions’.
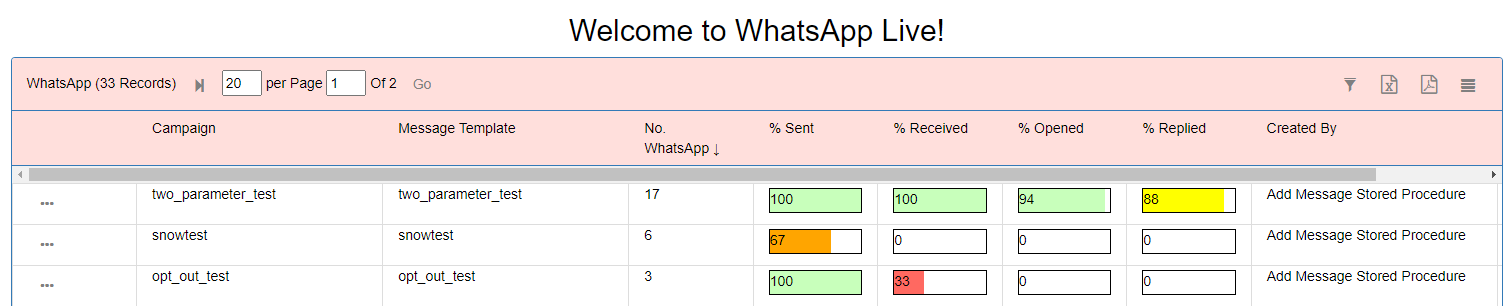
Once WhatsApps have been sent there are various places in WhatsApp Live where they can be viewed.
Depending where you are in the system the grid will either show a record for each ‘campaign’ or for each individual WhatsApp message. You can toggle between views by using the upper right hand button in the grid.
A Campaign is either:
The campaign grid will show
The individual message view will show similar information but for each message. In this view you will see:
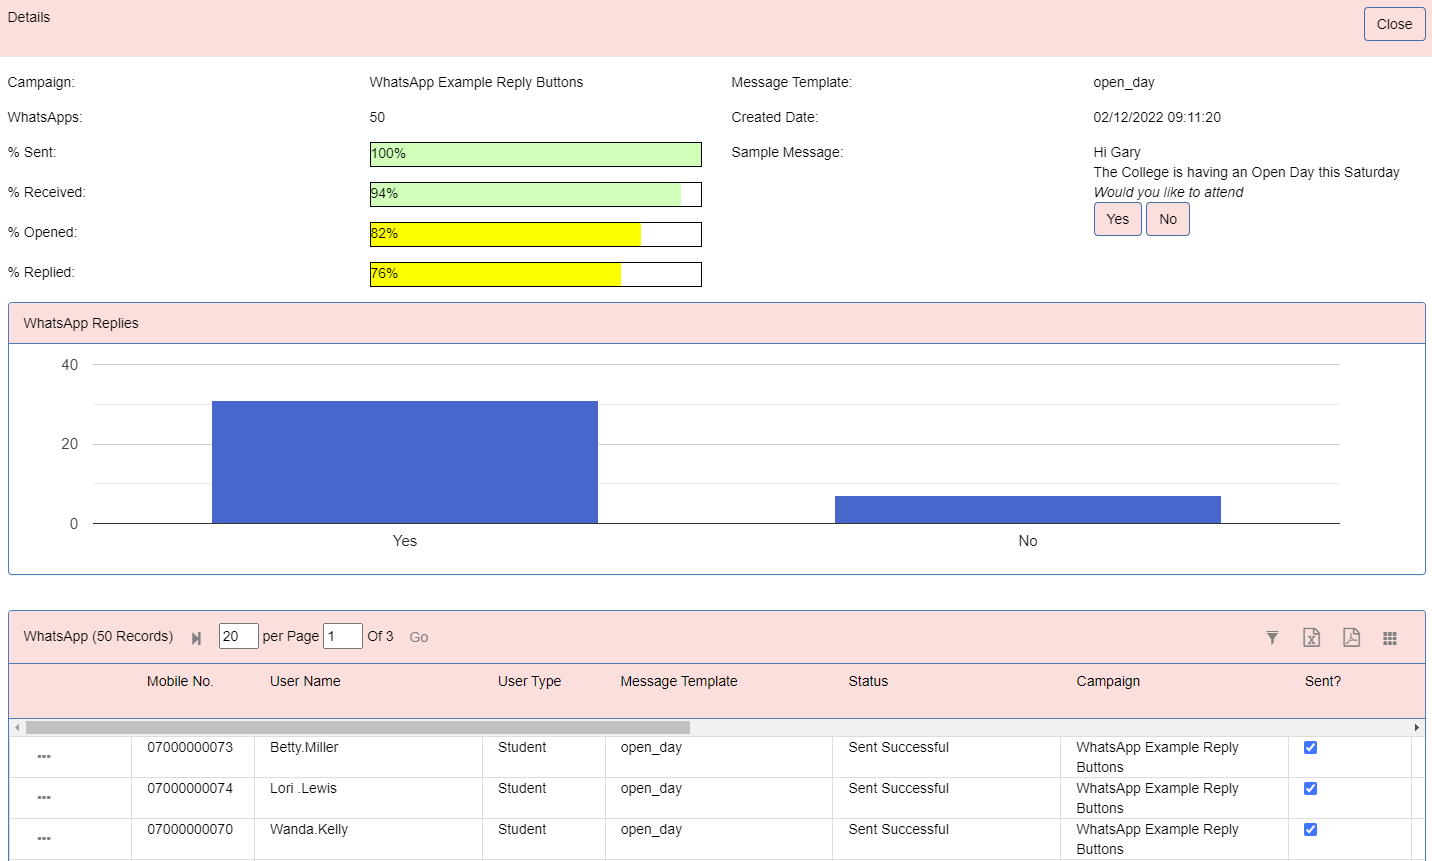
In the campaign view clicking the … button will show more details
The popup will display a sample message.
If the WhatsApp message can be replied to you will see a graph with the number of the top 12 replies.
Underneath you will see a grid of the detail of each message so you can see who did not receive the WhatsApp, etc.
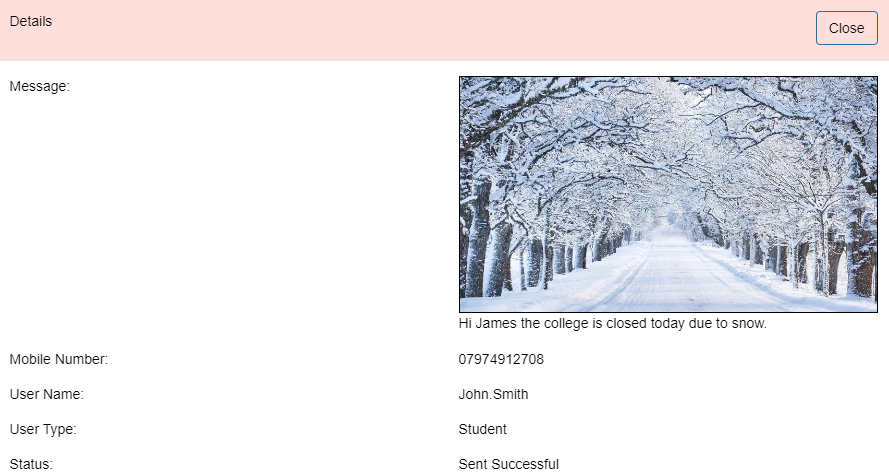
In the individual message view clicking the … button will show more details about that message including how the message would have appeared in WhatsApp…
Note that the Campaign grids only show messages whose origin is Message Creator or Developer.
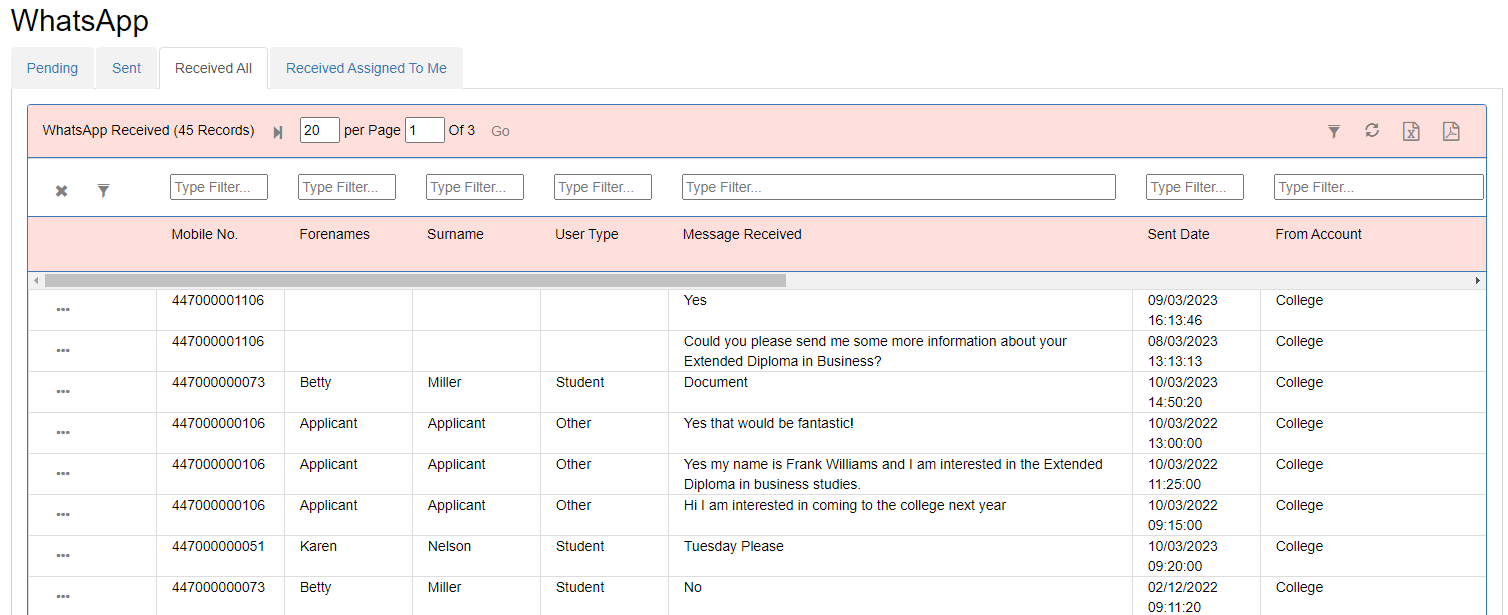
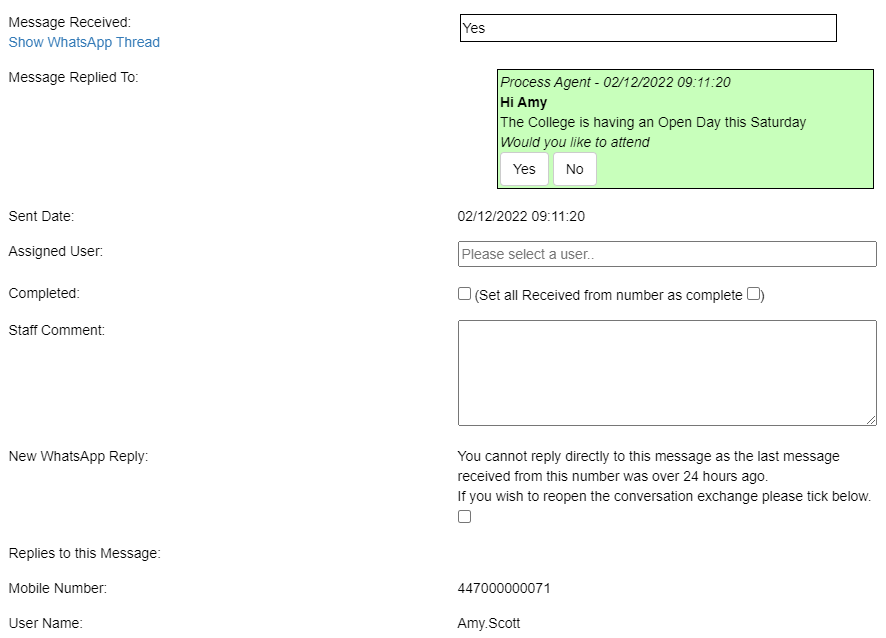
Received WhatsApp can be viewed in various parts of the system:
The WhatsApp received have 3 main elements:
To better manage the process the Communication > WhatsApp and Organisation Structure Details are filtered to show only those received in the last 3 days and that have not been completed. The filter can be changed however to include more received WhatsApps.
The WhatsApp Received grid contains the following columns:
Clicking the … button against each row will show the above information
From here the member of staff will be able to:
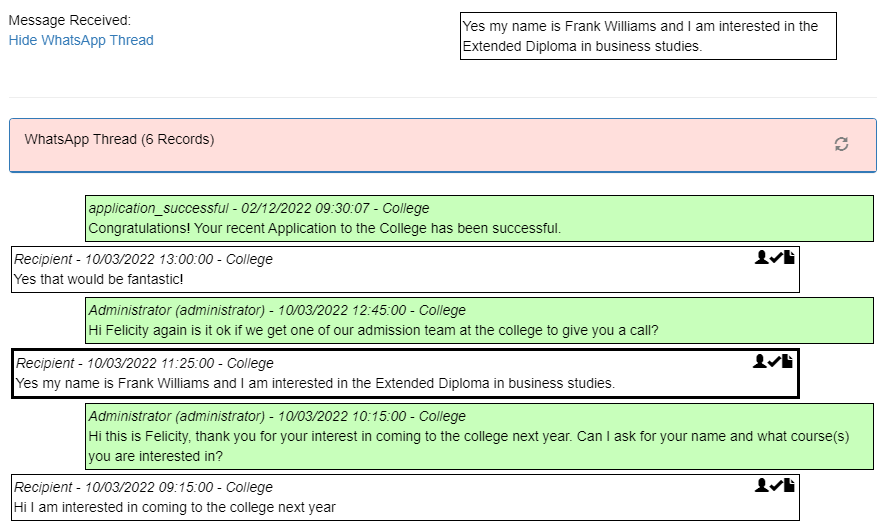
This appears like a Thread would appear in WhatsApp:
WhatsApp Live has many General Features used throughout. Please see the General Documentation for more details.
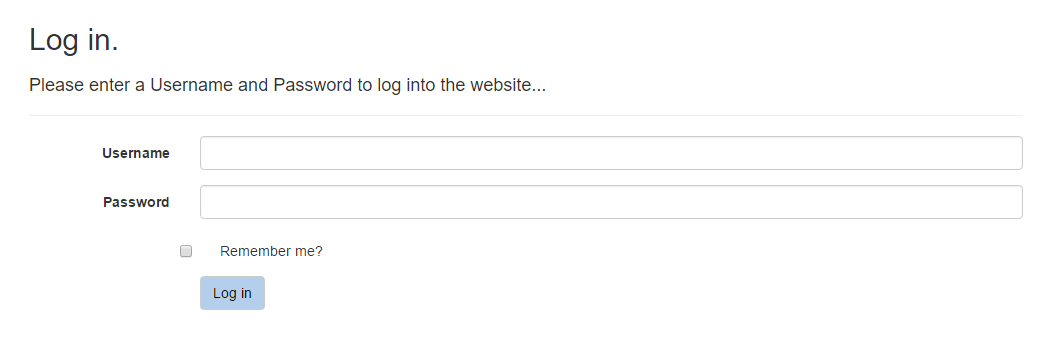
When navigating to the website the user will be taken to the login page. They need to provide a correct username and password and then click the ‘Log in’ button. Selecting the ‘Remember me’ box will tell the browser to remember the username password the next time the user navigates to the website. This is not recommended if the user is using a shared computer/ device.
When using Password based authentication there are two methods:
If the website has been configured to use windows authentication then the login page will be bypassed and the user automatically logged in. The system will verify the user based on the account the user has logged onto windows with. However if your windows user is not configured in the system then the system will fall back to the login prompt to allow the user to provide a username and password.
If you are unable to access the system you should contact the system’s administrator who will be able to create a user account for you and provide a password.
Checks
When logging in the following system checks are made. Failure in any of these checks will prevent the user logging in.
SQL Server Connection
If the system cannot connect to the SQL Server check the SQL Server connection in the web.config file in the root of the website. Then restart the website for the effects to take place.
Licence Key
The system checks for a valid licence key. The licence key sits within a .lic file on the website in the User Area folder. Please contact support - it could be that the licence key is out of date. A new licence key should be added to overwrite the old one. Then restart the website for the effects to take place.
Database and Server Version
The system checks that the database version and web site versions are the same. If they are not the same the user will not be able to login. Mismatched version may mean that the website has been upgraded but not the sql server or vice versa.
The homepage will show information about the latest WhatsApp campaigns.
The Search menu allows you to search further by Group, Course, Staff, Students and Organisation Structure.
There are several ways to search. The first tab shows ‘MyGroups’ etc. These are the groups or students attached to your groups. The second tab shows ‘All Groups in My Area’. If you are the head of a department for example this will show all groups in your department. The third tab if you have the relevant permissions shows ‘All Groups’.
All the grid can be filtered and sorted. You can go to the detailed information about that record by clicking the … button.
Please see the General Documentation for more detail about the Search menu.
The system menu contains the following sub menus. Please see the General Documentation for more detail.
Allows users to be added, details changed and associated to permission groups. This can also be automated within the Staff, Student and Other Users imports.
If a user no longer wants to receive marketing messages the Opt In Marketing flag can be set as false. Whenever messages from templates with the category of Marketing are sent out this flag is checked.
Allows Permission Groups to be altered.
Sets up connections to SQL Server Databases used for Imports, Message Creator and Dashboards.
Import data into the system.
Course
Course information. Useful if staff want to see WhatsApps sent to students within a Course or Group.
Enrolment
Student Enrolment information. Useful if managers want to see data about WhatsApp campaigns.
Organisation Structure
Imports Organisation Structure and their Managers. Up to 4 levels can be imported e.g. Campus > School > Department > Team. Useful if managers want to see data about WhatsApp campaigns.
Organisation Structure Course
Imports the Courses assigned to each Organisation Structure. Useful if managers want to see data about WhatsApp campaigns.
Other Users
The college can bring in Other User information. For example Parents, Applicants, Alumni. This is useful if the college wants to see the messages sent to the user within WhatsApp Live.
Staff
The college may want to bring in their staff account details into WhatsApp Live so that staff can login. This may be particularly useful if a large number of staff need to use WhatsApp Live. If only a small number require access then you may wish to just manually add them into the system.
Student
The college can bring in student information. This is useful if the college wants to see the messages sent to the student within WhatsApp Live.
Timetable
Teachers can log in and see their groups and quickly see WhatsApp messages sent against students in their group.
Recommended Order Import
The order in which the imports are imported is important as imports rely on other data being present and should be as follows.
View pending emails and emails sent. Allows the system to be setup to send emails.
View pending SMS and SMSs sent. Allows the system to be setup to send SMSs.
View the status of the Process Agent. The Process Agent performs various background jobs including imports.
View and edit system settings which change the overall functionality of the system.
A college can change the theme of the website including colours, the name of Whats App Live and images.
View audit log changes
View resources.
View details error log and system status.
This screen allows organisation structure areas to be set up.
This screen is useful in Cognito because it allows heads to analyse the Cognito Scores of students in their area
Please see the General documentation for more information about how to use the Organisation Structure page.
This screen allows academic years to be turned on or off and information copied between academic years such as Organisation Structure.
Please see the General documentation for more information about how to use the Academic Years page.